# Important Links

## exSat Mainnet

The exSat mainnet successfully launched on October 23, 2024, and the Bridge is now live. You can [bridge BTC to exSat](/user-guides/bridge-your-assets) to [stake and earn XSAT rewards](/user-guides/earn-rewards-via-btc-staking) or [develop DApps](/developer-guides/quick-start) to expand the Bitcoin ecosystem on exSat. Below is a summary of key information you may find useful when using exSat:

exSat is composed of a native layer and an EVM layer. Click [here ](/developer-guides/quick-start)to learn more.

### EVM Layer of exSat Mainnet

* **UTXO Verse**: [https://utxoverse.xyz/](https://utxoverse.xyz/dashboard)
* **Consensus Portal** : <https://portal.exsat.network/>
* **Bridge** : <https://exsat.network/app/bridge>
* **ChainID:** 7200
* **Symbol**: BTC
* **Http RPC Endpoint:**  <https://evm.exsat.network/>
* **Web Socket Endpoint:** <wss://evm.exsat.network/>
* **Block Explorer:** <https://scan.exsat.network/>
* **Wallet Support**:  Any EVM Wallet like Metamask, OKX Wallet, etc.  \
  It's easy to [add exSat network to Metamask](/user-guides/wallet-setup).
* **XBTC Token Contract address:** 0x4aa4365da82ACD46e378A6f3c92a863f3e763d34
* **XSAT Token Contract address**:  0x8266f2fbc720012e5Ac038aD3dbb29d2d613c459
* **Addresses of widely-used token contracts**: [click here](/popular-token-contract-addresses).

### Native Layer of exSat Mainnet

**URL**: <https://exsat.network/app/>

The core services of exSat are built on the native layer, offering support for writting smart contract in C++, database-style data access, instant finality, and far more. It delivers enhanced performance and seamless integration with Bitcoin data.

**Http RPC Endpoint** : <https://rpc-us.exsat.network>\
&#x20;                                      <https://rpc-sg.exsat.network>

## Testnet

**Testnet** serves as exSat's primary testing ground for exploring cutting-edge technologies and fundamental applications. Here, exSat's core participants rigorously test and validate new functionalities, often involving the development and refinement of underlying features. While Testnet integrates the latest advancements, it may not always be stable for application-level use as it serves as a proving ground for emerging technologies.

### App Layer of Testnet (EVM Compatible)

* **UTXO Verse**: [https://test.utxoverse.xyz](https://utxoverse.xyz/dashboard)
* **Consensus Portal** : [https://tportal.exsat.network/](https://portal.exsat.network/)
* **Bridge** : <https://test.exsat.network/app/bridge>
* **ChainID:** 840000
* **Symbol**: BTC
* **Http RPC Endpoint:**  <https://evm2.exactsat.io/>
* **Web Socket Endpoint:** wss[://evm2.exactsat.io](https://evm.exactsat.io/)
* **Block Explorer:** <https://scan2.exactsat.io/>
* **Gas Fee Faucet**:  <https://faucet.exsat.network/>
* **Wallet Support**:  Any EVM Wallet like Metamask, OKX Wallet.
* **XBTC Token Contract address:**&#x30;xADeb1300E4860089d93233ddED31B33206ba8432
* **XSAT Token Contract address**: 0x8266f2fbc720012e5Ac038aD3dbb29d2d613c459
* **Addresses of widely-used token contracts**: [click here](/popular-token-contract-addresses#popular-token-contract-addresses-on-testnet).

### Native Layer of Testnet

**Http RPC Endpoint** : <https://chain2.exactsat.io>


# Start Here

{% hint style="info" %}
Note that exSat will launch the mainnet on October 23rd. Discover the multiverse of BTC together with exSat. Empower your BTC hash rate and BTC assets with new scenarios and earnings, and gain a completely innovative experience.
{% endhint %}

## exSat - Extending Satoshi’s Vision, Unlocking Bitcoin’s Possibilities

exSat is a docking layer (Layer 1.5) scaling solution designed to achieve Bitcoin's massive adoption by addressing its limitations in scalability, functionality, interoperability and user experience, all while upholding Bitcoin's core principles of decentralization and security.&#x20;

It achieves this through a unique data consensus protocol involving mining pools and BTC holders, a real-time On-chain UTXO Index on the RAM(a decentralized database via Spring chain). Key features include Lightning Finality in 1 Second, Decentralized Enhanced Asset Custody, and DApp Abstraction with EVM Compatibility.

By comprehensively parsing BTC block data and indexing UTXO data on-chain, exSat unlocks Bitcoin's vast potential, empowering various innovative applications such as a new, highly efficient, and trustless BTC Lightning Network protocol, a more secure decentralized BTC asset custody protocol, and a powerful on-chain BTC asset issuance and interoperability protocol.

exSat aims to create new opportunities and revenue streams for BTC miners and holders, fostering a more robust and versatile Bitcoin ecosystem.

### Proof of Data Synchronization

Proof of Data Synchronization (PoDS) is the basic mechanism of the exSat solution.


# What is exSat

### Vision and Motivation

The introduction of Bitcoin ETFs has significantly bolstered Bitcoin's presence in traditional financial markets, illustrating a maturing landscape for cryptocurrencies. As Bitcoin continues to solidify its role within the broader financial ecosystem, the need for enhanced trust, scalability, utility, interoperability, and complex business logic functionality becomes increasingly apparent to meet both retail and institutional-grade demands.

With smart contract platforms demonstrating a wide array of initial solutions in scalability and functionality, there is a clear opportunity to unlock similar capabilities within the Bitcoin ecosystem in a more holistic and uniform approach.&#x20;

exSat is introduced in this context as a scaling solution designed to extend the Bitcoin ecosystem to address these core challenges and cement itself as a critical piece of Bitcoin infrastructure moving forward.

### Core Innovations

exSat introduces several key innovations to realize its vision including:

* **Data Consensus + BTC Staking to Import BTC Data**: Imports Bitcoin's data through a Hybrid Consensus Mechanism, combining Proof of Work (PoW) and Proof of Stake (PoS).
* **Decentralized State Data Indexing for Easy On-chain Operation**: Critical for smart contracts to operate easily, and the support of diverse assets through multi-indexing capabilities including BTC, Ordinals, Runes and more potential protocols.&#x20;
* **Universal Asset Custody between BTC and exSat**: Develop a decentralized asset custody protocol to establish a trustworthy and seamless asset transfer channel between BTC and exSat. This will enable trust to extend from BTC to exSat, unlocking innovative dApp development possibilities.
* **Scaling Bitcoin Ecosystem with Smart Contract Platform**: Extends full support for Ethereum Virtual Machine-based (EVM) application development, enabling a broader range of decentralized application (DApp) functionalities, further bridging the capabilities between Bitcoin and advanced smart contract platforms.
* **The Modular Scaling Solution for the Bitcoin Ecosystem**: exSat empowers developers to enhance the scalability of the Bitcoin ecosystem efficiently and securely, leveraging the robust trust and security of exSat. It simplifies the creation of customizable BTC Layer 2 (L2) solutions incorporating Zero-Knowledge (ZK) rollups, or side chains using the latest implementation of the [Antelope](https://github.com/AntelopeIO/spring) protocol, facilitating easy, quick, and seamless development.

### Strategic Impact

exSat forges a trustworthy and secure pathway to enhance Bitcoin's scalability and enable smart contract capabilities, unlocking additional utility value for BTC beyond its role as a store of value. Compared to most other chains aimed at scaling BTC, exSat places a greater emphasis on extending Bitcoin's robust consensus and trust beyond the Bitcoin chain. It spreads the trust and assets to DApps and other BTC L2s for extending BTC. exSat aims to serve as the foundational infrastructure for expanding Bitcoin's ecosystem, enabling it to support large-scale applications.

Through exSat's innovative approach, users and developers from diverse backgrounds will experience the convenience of intent-centric operations and unified liquidity. By abstracting away complexities, exSat empowers a broader audience to leverage the power of Bitcoin and its L2 solutions seamlessly, fostering a more inclusive and accessible blockchain landscape.

Embracing a modular and extensible architecture, exSat's trustworthy and secure solution lays the foundation for a vibrant ecosystem built upon Bitcoin's robust security model. As the adoption of blockchain technology continues to accelerate, exSat's vision positions Bitcoin at the forefront of this revolution, enabling a vast array of DApps and services to thrive within its decentralized and transparent framework.

<br>


# exSat’s Docking Layer Approach

The philosophy of the exSat Network is to extend Bitcoin's powerful and well established trust based on the data and assets within the Bitcoin ecosystem. This allows for more possibilities in functionality, scalability, utility and interoperability of Bitcoin assets and empowers the omnichain application ecosystem. Ultimately, it aims to provide an intent-centric user experience for more Web3 users.

At the core of exSat's innovative approach lies the philosophy of extending Bitcoin's powerful consensus by leveraging the data and assets within the Bitcoin ecosystem. This data and asset-driven integration unlocks new possibilities for Bitcoin assets, empowering a powerful bedrock for the omnichain application landscape.&#x20;

<figure><img src="/files/qSqfWOTCPZfxHuRHLG4q" alt=""><figcaption></figcaption></figure>

As the Docking Layer for extending Bitcoin, exSat enables access to Bitcoin's data and assets through a decentralized paradigm. This opens up richer application scenarios and broader market opportunities for $BTC.

* **Towards Bitcoin:** it maps Bitcoin‘s core elements such as block data and state data to exSat via [Data Consensus Protocol](/approach/architecture/data-consensus-protocol), while establishing an [decentralized asset custody](broken://pages/w6GmV655E5AFVa88CBRz) across exSat and Bitcoin. This allows Bitcoin developers to fully leverage Bitcoin's consensus and exSat’s scalability in a more flexible way, unlocking new DApp development models. For instance, developers can create "modular" DApps where trust remains anchored to Bitcoin, while business logic is executed on exSat.
* **Towards ecosystem:** exSat brings Bitcoin data and assets to the ecosystem, which consists of  DApps and various Bitcoin Layer 2 solutions. This enables vast performance improvements, customizable blockchain solutions, and enhanced application scenarios, contributing to Bitcoin's widespread adoption.

In this way, exSat serves as a crucial component of the Bitcoin ecosystem, liberating BTC assets and trust from the Bitcoin network and making them accessible to the broader Bitcoin ecosystem. This unlocks limitless potential for the growth and development of Bitcoin applications.

## **Extending Bitcoin ecosystem via exSat**

Since exSat reliably maps all elements of Bitcoin into its RAM and provides a universal asset custody service across both Bitcoin and exSat, developers can leverage new approaches to build Bitcoin DApps, e.g. , the dapp could have different logic layers to achieve different targets.

<figure><img src="/files/XJmSbNkaYdeK9gVVwtv0" alt=""><figcaption></figcaption></figure>

* **Assets & Liquidity layer** can be built directly on Bitcoin, locking BTC using various scripts such as HTLC, DLC, or multi-signature scripts. Bitcoin’s security ensures the safety of funds and provides a trusted foundation.
* **Application Logic layer** can handle complex dapp logic. The exSat native layer allows for smart contracts to be written in C++, while the EVM layer supports Solidity smart contracts. With instant finality (1 second irreversibility) and high TPS, and the Bitcoin's complete data, this layer can execute various complex and high-performance business logic.
* **User Interface layer** can be developed using EVM, which's familiar to many developers, facilitating user interaction, dApp integration, and cross-chain operations. This makes it easier to interface with all the ecosystem.

As the **docking layer** of extending Bitcoin, exSat extracts trust and assets from Bitcoin and distributes them across the whole Bitcoin ecosystem, serves as a critical infrastructure for Bitcoin’s ongoing mass adoption.


# The Paradigm Shift of the Bitcoin Economic Ecosystem

As the pioneering cryptocurrency, the Bitcoin economic ecosystem is undergoing a profound paradigm shift. This transformation manifests itself in the following aspects:

### **From Single Asset to Multi-Asset**

The Bitcoin ecosystem is transitioning from a single-asset economy revolving around BTC to a multi-asset economy through tokenization. This shift enables the representation and exchange of diverse assets like non-fungible tokens (NFTs), and DApp tokens on the Bitcoin blockchain. Tokenization unlocks new use cases such as fractional ownership, asset-backed tokens, stablecoins, and synthetic derivatives, fostering innovation, liquidity, and economic opportunities.

Moreover, the issuance of tokens associated with specific DApps and protocols incentivizes participation, governance, and the creation of decentralized economies within the Bitcoin ecosystem. This transition towards a multi-asset economy positions Bitcoin as a versatile platform, capable of representing and transacting with various assets, attracting broader adoption and unlocking new economic possibilities within the cryptocurrency space.

### **From Value Storage to Value Creation**

Initially viewed as a store of value, Bitcoin is now transcending that role and emerging as an engine for value creation within its ecosystem. The rise of decentralized finance (DeFi) has unlocked opportunities for generating yield, lending, borrowing, and creating innovative financial instruments built on Bitcoin. In addition, NFTs have enabled the tokenization and monetization of digital and physical assets, giving rise to new markets and business models.

Beyond DeFi and NFTs, the development of scaling solutions like the Lightning Network, smart contract platforms, and L2 solutions are expanding Bitcoin's capabilities, paving the way for micropayments, complex applications, and a flourishing ecosystem of decentralized services and products. This paradigm shift positions Bitcoin not merely as a value storage but as a robust foundation for innovation, value creation, and unlocking new economic opportunities within the cryptocurrency space.

### **From Payment Intermediary to Value Network**

Initially conceived as a peer-to-peer electronic cash system, Bitcoin is evolving beyond its role as a payment intermediary into a decentralized value network. This transition positions Bitcoin as the foundational infrastructure and consensus mechanism for a broader "value internet," enabling the secure exchange and transfer of value in various forms.

This evolution from a payment intermediary to a decentralized value network expands Bitcoin's utility, fostering an inclusive ecosystem for value exchange and creation, free from traditional constraints and intermediaries, while harnessing the inherent security and trust of the Bitcoin network.

### **From Chain-Specific to Omnichain**

The Bitcoin ecosystem was originally limited to chain-specific activities. However, through cross-chain technologies and solutions, its value and influence are expanding into the broader omnichain domain.

The interoperability allows Bitcoin's value and assets to be utilized in DApps and protocols across different chains, unlocking new use cases and liquidity. Furthermore, the integration of tokenized Bitcoin representations into DeFi protocols expands Bitcoin's presence and utility within the broader crypto landscape.

By embracing an omnichain approach, the Bitcoin ecosystem positions itself as a versatile and interoperable asset, fostering collaboration and driving innovation across the entire blockchain space while enhancing its value proposition.

### **From Digital Gold to Protocol Currency**

Originally pioneering the concept of "digital gold," Bitcoin is now poised to become a widely accepted decentralized protocol currency, driven by the rise of DeFi and Web3.

As the ecosystem evolves, Bitcoin holders are likely to transition from passive value storage to active users, unlocking new utilities. Through integration with DeFi protocols via wrapped BTC, Bitcoin can enable lending, borrowing, yield farming, and decentralized exchanges.

As Web3 adoption grows, Bitcoin's decentralized and trustless nature positions it as a potential universal protocol currency, facilitating payments, collateralization, and settlement across platforms. This evolution could unlock new value propositions and use cases, solidifying Bitcoin's role as a versatile decentralized protocol currency for emerging ecosystems.

<br>


# Challenges Addressed by exSat

Bitcoin's ecosystem development has suddenly exploded, catalyzed by the emergence of groundbreaking technologies and innovative solutions that extend the utility and reach of the world's premier cryptocurrency. This rapid expansion has unlocked new frontiers, driving mainstream adoption and solidifying Bitcoin's position as a versatile and indispensable asset in the burgeoning DeFi and Web3 landscapes.

Drawing parallels to Ethereum's growth trajectory, the Bitcoin ecosystem will likely experience user adoption surges driven by viral use cases that kickstart the flywheel. This, in turn, will attract more developers and increase the ecosystem's application TVL. Considering Bitcoin’s $1.3T market capitalization is about 3 times that of Ethereum’s $400B, while its application TVL is currently only a tiny fraction at about $364 Million compared to Ethereum’s $112B, this scenario presents a potential tenfold growth opportunity for the Bitcoin ecosystem to reach the similar level of maturity on the application front as Ethereum, not counting additional liquidity influxes once the ecosystem gains momentum.&#x20;

#### **The landscape of Ethereum Ecosystem**

\~$390B MCap, 30+ Layer2 chains, 124M+ users, and 5000+ DApps

#### **The landscape of Expected Bitcoin Ecosystem**

\~$1200B MCap, 70+ Layer2 chains, 300M+ users, and many more DApps are coming

\*Data source: Crypto.com

Despite Bitcoin's immense growth potential and vast market opportunities, we must recognize that its network attributes and infrastructure differ significantly from Ethereum, creating challenges for dapp development. To address these limitations, it is essential to offer diverse solutions that comply with Bitcoin’s network requirements while resolving the issues hindering dapp development, and build infrastructure that is more conducive to dapp innovation.

<figure><img src="/files/fPfO0lsSeHTs7fRobzK8" alt=""><figcaption></figcaption></figure>

### Bitcoin's Scalability and Capability Challenges

The scalability challenges of Bitcoin have been widely recognized and extensively discussed within the cryptocurrency community. At the core of this issue lies the inherent trade-off between security and scalability, as Bitcoin's robust security measures are inversely proportional to its ability to scale. In pursuit of non-negotiable security, a fundamental pillar of Bitcoin's design, its transaction processing capability is constrained to a range of 4 to 7 transactions per second (TPS).

This limitation has led to several challenges, particularly during periods of high network demand. Network congestion has become a recurring issue, resulting in higher transaction fees and delayed confirmation times. As the adoption of Bitcoin continues to grow, these scalability constraints have become a bottleneck, hindering the seamless and efficient execution of transactions on the network.

While Bitcoin's security and decentralization remain its core strengths, the scalability challenges have prompted the exploration of innovative solutions. L2 technologies, such as the Lightning Network and sidechains, have emerged as promising approaches to enhance scalability while preserving Bitcoin's fundamental properties. These solutions aim to offload a significant portion of transactions from the main Bitcoin blockchain, enabling faster and more cost-effective transactions without compromising security.

As the Bitcoin ecosystem continues to evolve, addressing scalability challenges remains a critical priority for developers, researchers, and the broader community. Finding the right balance between security, decentralization, and scalability will be crucial for Bitcoin to realize its full potential as a global, decentralized currency and a foundational layer for various applications in the burgeoning world of DeFi and beyond.

### Limited Functionality Versus Expanding Requirements

Bitcoin uses scripts to handle the UTXO model. These scripts are simple enough to easily achieve security, but it also limits the possible range of use cases. As new protocols like DeFi, NFTs, and various DApps emerge, there is a growing need for more powerful and extensible tools to meet the expanding requirements of the Bitcoin ecosystem.

As demand for complex applications grows, the Bitcoin ecosystem must evolve by embracing innovative solutions that expand its functionality while preserving its core principles. This will solidify Bitcoin's position as a foundational layer for the decentralized economy, enabling a vast array of use cases and fostering an interconnected and thriving ecosystem.

### Trust & Security Versus Custom Use Cases

In the rapidly evolving blockchain landscape, the ability to customize platforms to meet specific needs is essential. However, this flexibility often comes with a trade-off in terms of trust and security. exSat addresses this challenge by extending Bitcoin’s renowned security and trust mechanisms to Layer 2 solutions. This foundation allows these secondary layers to innovate and tailor their functionalities without compromising on the core principles of security and decentralization. As a result, exSat enables a dynamic ecosystem where customized features can thrive alongside robust security, broadening the potential for diverse blockchain applications.

### Fragmentation Issues within Current Bitcoin L2 Solutions

The emergence of Bitcoin L2 solutions has been a significant step forward in addressing the scalability and throughput limitations of the base Bitcoin layer. These innovative solutions, such as the Lightning Network, sidechains, and rollups, have introduced new capabilities and features, enabling faster and more cost-effective transactions while leveraging the security and decentralization of the Bitcoin network.

However, as the ecosystem of Bitcoin L2 solutions continue to expand, a concerning issue of fragmentation is emerging. This diversity, while technologically innovative, is creating a fragmented landscape that challenges users' ability to navigate and effectively utilize their accounts and assets across multiple platforms and applications.

The proliferation of diverse L2 solutions, each with its own unique architecture, protocols, and user interfaces, has led to a lack of interoperability and seamless integration. Users often find themselves managing multiple accounts, wallets, and interfaces, complicating the process of accessing and managing their digital assets. This fragmentation not only introduces complexities but also hinders the overall user experience, posing a significant barrier to mass adoption and widespread utilization of blockchain technology.

To effectively tackle these issues, the focus must shift toward initiatives that enhance interoperability. By developing shared security models and improving user interfaces across platforms, the ecosystem can simplify digital asset management and encourage broader adoption. These efforts are key to overcoming the barriers presented by fragmentation and to facilitating a smoother blockchain experience.<br>


# Architecture

exSat introduces a first-of-its-kind Docking Layer solution to overcome the siloed nature of existing blockchain infrastructures, for a more interconnected, efficient, and versatile blockchain ecosystem. Unlike typical L2 solutions that aim to increase transaction speed or reduce costs, exSat introduces [a Docking Layer](/approach/what-is-exsat/exsats-docking-layer-approach) to scale the Bitcoin ecosystem comprehensively.

<figure><img src="https://lh7-us.googleusercontent.com/docsz/AD_4nXcVXrWR3SiC03fpBRku5RF0q9ywl7_DJUVuyCu7rSarjiU-LY889ILRDyVXeahB7CIWBRYRHs5B_eMfXmcWgCFae2lhM-W5Va1mCr7h3p40Xe7t9Jx14Mfn63sbtqSRhye2IBJG9by4HeGYz-DYqOjTnq8v?key=6Axyre-pSVFtX1IgrJPPPA" alt=""><figcaption></figcaption></figure>


# Data Consensus Protocol

<figure><img src="/files/VWlQRJxmhmwoGBuLPSJt" alt=""><figcaption></figcaption></figure>

Most blockchains operate on a state machine model, and Bitcoin adheres to this framework as well, comprising three key elements:

1. **State (Sn)**: This represents the current state of the blockchain, such as account balances or the present state of smart contracts. In Bitcoin's case, it refers to the set of UTXOs (unspent transaction outputs).
2. **Transactions (Txs)** : The transactions are external inputs which trigger the State switch from current to the next. In Bitcoin's case, it refers to the new block data.
3. **State Transition Function f(x)**: This function describes how the blockchain’s state transitions from the current state to the next based on the new transactions. For Bitcoin, it encompasses all rules applied to UTXOs, such as the transfer rules.

exSat’s **Data Consensus Protocol** decentralizes and securely maps these three elements of Bitcoin onto the exSat network. This process includes:

1. **Storing Bitcoin's State Data**: Using exSat's RAM to fully store Bitcoin’s state ,which's the complete set of UTXO data.
2. **PoW + PoS for Block Updates**: [Synchronizers ](/guides-of-data-consensus/run-a-sychronizer)(mining pools) and [Validators ](/guides-of-data-consensus/run-a-btc-validator)upload and verify the latest Bitcoin blocks on exSat in a decentralized pattern.
3. **Transaction Parsing**: Each transaction from the uploaded Bitcoin blocks is parsed within exSat smart contract to update UTXO data. This parsing capability is also available to DApps, allowing them to filter their relevant Bitcoin transactions and build Bitcoin-based application databases directly on exSat.

<figure><img src="/files/A2vW6uvgbvrKW9TqhAk0" alt=""><figcaption></figcaption></figure>


# Network launch phases

## Network Launch Phases

The exSat network launch is structured into three phases:

### **1. Initialization （Ended）**

During this phase, the exSat Foundation [synchronizes the UTXO data of the first 840,000 Bitcoin blocks](/guides-of-data-consensus/utxo-initialization) as a snapshot to kickstart network operations. This phase is non-incentivized and focuses solely on establishing the initial infrastructure.

### **2. Network Launch (In progress)**

After completing the Initialization phase, the exSat network begins synchronizing raw Bitcoin block data. This ongoing process involves uploading and processing Bitcoin blocks, starting from height 840,000 up to the latest block. As of **February 22, 2025**, the network has caught up with the latest Bitcoin block.\
At this stage, the exSat reward mechanism is activated, allowing participants to stake a minimum of 100 BTC to become Validators and engage in the consensus process.

### **3. BTC & XSAT Staking (Coming soon)**

With the exSat network fully synchronized with Bitcoin’s latest block, participants will soon be able to stake **$XSAT** to qualify as Validators. This enables them to participate in the consensus process and earn **$XSAT rewards**.

## Differences Between "Network Launch" and "BTC & XSAT Staking" Phases

### **1. Consensus Rules**

* **Network Launch Phase**: Participants can only stake **100 BTC** to become Validators.
* **BTC & XSAT Staking Phase**: Participants can stake either **100 BTC** or **2,100 XSAT** to qualify as Validators.

During the Network Launch phase, Validators are primarily institutions or large BTC holders due to the high entry requirement. Introducing XSAT staking diversifies Validator participation by making it more accessible to community members. This enhances the decentralization and security of the exSat Data Consensus Protocol. Learn more about the new [consensus rules](/approach/architecture/data-consensus-protocol/hybrid-consensus-mechanism) here.

#### Why XSAT Staking Begins in the Third Phase

XSAT staking is introduced in the third phase to align with the tokenomics and fair-launch principles of the exSat network. XSAT tokens are **fairly distributed with no pre-mining or initial allocations**, meaning all XSAT is mined during the synchronization of Bitcoin blocks.

At the time of the mainnet launch, the market lacked a sufficient supply of XSAT tokens for staking. By the third phase, after several months of mining and catching up with Bitcoin blocks, the network has achieved a significant XSAT token supply, making it feasible to enable XSAT staking for Validators.

### **2. Token Reward Allocation**

The reward distribution for XSAT differs between the **Network Launch** and **BTC & XSAT Staking** phases. See the detailed reward distribution [here](/approach/usdxsat-tokenomics/rewards-to-synchronizers-and-validators).

## Transitioning from "Network Launch" to "BTC & XSAT Staking"

The transition from the **Network Launch** phase to the **BTC & XSAT Staking** phase involves three steps:

**Step 1: Consensus Contract Upgrade**

The upgrade introduces XSAT staking. Community participants can stake **2,100 $XSAT** and run the Client to become [XSAT Validators](/guides-of-data-consensus/run-a-xsat-validator). At this stage, XSAT rewards are not yet enabled, and running an XSAT Validator will not yield rewards. This step is a preparatory phase for the consensus upgrade.

**Step 2: New Reward Mechanism Activation**

Once the new reward distribution mechanism is activated:

* Synchronizers, BTC Validators, and XSAT Validators receive rewards based on the [updated rules](/approach/usdxsat-tokenomics/rewards-to-synchronizers-and-validators#after-btc-and-xsat-staking-phase).
* XSAT Validators begin earning rewards, encouraging more community members to participate and further decentralize the exSat network.

**Note**: During this phase, XSAT Validator consensus results are not included in the final consensus results. Only BTC Validator consensus results are considered valid. This precaution ensures network stability, as an insufficient number of XSAT Validators could allow malicious actors to disrupt the consensus by controlling 1/3 of the XSAT Validators.

**Step 3: New Consensus Activation**

Once there are enough XSAT Validators operating, the new consensus mechanism is activated. At this stage, the exSat Network requires agreement between XSAT Validators and BTC Validators to achieve consensus on the latest Bitcoin block hash, ensuring a highly decentralized and secure system.


# Decentralized UTXO index

exSat stores the full UTXO dataset, which's directly accessible by smart contracts. It's important to note that for DApps, this UTXO data is **read-only**. To modify the UTXO data, a transaction must be sent to the Bitcoin network. The Data Consensus Protocol will then sync the latest Bitcoin blocks onto exSat and parse them to update the UTXO data. Since exSat begins syncing blocks from Bitcoin's block height 840,000, the storage and update of UTXO data are handled in two parts:

1. **UTXO Data Generated Before Block 840,000**: This data was parsed and uploaded by exSat in a trusted manner. The data is under audit by multiple security agencies using different methods to ensure the accuracy of both the UTXO data itself and the UTXOs stored on-chain. More details can be found at [UTXO Initialization](https://app.gitbook.com/o/jcpHiPEMUsfleqnprFf0/s/aDUBtTPZKYj40o0zqoC8/~/diff/~/changes/105/guides-of-data-consensus/utxo-initialization/~/overview).
2. **UTXO Data Generated After Block 840,000**: [Synchronizers ](https://app.gitbook.com/o/jcpHiPEMUsfleqnprFf0/s/aDUBtTPZKYj40o0zqoC8/~/diff/~/changes/105/guides-of-data-consensus/run-a-sychronizer/~/overview)and [Validators ](https://app.gitbook.com/o/jcpHiPEMUsfleqnprFf0/s/aDUBtTPZKYj40o0zqoC8/~/diff/~/changes/105/guides-of-data-consensus/run-a-validator/run-as-validator/~/overview)upload Bitcoin blocks starting from height 840,000. [The exSat contracts](https://app.gitbook.com/o/jcpHiPEMUsfleqnprFf0/s/aDUBtTPZKYj40o0zqoC8/~/diff/~/changes/105/developer-guides/native-layer-developer-guides/exsat-consensus-contracts/~/overview) then parse the block data and update the UTXO dataset.

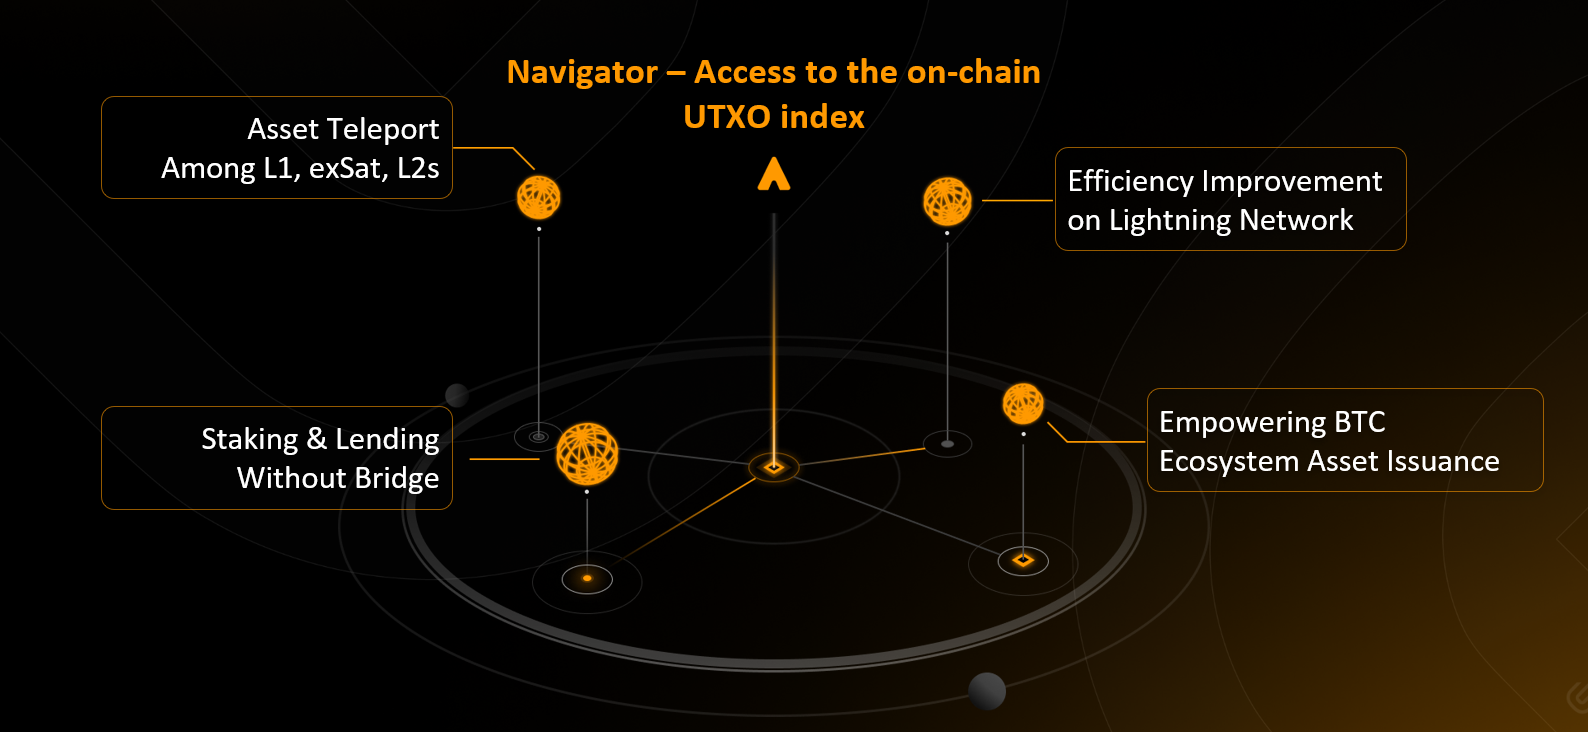
With UTXO data stored on-chain in exSat, several innovative smart contract functionalities can be unlocked, including:

<figure><img src="https://lh7-us.googleusercontent.com/docsz/AD_4nXeSiRExbsf6p2SsgbKeH5xhQSY64sw3FICK3oM2g0ERBnY38ZKTRAWBViOG8wDFvsMmN8fp_ysUyqJZ5NnkONf6BgEkTtrijwVMuH6kT4-E3oSR_CAuD4hfzhOtQ3hqsw7YzPKj9E3hY0eFtNnkAgA2KKc?key=6Axyre-pSVFtX1IgrJPPPA" alt=""><figcaption></figcaption></figure>

* Cross-chain bridge with more security and more assets.
* BTC Staking & Lending without bridge.
* Constructing decentralized Lightning Network channels that interact with the Lightning Network.
* Combining with asset custody solutions to create cross-chain asset issuance platforms between Bitcoin and exSat, allowing assets to be issued on Bitcoin at lower costs.

<figure><img src="https://files.gitbook.com/v0/b/gitbook-x-prod.appspot.com/o/spaces%2FaDUBtTPZKYj40o0zqoC8%2Fuploads%2F5MNDTe3hgI29xzj6ig7R%2Fimage.png?alt=media&#x26;token=ce37be6f-d15a-40ed-9c8d-59e756ba6d49" alt=""><figcaption></figcaption></figure>


# Synchronizers and Validators

### **BTC Mining Pools as Synchronizers to Sync the Raw Block Data from BTC to exSat**

Bitcoin mining pools that have mined at least one block within the last **432 Bitcoin blocks** (approximately **72 hours**) qualify as Synchronizers. Qualified Synchronizers can submit blocks to the exSat network, participate in the consensus process, and earn **$XSAT rewards**.

The Bitcoin block data submitted by Synchronizers undergoes stringent validation within smart contracts. A block is only accepted as valid when its hash aligns with the consensus result from Validators. The fastest Synchronizer to upload the correct block data receives XSAT rewards. To learn more about Synchronizers, click [here](/guides-of-data-consensus/run-a-sychronizer).

### **BTC & XSAT Staking to be Validator Nodes to reach consensus on the Data Provided by Synchronizers**

Validators contribute trust and security to exSat, they will use a PoS model to achieve consensus to the Bitcoin block data. Staking of $BTC and $XSAT tokens is required to be qualified as validators, thereby aligning their interests with the network’s security and reliability.

#### Staking at Least 100 $BTC to Become a BTC Validator

After the launch of the exSat network, BTC holders can stake 100 $BTC to qualify as Validators, participate in the exSat consensus and earn $XSAT rewards. The rewards for BTC stakers will be proportional to the amount of BTC they stake.

#### Staking at Least 2,100 $XSAT to Become a XSAT Validator

Once the[ BTC and XSAT staking phase](broken://pages/NalX8bQVLqIlgsIKDBgG) begins, XSAT holders can stake 2,100 $XSAT to become Validators, participate in the exSat network consensus, and earn $XSAT rewards. The reward pool for XSAT staking is separate from that of BTC staking, and XSAT stakers equally share the rewards within their pool.

After Synchronizer and Validators’ work, Bitcoin block data is onto exSat and gets consensus on exSat, this brings trustworthy data for all other works.


# Hybrid Consensus Mechanism

### How Data Conesensus Protocol works

<figure><img src="/files/iwxKHqBcYldykp8HIkB1" alt=""><figcaption></figcaption></figure>

exSat employs a hybrid consensus mechanism to decentralizely import Bitcoin blocks. By combining PoW and PoS, exSat ensures that the imported Bitcoin blocks are both decentralized and trustworthy.

* **PoW**: Bitcoin mining pools that have mined at least one block in the lastest 432 blocks (approximately 3 days) can act as [**Synchronizers**](/guides-of-data-consensus/run-a-sychronizer), uploading Bitcoin blocks to exSat.&#x20;
* **PoS**: Users who stake at least 100 $BTC or 2100 $XSAT can become [**Validators** ](/guides-of-data-consensus/run-a-btc-validator)and participate in voting on the hash of new blocks.

The process of importing Bitcoin block data into exSat involves the following steps:

1. **Uploading Bitcoin Blocks**\
   Synchronizer retrieves the latest Bitcoin block, splits it into slices (default: 256 kB), and uploads the data to the exSat contract. The uploaded data includes:
   * **Block height**
   * **Block body**
   * **SegWit data**
2. **Verifying Block Data**\
   Synchronizer ensures that the uploaded data is consistent with the block hash. Verification includes:
   * **Verifying the block header**:
     * Ensuring the **previous block hash** matches the hash in the block header.
     * Confirming the correctness of mining data, including **nonce** and **difficulty** , which is calculated according to Bitcoin network rules.
   * **Verifying transaction data**:\
     Reconstructing the Merkle tree for transactions and ensuring the **merkle root** matches the transaction tree root in the block header.
   * **Verifying witness data**:\
     Reconstructing the Merkle tree for witness data and verifying it matches the **witness merkle root** stored in the Coinbase transaction.
3. **Reach consensus on Block data**

   Each BTC Validator and XSAT Validator independently retrieves the latest Bitcoin block header and submits the block hash they consider valid to the exSat network. \
   BTC Validators and XSAT Validators establish consensus independently. This means that:

   * If at least two-thirds of all BTC Validators submit the same block hash, referred to as `Hash_BTC`, the BTC Validators reach consensus and determine that the current Bitcoin block hash is `Hash_BTC`.
   * Similarly, if at least two-thirds of all XSAT Validators submit the same block hash, referred to as `Hash_XSAT`, the XSAT Validators reach consensus and determine that the current Bitcoin block hash is `Hash_XSAT`.

   If `Hash_BTC` equals `Hash_XSAT`, it is considered that all Validators have reached unified consensus, confirming the current Bitcoin block hash as the agreed-upon value.\
   If the Bitcoin block hash agreed upon by all Validators matches the block hash submitted and verified by the Synchronizer, it is considered that the entire exSat network has reached consensus on the current Bitcoin block data. This data can then be used to parse and update the UTXO index.

   Due to the possibility of forks and reorganizations in Bitcoin, a block is only considered **finalized** after consensus has been reached and the block has received at least **six confirmations** on the Bitcoin network.
4. **Parsing Transactions and Updating UTXO Data**\
   Synchronizer processes Bitcoin blocks that have reached consensus by sequentially parsing each transaction. It removes spent input UTXOs and adds newly created output UTXOs to the UTXO database.

   UTXO data is maintained in two separate databases:

   * **Irreversible UTXO database**: Contains UTXOs from blocks that have become irreversible.
   * **Pending confirmation UTXO database**: Holds UTXOs from blocks that are not yet irreversible.

   As new blocks reach consensus, earlier blocks transition to an irreversible state, and their UTXO changes are migrated to the irreversible UTXO database.

   DApps can select to use either the irreversible UTXO data or the pending confirmation UTXO data  based on their risk tolerance and user experience needs.

### Consensus Safety and Liveness

#### Safety Assumptions

* **Synchronizers**: These are well-established Bitcoin mining pools with an extremely low likelihood of malicious behavior.
* **BTC Validators**: The threshold for becoming a BTC Validator is significantly higher, limiting participation primarily to institutions or large BTC holders. The substantial cost of BTC staking greatly reduces the likelihood of malicious actors gaining control of more than two-thirds of the nodes. Additionally, these participants typically have professional engineering teams managing their [Validator clients](/guides-of-data-consensus/run-a-btc-validator/run-as-btc-validator), ensuring more stable and reliable client operations.
* **XSAT Validators:** The requirements for becoming an XSAT Validator are relatively lower, resulting in a larger pool of XSAT Validators, which may include more community participants. Since XSAT Validators are more likely to consist of individual users, the stability and continuity of their [Validator clients](/guides-of-data-consensus/run-a-xsat-validator/run-as-xsat-validator) may not always be guaranteed. Additionally, the lower entry threshold increases the risk of attackers potentially gaining control of a portion of the XSAT Validators.

#### Possible Scenarios:

* **Consensus not reached:**\
  Consensus maynot be reached if the Bitcoin chain forks or if the number of nodes not participating in voting, or voting inconsistently, exceeds one-third. In such cases, Validators cannot internally achieve consensus.
* **Discrepancy Between BTC and XSAT Validator Consensus:**\
  A mismatch between the consensus results of BTC Validators and XSAT Validators may occur during a Bitcoin chain fork or in cases of coordinated malicious activity. This leads to inconsistencies between the two groups' agreed-upon Bitcoin block hashes.

#### Solutions to Address Consensus Issues

* **Unstable Validator Nodes**\
  Unstable Validator nodes, such as those frequently offline, may fail to participate in voting. If the number of non-participating nodes becomes significant, it can prevent that type of Validator (e.g., XSAT Validators) from reaching consensus. If a node fails to submit votes for M consecutive blocks, it will be temporarily excluded from the consensus process (its votes will be allowed but not counted toward consensus) until it has consistently participated in voting for M consecutive blocks (where M is configurable through community governance). This mechanism ensures that only stable nodes contribute to consensus, while allowing excluded nodes to rejoin once their reliability is restored.
* **Malicious Validator Nodes**\
  Malicious Validator nodes may abstain from voting or cast votes with incorrect block hashes. This could result in failed consensus within their Validator group (e.g., XSAT Validators) or produce a consensus result inconsistent with the other Validator group.

In such cases, the exSat network must wait for consensus to be reached before proceeding. However, if more than two-thirds of any kind of Validator nodes behave maliciously, they can continuously disrupt the process, halting consensus progression.

The key to resolving this issue lies in determining the set of Validators eligible to vote for the current block. Under normal circumstances, the eligible Validator set for a block is recorded at the start of its voting process and remains unchanged throughout.

When malicious activity prevents consensus, it becomes necessary to adjust the eligible Validator set to ensure that honest nodes form the majority. This adjustment is initiated by the Synchronizers. If Synchronizers detect a failure in consensus, they can propose a re-vote for a specific block height, allowing new Validator nodes to join and participate in the voting.

A [re-vote](/guides-of-data-consensus/others/operation-references/synchronizer-operations/revote-for-consensus) is triggered when more than half of the Synchronizers request it for the given block height. During this process, the foundation and community can rally honest participants to run nodes and join the consensus, enabling the network to achieve the correct consensus and resume operations.

**Why Must BTC Validators and XSAT Validators Reach Independent Consensus, and Why Is Agreement Between Both Required for Network Consensus?**

By requiring BTC Validators and XSAT Validators to independently reach consensus and validating only when both groups align, the exSat network achieves a fair and decentralized approach to determining the hash of a Bitcoin block. This dual-consensus mechanism balances the influence of a small number of institutional participants with that of the broader community, making it significantly harder for consensus to be manipulated or for collusion to lead to incorrect results. This ensures the security and reliability of exSat’s consensus, providing a robust and trustworthy foundation of Bitcoin data to support the growth of the Bitcoin ecosystem.

**Under What Circumstances Could exSat Reach an Incorrect Consensus?**

Consider the following conditions:

* At least one Synchronizer (Bitcoin mining pool) engages in malicious behavior by uploading incorrect Bitcoin block data for the block it mined on the Bitcoin network (If a block is mined by a pool not participating in exSat, that synchronizer could also engage in malicious activity.).
* At least two-thirds of BTC Validators collaborate in malicious activity and reach consensus on the incorrect block hash.
* At least two-thirds of XSAT Validators participate in the malicious activity and reach consensus on the incorrect block hash.

All three conditions must be met for exSat to produce erroneous data for a Bitcoin block. This would require the collaboration of mining pools, the majority of institutional BTC staking nodes, and the majority of community-based XSAT staking nodes, making this scenario extremely unlikely. Therefore, the likelihood of exSat generating incorrect Bitcoin block data is nearly zero.


# Decentralized execution

The entire Data Consensus Protocol is executed within exSat’s smart contracts, ensuring that all operations are decentralized and trustworthy. This results in two key outcomes:

1. The UTXO data is reliable and trustworthy.
2. When DApps parse Bitcoin transactions within the smart contracts, the parsed results are also trustworthy.

This establishes a solid data trust for extending Bitcoin through DApps. As long as the DApp’s smart contract code is reliable, any data derived from processing Bitcoin's raw data on exSat is also trustworthy. This provides a data trust for expanding Bitcoin’s use cases. For example, if a DApp is handling Bitcoin asset protocols like Runes, the assets recorded in the DApp's contract are considered trustworthy. This allows for the decentralized asset index to be seamlessly created through exSat’s Data Consensus Protocol.The entire Data Consensus Protocol is executed within exSat’s smart contracts, ensuring that all operations are decentralized and trustworthy. This results in two key outcomes:

1. The UTXO data is reliable and trustworthy.
2. When DApps parse Bitcoin transactions within the smart contracts, the parsed results are also trustworthy.

This establishes a solid data trust for extending Bitcoin through DApps. As long as the DApp’s smart contract code is reliable, any data derived from processing Bitcoin's raw data on exSat is also trustworthy. This provides a data trust for expanding Bitcoin’s use cases. For example, if a DApp is handling Bitcoin asset protocols like Runes, the assets recorded in the DApp's contract are considered trustworthy. This allows for the decentralized asset index to be seamlessly created through exSat’s Data Consensus Protocol.


# Decentralized Asset Custody (Coming soon)

The **Data Consensus Protocol** builds a trusted data basis for extending Bitcoin, while **decentralized custody** provides a bridge for managing Bitcoin assets. Together, they provide the necessary infrastructure for developing Bitcoin-based DApps in a fast, easy, and reliable manner.

Decentralized asset custody is not a cross-chain bridge, but a decentralized service to help users or DApps hold and manage their assets on both Bitcoin and exSat. It's easy for DApps to build customized cross-chain bridge for customized assets, and more potentials can be discovered by using the decentralized asset custody service.

Validators with asset custody capabilities can stake collateral and register as asset custodians. Once the number of custodians meets the required threshold, the decentralized custody service becomes operational. These custodians collaborate within an MPC (Multi-Party Computation) network to securely manage assets and perform custody tasks.

With decentralized asset custody, DApps can seamlessly build custom cross-chain bridges between different blockchain networks. For instance, a DApp issuing Runes assets on the Bitcoin network can use decentralized custody to bridge those assets between Bitcoin and exSat effortlessly.

This custody service is accessible to everyone, including DApps and other Bitcoin Layer 2 solutions, providing a universal decentralized asset custody framework. It opens the door to a wide array of innovative applications, allowing DApps to build their own cross-chain bridges with ease.

<figure><img src="/files/cdfQ5k1OCp5sw3gmgK6f" alt=""><figcaption></figcaption></figure>


# Enhancing the Bitcoin Ecosystem with Smart Contract Capabilities

### Support for EVM Compatibility

By integrating full compatibility with the EVM, exSat opens up the platform to a broader developer community. This compatibility allows for the development of diverse smart contracts, significantly expanding the utility and functionality of the exSat platform.

### Universal Gas Fee Support via Account Abstraction

With EVM compatibility and Account Abstraction, support for universal gas fee becomes possible across various assets, e.g. BTC, Ordinals, and other Bitcoin ecosystem assets. Paying gas fees for others also becomes possible, thus making it easier for developers and users.

<br>


# Expanding Possibilities with Rollups

exSat, powered by Antelope, provides a modular blockchain solution that enhances the Bitcoin ecosystem. It serves as both Data Availability (DA) and settlement layer within rollup systems, streamlining the deposit and withdrawal processes and bolstering trust in Bitcoin L2 solutions. Developers can leverage exSat to create secure and efficient Bitcoin L2 solutions with minimal effort and resources.<br>

exSat provides the DA and settlement layer for BTC. This naturally enabled all the Rollup solutions including Optimism (OP) and ZK. As both DA and settlement are performed on exSat, we don’t need Data Availability Sample (DAS) for data publication. The verification of Zero-Knowledge Proofs (ZKP) from Bitcoin L2 Rollups are executed on exSat.<br>

This modular approach allows developers to customize Bitcoin L2 solutions to meet diverse requirements, promising a flourishing ecosystem of DApps as Bitcoin continues to evolve.<br>

For the modular scaling solution architecture, please refer to the figure below.

<figure><img src="https://lh7-us.googleusercontent.com/docsz/AD_4nXc7G4Z7Buq46vLK_Dr7dmvwlq-Pil_gfagyYm17YAt82VCeFbe1UbiCNSNGEnjNYMQ4KTWCX61H6rb_7aQ-BV2R9Wt0Alhi8SqNlyOyTytUWoaYUtVmzIO4usoFOw2wDaUQGaKjzT9PKWtSmC9_ABRMi64a?key=6Axyre-pSVFtX1IgrJPPPA" alt=""><figcaption></figcaption></figure>

<br>


# $XSAT Tokenomics

The economic framework for exSat is deeply rooted in the principles that guided Bitcoin's original launch, embodying a commitment to transparency and equality. This is reflected in our adoption of a fair launch strategy for the distribution of the official exSat token, XSAT.


# Total Supply and Issuance

* **Total Supply:**\
  The total supply of XSAT is capped at 21,000,000 tokens, mirroring the supply of Bitcoin.
* **Issuance and Halving:**\
  The issuance of XSAT rewards follows a structure similar to Bitcoin's halving rules. The exSat network begins synchronizing Bitcoin blocks starting from block height 840,000, which is also when XSAT rewards start to be distributed. Rewards are issued after each Bitcoin block is processed and becomes irreversible. Initially, the reward per block is 50 XSAT. Every 210,000 Bitcoin blocks (approximately every 4 years), the block reward is halved.


# Rewards to Synchronizers and Validators

The distribution of XSAT rewards differs before and after the [BTC and XSAT staking phase](https://docs.exsat.network/approach/usdxsat-tokenomics/pages/HN9EbwSXkw8VEDM0jci8#id-3.-btc-and-xsat-staking-coming-soon) begins.

### Before **BTC & XSAT Staking phase (**&#x44;eprecated from 2025.5.8)

* **Synchronizer:**\
  A Bitcoin mining pool that has mined at least one block within the last **432 blocks** qualifies as a Synchronizer. A Synchronizer that successfully uploads and completes the parsing of a Bitcoin block will earn **10% of the current block rewards**. If the Bitcoin block was mined by the same Synchronizer, the reward increases to **50%**.
* **Validator:**\
  Participants can stake at least **100 $BTC** to qualify as a BTC Validator.&#x20;
  * The first 2/3 of Validators to submit the correct Bitcoin block hash will share 10% of the current block rewards, distributed proportionally based on their staked BTC.
  * Validators who submit the correct Bitcoin block hash will receive 40% to 80% of the current block rewards, depending on whether the Synchronizer that uploaded the block also mined it on the Bitcoin network. XSAT rewards are distributed among these Validators proportionally to their staked BTC.

### After **BTC & XSAT Staking phase (Enabled on 2025.5.8)**

* **Synchronizer:**

  A Bitcoin mining pool that has mined at least one block within the last **432 blocks** qualifies as a Synchronizer. A Synchronizer that successfully uploads and parses a Bitcoin block will receive 10% of the current block reward&#x73;**.** If the Bitcoin block was mined by this Synchronizer on the Bitcoin network, the reward increases to 15%.
* **Validator:**
  * **XSAT Validator:**\
    Participants can stake **2,100 $XSAT** to qualify as an XSAT Validator. A qualified XSAT Validator that submits the correct Bitcoin block hash will receive 20% of the block rewards, which will be distributed evenly among all XSAT Validators. Delegate staking is not permitted for XSAT Validators.
  * **BTC Validator:**\
    Participants can stake a minimum of 100 $BTC to qualify as a BTC Validator. A qualified BTC Validator that submits the correct Bitcoin block hash will earn 65% to 70% of the block rewards, depending on whether the Synchronizer that uploaded the block also mined it on the Bitcoin network. \
    BTC Validators can stake through either Credit Staking or XBTC Staking, with each method offering distinct reward weightings. The reward weighting for BTC Staking is always equal to or higher than that of Credit Staking.\
    Rewards are allocated proportionally based on the reward weighting associated with staked BTC. Delegate staking is not permitted for the initial 100 BTC, but once a Validator stakes this amount, they can accept delegate staking from the community. \
    If you hold fewer than 100 XBTC, you can still earn XSAT rewards by delegating your XBTC to a BTC Validator through Delegate Staking.<br>


# Incentives and Staking Requirements

* **Mining and Staking Incentives**: Like Bitcoin, the entire distribution of XSAT tokens is synchronized with the mining of new BTC blocks through a mining process. This ensures that anyone with the necessary computational resources can participate in the network and earn tokens, promoting a decentralized and egalitarian distribution mechanism. This method not only incentivizes participation but also enhances the security and decentralization of the network by dispersing token ownership widely among those contributing to the network’s operations.
  * **Block Data Submission and Discovery Rewards**: Synchronizers receive 10% of the block's token incentive for submitting verified BTC block data first. This reward increases to 50% if the synchronizer is also the miner of the BTC block. This incentive design aligns the interests of Bitcoin miners with the exSat network, encouraging contributions to both ecosystems.
  * **Block Data Verification Rewards**: Immediately after the network launch, the first 2/3+1 validators to verify signatures for each block will share 10% of the total XSAT generated in that period as the verification incentive. After the commencement of staking XSAT, only qualified validators among the top stakers by XSAT amount will be eligible for these rewards.
  * **BTC Staking Rewards**: If the synchronizer, who is also a mining pool, does not discover a Bitcoin block, all participating validator nodes will share 80% of the total XSAT generated in that period based on their BTC staking ratio. If the synchronizer does discover a block, all participating nodes share 40% of the total XSAT generated. This approach ensures a fair and equitable distribution of rewards, recognizing the contributions of all network participants.
* **Validator Participation**: Validators are required to stake a minimum of 100 BTC and XSAT, securing a significant financial commitment to the network’s security. To become a validator node, a participant must be among the top stakers by the staked amount of XSAT.


# Quick Start

In the exSat system, participants are divided into different roles:

* **Synchronizer (Mining pools)**: Synchronizers are key participants in exSat's underlying protocol and typically come from BTC mining pools. Only miners who have successfully mined a block on the BTC chain in the past 72 hours are eligible to become Synchronizers. Synchronizers are responsible for uploading the latest BTC blocks to exSat and completing the validation and parsing works. Click [here ](/guides-of-data-consensus/run-a-sychronizer)to learn more about Synchronizers.
* **Validator**: Validators are key participants in exSat's underlying protocol. Users must stake at least 100 $BTC or 2100 $XSAT to become Validator. Validators provide security for exSat and are responsible for reaching consensus on the latest BTC blocks. Only BTC block data that has got consensused by Validators will be accepted as valid on the exSat network. You can read more about [BTC Validator](/guides-of-data-consensus/run-a-btc-validator) and [XSAT Validator](/guides-of-data-consensus/run-a-xsat-validator).
* **Developer**: Developers use the various infrastructures provided by exSat (such as the Data Consensus Protocol, UTXO index, Custody service, etc.) to build a wide range of decentralized applications (DApps) based on BTC. These applications may cover a variety of scenarios, including BTC lending, payments, asset issuance, cross-chain bridges, and more. Developers can write smart contracts using C++ on the native layer or develop contracts based on EVM on the extended layer. Developers can quickly access development resources [here](/developer-guides/quick-start) or learn more about EVM support.
* **User**: Users can use the services provided by exSat or access various DApps created by developers. Users will be able to bridge their BTC to exSat via the cross-chain bridge, to use it as gas fees or for other purposes. Users can also participate in consensus by [staking their BTC to Validators](/user-guides/earn-rewards-via-btc-staking), enhancing the security of exSat and getting XSAT rewards. Click [here ](/user-guides/wallet-setup)to explore more.
* **Custodian** (coming soon) : Custodians play a key role in exSat's asset protocol, building the connection between BTC and exSat on the assets. Custodians provide security and trust for exSat's cross-chain bridge and various asset protocols. Click [here ](/cutodian-guides/custodian-coming-soon)to learn more about Custodians.


# UTXO Initialization

exSat begins synchronizing and processing Bitcoin blocks starting from block height 840,000. For Bitcoin data before block 840,000, including UTXOs and block headers, the data is gathered and verified before being uploaded to the exSat network in a fully verifiable manner.

To ensure the accuracy and integrity of this data initialization process, the following requirements should be met:

* The UTXO and block header data to be uploaded to exSat must be accurate and verifiable, allowing any party, including professional auditing firms, to review and verify the data.
* Once uploaded, the data on the exSat chain must exactly match the prepared data. A snapshot of the exSat chain should be provided for anyone, including auditing firms, to inspect and verify the consistency between the prepared data and the data on the exSat chain.


# Data preparation

### **Block Header Preparation:**

<figure><img src="/files/to48izTf95ACIDc2b4ey" alt="" width="563"><figcaption></figcaption></figure>

Preparing the block headers is relatively straightforward. We wrote a [script](https://github.com/exsat-network/exsat-initialize-data/tree/main/fetch_bitcoin_blockhaeder) in Rust that requests data from a Bitcoin full node via RPC, starting from the genesis block. The script retrieves and interprets block data (hash, height, version, preHash, nextHash, merkleRoot, time, bits, nonce, difficulty, chainwork). Using preHash, it fetches subsequent blocks in a chain request manner. The data is saved into an SQLite file. After running the script, we compare the data with another set obtained from a different Bitcoin full node. Once verified, the SQLite DB file is finalised and uploaded for public download and verification.

Welcome to download and verify the block header data : [Block headers prior to 840,000](https://s3.amazonaws.com/exsat.initialize.data/block_headers_lt_840000.csv.zip)

### **UTXO Data Preparation:**

<figure><img src="/files/YqkRvv5cTl4qTsiAoCEX" alt=""><figcaption></figcaption></figure>

#### Datasource

We compiled the[ Bitcoin](https://github.com/exsat-network/bitcoin-utxo-dump) (v27.1) code on three machines, starting full nodes to synchronise with the Bitcoin mainnet. [One node](https://github.com/exsat-network/bitcoin) was modified to stop block synchronisation at height 839,999, while the other two nodes continued to sync to the latest block.

#### Middleware

We selected three popular open-source projects:[ ElectrumX](https://github.com/exsat-network/electrumx),[ bitcoin-utxo-dump](https://github.com/exsat-network/bitcoin-utxo-dump), and[ rusty-blockparser](https://github.com/exsat-network/rusty-blockparser). Each project was used to read block records from the data sources, extracting necessary fields such as height, address, txid, vout, value, and scriptPubKey. This process resulted in approximately 170 million records, which were ultimately stored in our Clickhouse database. We use this [script](https://github.com/exsat-network/exsat-initialize-data/tree/main/fetch_utxos_from_eletrumx) to transfer data from ElectrumX to clickhouse.

#### Data Cleaning & Comparative Verification

We used SQL to aggregate and summarise the data, comparing the theoretical total Bitcoin output at block height 839,999 with the actual data. A cross-comparison was performed between the three methods to verify address and balance data consistency. Once all methods produced consistent results, we confirmed the data's integrity and readiness for upload.

By following these meticulous steps, we ensured the reliability and accuracy of the UTXO data and block headers for the exSat network initialization. This collaborative effort demonstrates our commitment to transparency and precision in blockchain data management.

Welcome to download and verify the UTXO data : [UTXO data prior to 840,000](https://s3.amazonaws.com/exsat.initialize.data/utxo_lt_840000_ordered.csv.7z)


# Analysis on the UTXO data tobe uploaded

We exported data using three methods:&#x20;

* bitcoin-utxo-dump
* electrumX
* rusty-blockparser

The first two were primarily used for UTXO export and comparison at block 839,999, while the latter was used to calculate burned BTCs. The results are as follows:

| Method            | Total BTC           | UTXO Count  |
| ----------------- | ------------------- | ----------- |
| Theoretical       | 19,687,500.00000000 | -           |
| bitcoin-utxo-dump | 19,687,280.49271483 | 176,944,794 |
| electrumX         | 19,687,280.49271483 | 176,944,794 |

The discrepancy between the theoretical output and the tool-exported quantity is primarily due to:

1. The 50 BTC produced in the genesis block cannot be used. Tools ignore processing of block 0.
2. Bitcoin code bugs resulted in coinbase outputs less than the theoretical value, totaling 128.95502904 BTC.
3. OP\_RETURN burns, totaling 40.55225613 BTC.

These factors account for a total of 219.50728517 BTC.

<mark style="color:red;">Theoretical value</mark> = <mark style="color:red;">Genesis block</mark> + <mark style="color:red;">Code bug burns</mark> + <mark style="color:red;">OP\_RETURN burns</mark> + <mark style="color:red;">Exported data</mark>&#x20;

<mark style="color:red;">19,687,500</mark>             = <mark style="color:red;">50</mark> + <mark style="color:red;">128.95502904</mark> + <mark style="color:red;">40.55225613</mark> +<mark style="color:red;">19,687,280.49271483</mark>

**This confirms that our exported data is reasonable.**

Below, we detail the source of each data point.

### BTC Theoretical Output

* 1st Halving: 210,000 × 50 = 10,500,000 BTC
* 2nd Halving: 210,000 × 25 = 5,250,000 BTC
* 3rd Halving: 210,000 × 12.5 = 2,625,000 BTC
* 4th Halving: 210,000 × 6.25 = 1,312,500 BTC

Total BTC generated up to block 839,999: 10,500,000 + 5,250,000 + 2,625,000 + 1,312,500 = 19,687,500

### Unusable Genesis Block

Although the genesis block points to a URL written in its code, this link displayed an error message when activated. The system couldn't locate the first 50 BTC transaction in the database, and spending transactions were rejected. Consequently, the original Bitcoin client doesn't consider the genesis block transaction as a "real transaction." —>[Reference Links](https://www.investopedia.com/terms/g/genesis-block.asp#:~:text=The)

### UTXO Dataset

We established a [bitcoind](https://github.com/bitcoin/bitcoin) full node, then indexed and processed its data using electrumX or bitcoin-utxo-dump tools.

* For electrumX usage, refer to[ https://github.com/exsat-network/electrumx](https://github.com/exsat-network/electrumx)
* For bitcoin-utxo-dump usage, refer to <https://github.com/exsat-network/bitcoin-utxo-dump>

### Bitcoin Code Bug Burns

Several [events](https://bitcoin.stackexchange.com/questions/38994/will-there-be-21-million-bitcoins-eventually/38998#38998) have led to coinbase outputs less than the theoretical value due to bugs:

1. Duplicate txid coinbase, fixed in BIP30: 100 BTC
2. Block 124724 intentionally claimed 0.00000001 BTC less, but accidentally didn't claim fees: 0.01000001 BTC
3. Blocks 162705 and 169899 bug: 9.66184623 BTC
4. Blocks 180324 and 249185 claimed less than allowed: 0.52584193 BTC
5. Block 501726: Approximately 12.5 BTC
6. Block 526591: Approximately 6.25 BTC

### Tools & Data

We modified electrumX slightly, mainly in data structure or API, without changing core UTXO calculation logic. Since  rusty-blockparser does not support Pay2MultiSig type addresses, it is not used to export the UTXO. We modified it to include coinbase output discrepancy records and OP\_RETURN burn calculations. Bitcoin-utxo-dump and electrumX were used for UTXO export and comparison at block 839,999, while rusty-blockparser was used to calculate burned BTCs.Because bitcoin-utxo-dump cannot specify an end block, Spider Pool also instructed to modify [bitcoind](https://github.com/exsat-network/bitcoin) to stop at block 839999. specifically to cooperate with bitcoin-utxo-dump to obtain data.

#### References of tools:

1. rusty-blockparser:[ ](https://github.com/seancheen/rusty-blockparser)<https://github.com/exsat-network/rusty-blockparser>
2. electrumx:[ https://github.com/exsat-network/electrumx](https://github.com/exsat-network/electrumx)
3. bitcoin-utxo-dump:[ ](https://github.com/in3rsha/bitcoin-utxo-dump)<https://github.com/exsat-network/bitcoin-utxo-dump>
4. Bitcoind(modified)  <https://github.com/exsat-network/bitcoin>

#### References of data：

1. [Code bug coinbase burn dataset](https://s3.amazonaws.com/exsat.initialize.data/coinbase_burned.csv.zip)
2. [OP\_RETURN burn dataset](https://s3.amazonaws.com/exsat.initialize.data/opreturn_burned_lt_840000.csv.zip)


# Verify the data uploaded to exSat

We offer a range of tools and resources to help you verify the consistency of block headers and UTXO data with the Bitcoin network, as well as exSat snapshot to verify the consistency of source data with the onchain data.

### Data sources:

* [Block headers prior to 840,000](https://s3.amazonaws.com/exsat.initialize.data/block_headers_lt_840000.csv.zip)
* [UTXO data prior to 840,000](https://s3.amazonaws.com/exsat.initialize.data/utxo_lt_840000_ordered.csv.7z)
* [exSat snapshot with uploaded data](https://s3.amazonaws.com/exsat.initialize.data/spring-snapshot-utxo-mainnet.zip)

### Verification solutions

You can verify the accuracy of the above data using any of the following methods, or you may use your own preferred methods and tools for verification.

* [Methods and tools used by exSat for data initialization and verification](https://github.com/exsat-network/exsat-initialize-data)

### Audit Reports

[UTXO Data Initialization Audit Report by BlockSec](/security-reports/audit-report-from-blocksec#report-for-utxo-data-before-block-height-84-000).


# Run a Sychronizer

Synchronizers play a vital role in the [Data Consensus Protocol](/approach/architecture/data-consensus-protocol) and are typically from Bitcoin mining pools. To learn how to qualify as a Synchronizer and understand the reward distribution process, please refer to the detailed guide [here](/approach/usdxsat-tokenomics/rewards-to-synchronizers-and-validators).

A Synchronizer must run the **Synchronizer Client** to perform its tasks. The client periodically queries the BTC RPC node to retrieve the latest Bitcoin block. If the block needs to be uploaded, it is split into multiple shards and submitted to the exSat contract for verification and parsing. For a detailed explanation of how the Data Consensus Protocol works, click [here](/approach/architecture/data-consensus-protocol/hybrid-consensus-mechanism).

Multiple Synchronizers typically operate simultaneously, competing to be the first to upload and verify the latest Bitcoin block. The Synchronizer that successfully completes the task first receives the reward for that block.

If a Bitcoin block was mined by a specific Synchronizer, that Synchronizer gains a competitive advantage and is highly likely to get the reward for the block. Additionally, the reward for blocks mined by the Synchronizer is significantly higher than for regular blocks.


# Requirements for Synchronizers

Mining pools that have successfully mined blocks in the last 432 Bitcoin blocks (approximately 72 hours) are eligible to become Synchronizers and submit BTC data to exSat.&#x20;

Mining pools must include a specific OP\_RETURN output in the coinbase transaction of each Bitcoin block they mine. This output serves to identify the block as being mined by the pool. For detailed instructions on how to register as Synchronizer, please refer [here](/guides-of-data-consensus/others/operation-references/synchronizer-operations/synchronizer-registration).


# Rewards for synchronizers

## **Synchronizer Rewards**

For detailed rules about rewards for synchronizers, please refer [here](/approach/usdxsat-tokenomics/rewards-to-synchronizers-and-validators).

## How to determe which synchronizer gets rewards

Synchronizers upload BTC block data to exSat. The one that obtains the correctness verification of the block data and finishes parsing the block will receive exSat's block rewards.

Each BTC block only issues rewards to one Mining Pool, so if you think there is a fork at a certain BTC block height, it is recommended to upload the data of each fork to increase the probability of receiving rewards.

#### Example&#x20;

In a typical scenario, multiple mining pools simultaneously submit the latest block data. **The mining pool that completes the data submission and passes the block data verification first earns the exclusive right to parse the block within a 10-minute window** (equivalent to 1200 blocks in exSat). During this period, other mining pools are prohibited from parsing the same block. If the mining pool successfully parses the block within the allocated time, it receives the corresponding block reward.&#x20;

However, if the mining pool fails to complete the block parsing within the 10-minute window, it forfeits the right to parse the block, and the opportunity is opened up to other mining pools. The mining pool that subsequently completes parsing the block will be entitled to the block reward.&#x20;

This process ensures fair competition among mining pools and maintains the efficiency and integrity of the blockchain network.

<figure><img src="https://lh7-us.googleusercontent.com/docsz/AD_4nXfaTddvwcYkVSg9Kop1D3w5MsO-iasHPjOV8k6SvYxsPQv1u4vcaXrNJmStN4wAqLNdA0A0Pg8MhBbuILava3LfHGbNt_TqYGW5piFvC79_VplaBsu-VrgJGfcBGQGCtGh3ybRVxBrQcKfUsu287kWSf8u-?key=AkA2EpjrKAVtU-HCiHPW9w" alt=""><figcaption></figcaption></figure>

In this illustration, Synchronizer3 will receive the final reward.&#x20;

Despite Synchronizer2 completing the block data upload first, Synchronizer3 gains the exclusive right to parse the block data for the next 10 minutes because it achieved block data verification before any other synchronizer. Synchronizer3 successfully parsed the block within the allocated time frame and got the reward.<br>

### How to get block rewards from blocks mined by your pool

For Bitcoin blocks mined by a pool, the pool will have additional priority time when uploading the block to exSat. As long as the client is running properly, the pool has a high probability of getting the block rewards.

### How to get the rewards from blocks not mined by your pool&#x20;

If a Synchronizer's client isn’t running, or if gas fee runs out, preventing him/her from submitting a block within the priority window, other Synchronizers may get the block rewards. Additionally, for blocks mined by pools not yet connected to the exSat network, a pool can get the rewards if it handles the block faster than other Synchronizers.


# Run as Synchronizer

Please confirm that you have:

* [Prepared the necessary accounts](/guides-of-data-consensus/others/operation-references/preparation-before-you-start/account-preparation#account-preparation-for-synchronizer)
* [Got an available BTC RPC node](/guides-of-data-consensus/others/operation-references/preparation-before-you-start/run-a-btc-node)
* [Got a server to run the client](/guides-of-data-consensus/others/operation-references/preparation-before-you-start/environment-requirements)
* [Install the software dependencies on the server](/guides-of-data-consensus/others/operation-references/preparation-before-you-start/prerequisites)

The client can be:

* [Run from source code](/guides-of-data-consensus/others/operation-references)
* [Run with Docker](/guides-of-data-consensus/run-a-sychronizer/run-as-synchronizer/run-with-docker)

Choose your preferred method, and let's get started!


# Run from source code

## Download the Client

Execute the following command to clone the repository :

```
git clone https://github.com/exsat-network/exsat-client
```

## Build the client

```
cd exsat-client
yarn install && yarn build
```

## Edit the .env configuration file

Please generate ".env" file by coping from ".env.example":

```
cp .env.example .env
```

Please edit the ".env" file to configure the settings.

```
vim .env
```

Please ensure all configurations are correctly set. Some settings can also be adjusted by executing the Client. Detailed configurations can be found [here](/guides-of-data-consensus/others/operation-references/common-operations/environment-variables).

## Execute the client

### 1. Initiate the synchronizer account

#### Create or import the account

If you don't have a synchronizer account, please [create a new account](/guides-of-data-consensus/others/operation-references/synchronizer-operations/create-new-synchronizer-account).

If you already have a synchronizer account, and wish to import it to your client, please [import seed phase](/guides-of-data-consensus/others/operation-references/common-operations/import-from-seed-phrase) or [import private key](/guides-of-data-consensus/others/operation-references/common-operations/import-from-private-key).

#### Register account as synchronizer

You must [register your account as synchronizer](/guides-of-data-consensus/others/operation-references/synchronizer-operations/synchronizer-registration) to be qualified for Synchronizer tasks.&#x20;

### 2. Configurations

You can complete some client configurations or perform operations on your account:

* [Set BTC RPC Node](/guides-of-data-consensus/others/operation-references/common-operations/set-btc-rpc-node) (**required**, can also be done by editing the .env file)
* [Bridge BTC for gas fee ](/guides-of-data-consensus/others/operation-references/common-operations/refill-btc-for-gas-fees)(**required**)
* [Change Reward Address ](/guides-of-data-consensus/others/operation-references/synchronizer-operations/change-reward-address)(optional)
* [Export private key](/guides-of-data-consensus/others/operation-references/common-operations/export-private-key) (optional)
* [Remove your account](/guides-of-data-consensus/others/operation-references/common-operations/remove-your-account) (optional)
* [New version check](/guides-of-data-consensus/others/operation-references/common-operations/upgrade-to-new-version) (optional)

### 3. Execute the client

Please be aware that completing [Set BTC RPC Node](/guides-of-data-consensus/others/operation-references/common-operations/set-btc-rpc-node) and [Bridge BTC for gas fee ](/guides-of-data-consensus/others/operation-references/common-operations/refill-btc-for-gas-fees)is mandatory.

Once the above operations are completed, your account and client are ready, and you can [start it for long-term running](/guides-of-data-consensus/others/operation-references/synchronizer-operations/execute-the-synchronizer-client).

### 4. Check and claim rewards

You could [check and claim rewards ](/guides-of-data-consensus/others/operation-references/synchronizer-operations/check-and-claim-rewards-for-synchronizer)on the front-page with the reward address.


# Run with Docker

Please ensure that [Docker ](/guides-of-data-consensus/others/operation-references/preparation-before-you-start/prerequisites#running-with-docker)is installed on your Linux server.

## 1. Download docker image

```
docker pull exsatnetwork/exsat-client:latest
```

## 2. Download and configure the environment variables (.env)

Please create a directory (e.g., `$HOME/.exsat/`) to store the files for running the exSat Client via Docker. We will download the `.env` file directly from GitHub into this directory, and edit it.

```
mkdir -p $HOME/.exsat/
curl -o $HOME/.exsat/.env https://raw.githubusercontent.com/exsat-network/exsat-client/main/.env.example
vim $HOME/.exsat/.env
```

Please ensure all configurations are correctly set. Some settings can also be adjusted in the next steps. Detailed configurations can be found [here](/guides-of-data-consensus/others/operation-references/common-operations/environment-variables).

## 3. Initialize the account and configure the Client

Start Docker in interactive mode：

```
docker run -it --name commander -v $HOME/.exsat/:/app/.exsat -e CLIENT_TYPE=commander exsatnetwork/exsat-client:latest
```

Perform below actions in the docker.

### 3.1 Initiate the synchronizer account

#### Create or import the account

If you don't have a synchronizer account, please [create a new account](/guides-of-data-consensus/others/operation-references/synchronizer-operations/create-new-synchronizer-account).

If you already have a synchronizer account, and wish to import it to your client, please [import seed phase](/guides-of-data-consensus/others/operation-references/common-operations/import-from-seed-phrase) or [import private key](/guides-of-data-consensus/others/operation-references/common-operations/import-from-private-key).

#### Register account as synchronizer

If you didn't register your account as synchronizer, please [register as synchronizer.](/guides-of-data-consensus/others/operation-references/synchronizer-operations/synchronizer-registration)

### 3.2 Configurations

You can complete some client configurations or perform operations on your account:

* [Set BTC RPC Node](/guides-of-data-consensus/others/operation-references/common-operations/set-btc-rpc-node) (**required**, can also be done by editing the .env file)
* [Bridge BTC for gas fee ](/guides-of-data-consensus/others/operation-references/common-operations/refill-btc-for-gas-fees)(**required**)
* [Change Reward Account](/guides-of-data-consensus/others/operation-references/synchronizer-operations/change-reward-address) (optional)
* [Export private key](/guides-of-data-consensus/others/operation-references/common-operations/export-private-key) (optional)
* [Remove your account](/guides-of-data-consensus/others/operation-references/common-operations/remove-your-account) (optional)

## 4. Execute the Client

Please ensure that you have [configured the BTC RPC Node](/guides-of-data-consensus/others/operation-references/common-operations/set-btc-rpc-node) and [Bridge BTC for gas fee](/guides-of-data-consensus/others/operation-references/common-operations/refill-btc-for-gas-fees).

There are several ways to start the client using Docker, differing in how the keystore password is provided. Choose the method you prefer.

Assuming the keystore file is stored at `$HOME/.exsat/synctest_keystore.json`and the password is `123456` .the keystore file path in ".env" file should be look like:

```
SYNCHRONIZER_KEYSTORE_FILE=/app/.exsat/synctest_keystore.json
```

### Option1 : Password stored in ".env"

&#x20;Configure password in the `.env` file:

```
SYNCHRONIZER_KEYSTORE_PASSWORD=123456
```

Then, start the Docker container with the following command:

```
docker run -d --restart always --name synctest -v $HOME/.exsat/:/app/.exsat -e CLIENT_TYPE=synchronizer exsatnetwork/exsat-client:latest
```

### Option2 : Input password in the command

Start docker container with the password as parameter in the command:

```
docker run -d --restart always --name synctest -v $HOME/.exsat/:/app/.exsat -e CLIENT_TYPE=synchronizer -e SYNCHRONIZER_KEYSTORE_PASSWORD=123456 exsatnetwork/exsat-client:latest
```

### Option 3 : Interactive Password Input

Start Docker in interactive mode and enter the password in the command line interface.

```
docker run -it --name synctest -v $HOME/.exsat:/app/.exsat -e CLIENT_TYPE=synchronizer exsatnetwork/exsat-client:latest
```

> Different startup methods vary in terms of security and convenience. If you start the client interactively and enter the password in the interface, the password won't be stored in plain text in the startup command or files, reducing the risk of exposure. However, if you provide the password in the `.env` file or directly in the command line, it may be more prone to leakage but offers greater convenience during startup.

If your Synchronizer Client is running correctly, the following logs should appear on your screen:

```
2025-02-28T12:34:59.176+00:00 info: ExsatApi initialized successfully.
2025-02-28T12:34:59.934+00:00 info: synchronizer[synctest.sat] client configurations are correct, and the startup was successful
2025-02-28T12:35:00.939+00:00 info: Upload block task is running
2025-02-28T12:35:00.942+00:00 info: Verify block task is running
2025-02-28T12:35:00.945+00:00 info: Parse block task is running
```

Check [this guide](/guides-of-data-consensus/others/operation-references/common-operations/view-logs) for detailed instructions on viewing the logs.

## 5. Check and claim rewards

You could [check and claim rewards ](/guides-of-data-consensus/others/operation-references/synchronizer-operations/check-and-claim-rewards-for-synchronizer)on the front-page with the reward address.

## 6. Update to new Docker image

Please refer to the [Docker version update](/guides-of-data-consensus/others/operation-references/synchronizer-operations/update-to-new-docker-version-for-synchronizer) instruction.


# Run a BTC Validator

The operations of a BTC Validator involve two roles:

### **Validator**

In exSat, there is a group of Validators responsible for reaching consensus on the BTC block hashes to ensure the imported BTC block data is correct. Each Validator independently obtains the BTC block hash and submits it to exSat. Consensus on the current block hash is achieved when the block hash submitted by more than 2/3 of the Validators matches. Validators must stake at least 100 $BTC to participate in the consensus.

Validators must stake an initial 100 $BTC themselves to qualify as a Validator. Once this requirement is met, they can accept delegated staking from the community. Validators can set a commission rate, where a portion of the rewards is allocated to the Validator as a commission, and the remainder is distributed to the Stakers who delegated their stakes to the Validator.

To perform their duties, Validators must obtain Bitcoin block hashes from reliable sources, such as by operating their own Bitcoin node. Additionally, they need to run the Validator client to submit these block hashes to the exSat network.

### **Delegate Staker**

Everyone who holds $BTC can be a delegate staker. Delegate stakers can stake their $BTC to a BTC Validator to earn the $XSAT staking rewards. Delegate stakers can view the validators on [this page](https://btcyield.io/) and choose one to stake. Delegate stakers can claim rewards on [this page](https://btcyield.io/my-staking). Delegate stakers do not need to run the Validator Client themselves, the $XSAT rewards comes from the validator he/she staked to, so when selecting a BTC Validator, consider factors like the commission rate and operational stability.


# Requirements and rewards for BTC Validators

### Requirements for $BTC Validator

$BTC Validators must stake a minimum of 100 $BTC to qualify as a **BTC Validator**. This initial 100 $BTC cannot be raised through delegated staking from the community.

Once a Validator becomes qualified, they are allowed to accept delegated staking from community members.

### XSAT rewards received

If the Bitcoin block hash submitted by a BTC Validator matches the final exSat consensus, the Validator will receive the reward for that block.

BTC Validators receive 65% or 70% of the block rewards, depending on whether the Synchronizer receives current block rewards also mined the corresponding Bitcoin block:

* If the Synchronizer mined the corresponding Bitcoin block, the BTC Validator receives 65% of the current block rewards.
* Otherwise, the BTC Validator receives 70% of the current block rewards.

### **Reward Types:**

BTC Validator rewards are divided into two categories:

1. **Staking Rewards:**\
   These are rewards earned from staking BTC. The amount is proportional to the quantity of BTC staked. This portion of the reward is received by [the EVM address that completed the staking process](/guides-of-data-consensus/others/operation-references/validator-operations/change-stake-address).
2. **Commission:**\
   Community members who either do not meet the 100 BTC minimum or prefer not to run a Validator client can delegate their BTC to a BTC Validator to earn consensus rewards.\
   In return, the BTC Validator may charge a commission on the delegated BTC. The **Commission = Total Staking Rewards × Commission Rate**, and the commission rate is determined by the BTC Validator. The commission is received by the [Reward Address](/guides-of-data-consensus/others/operation-references/validator-operations/change-reward-address) set by the Validator.

> For BTC Validators using [Credit Staking](/guides-of-data-consensus/run-a-btc-validator/credit-staking-and-xbtc-staking#credit-staking), the BTC staking occurs on the Bitcoin network, not on the exSat chain. As a result, there is **no** Stake Address on the exSat chain for the staking operation.\
> Therefore, both the **staking rewards** and the **commission** earned are distributed to the Validator’s designated [Reward Address](/guides-of-data-consensus/others/operation-references/validator-operations/change-reward-address).

### Rewards distribution

XSAT rewards are distributed among BTC Validators proportionally based on the amount of BTC they have staked.&#x20;

After receiving the rewards, a validator deduct its commission, and the remaining amount is distributed among all stakers proportionally based on their BTC stakes.

For example:

* BTC Validators can receive 70% of the current block rewards, equivalent to 35 $XSAT.
* If a Validator staked 10% of the total BTC staked, it receives 3.5 XSAT.
* Assuming the Validator’s commission rate is 5%, and there are two stakers:
  * The Validator itself, staking 100 BTC.
  * A delegate staker from the community, staking 10 BTC.

The rewards are distributed as follows:

1. **Commission**: 3.5×5%=0.175 $XSAT, retained by the Validator and claimable through its Reward Account.
2. **Validator's Stake Rewards**:\
   (3.5−0.175)×100/110 ≈ 3.0227 $XSAT, claimable by the staker address of the validator.
3. **Delegate Staker's Rewards**:\
   (3.5−0.175)×10/110 ≈ 0.3023 $XSAT,claimable by the delegate staker.


# Credit Staking and XBTC Staking

BTC holders can become BTC Validators on the exSat network by staking their #BTC through either [**Credit Staking**](/guides-of-data-consensus/others/operation-references/validator-operations/stake-for-validator-via-credit-staking) or [**XBTC Staking**](/guides-of-data-consensus/others/operation-references/validator-operations/stake-for-validator-via-xbtc-staking-or-xsat-staking). Each method has distinct features and benefits, as outlined below.

***

### **Credit Staking**

Credit Staking allows BTC holders to retain self-custody of their #BTC on the Bitcoin network. By proving control over a specific BTC address and maintaining a locked balance of at least **100 #BTC**, users can qualify as BTC Validators. This method plays a key role in promoting decentralization and enhancing the security of the exSat network. However, it comes with certain limitations:

* **Fixed Staking Amount:**\
  Only two states are recognized: 0 #BTC or 100 #BTC.
  * If the BTC address balance falls below 100 #BTC, Credit Staking is deactivated and considered 0 #BTC.
  * If the balance is 100 #BTC or more, the staking amount is fixed at 100 #BTC—regardless of the actual balance (e.g., even with 1,000 #BTC, only 100 #BTC counts toward Credit Staking).
* **No XBTC Minting:**\
  BTC staked via Credit Staking does **not** generate XBTC, meaning it cannot be used in any on-chain yield-generating activities, such as quantitative strategies or restaking on the exSat chain.
* **Lower XSAT Reward Weight:**\
  Credit Staking typically earns a lower XSAT reward per BTC compared to XBTC Staking.
* **Mandatory XSAT Donation:**\
  A **20% portion** of the XSAT rewards earned through Credit Staking must be donated to the XSAT Foundation.

***

### **XBTC Staking**

In contrast, XBTC Staking involves bridging BTC to the exSat network and minting XBTC, which can then be staked to become a BTC Validator. This approach offers several advantages:

* **Secure Custody with Licensed Providers:**\
  Bridged BTC is safeguarded by regulated custodians such as **Ceffu** ,**Standard Chartered Bank** and **Cactus**. For large holdings, assets are stored in **dedicated cold wallets**, and users can monitor their BTC to ensure full transparency and security.
* **No Staking Limitations:**\
  A minimum of **100 #XBTC** is required to become a BTC Validator, but there is no upper limit. The more #XBTC you stake, the more #XSAT rewards you earn.
* **Participation in On-Chain CeDeFi Yields:**\
  XBTC holders can access the full suite of CeDeFi opportunities on the exSat network—such as **quantitative strategies**, **restaking**, and other high-yield protocols—while simultaneously participating in consensus.
* **Higher XSAT Reward Weight:**\
  The reward weight per unit of XBTC is **higher** than that of BTC staked via Credit Staking, enabling greater XSAT earnings for the same notional amount.
* **No Mandatory Donations:**\
  XSAT rewards earned through XBTC Staking are **fully retained** by the staker—no contributions to the XSAT Foundation are required.


# Run as BTC validator

Please confirm that you have:

* [Prepared the necessary accounts](/guides-of-data-consensus/others/operation-references/preparation-before-you-start/account-preparation#account-preparation-for-validator)
* [Got an available BTC RPC node](/guides-of-data-consensus/others/operation-references/preparation-before-you-start/run-a-btc-node)
* [Got a server to run the client](/guides-of-data-consensus/others/operation-references/preparation-before-you-start/environment-requirements)
* [Installed the software dependencies on the server](/guides-of-data-consensus/others/operation-references/preparation-before-you-start/prerequisites)

The validator client can be:

* [Run from source code](/guides-of-data-consensus/run-a-btc-validator/run-as-btc-validator/run-from-source-code)
* [Run with Docker](/guides-of-data-consensus/run-a-btc-validator/run-as-btc-validator/run-with-docker)

Choose your preferred method, and let's get started!


# Run from source code

## Download the Client

Execute the following command to clone the repository :

```
git clone https://github.com/exsat-network/exsat-client
```

## Build the client

<pre><code>cd exsat-client
<strong>yarn install &#x26;&#x26; yarn build
</strong></code></pre>

## Edit the .env configuration file

Please generate ".env" file by coping from ".env.example":

```
cp .env.example .env
```

Please edit the ".env" file to configure the settings.

```
vim .env
```

Please ensure all configurations are correctly set. Some settings can also be adjusted by executing the Client. Detailed configurations can be found [here](/guides-of-data-consensus/others/operation-references/common-operations/environment-variables).

## Execute the client

### 1. Initiate the validator account

#### Create or import the account

If you don't have a validator account, please [create a new BTC Validator account](/guides-of-data-consensus/others/operation-references/validator-operations/create-new-btc-validator-account).

If you already have a validator account, and wish to import it to your client, please [import seed phase](/guides-of-data-consensus/others/operation-references/common-operations/import-from-seed-phrase) or [import private key](/guides-of-data-consensus/others/operation-references/common-operations/import-from-private-key).

#### Stake for your validator account

To qualify as a BTC Validator, you must stake a minimum of 100 BTC. This can be done through either [Credit Staking](/guides-of-data-consensus/others/operation-references/validator-operations/stake-for-validator-via-credit-staking) or [XBTC Staking](/guides-of-data-consensus/others/operation-references/validator-operations/stake-for-validator-via-xbtc-staking-or-xsat-staking). Learn more about the two staking methods [here](/guides-of-data-consensus/run-a-btc-validator/credit-staking-and-xbtc-staking).

### 2. Configurations

You can complete some client configurations or perform operations on your account:

* [Set BTC RPC Node](/guides-of-data-consensus/others/operation-references/common-operations/set-btc-rpc-node) (**required**, can also be done by editing the .env file)
* [Bridge BTC for gas fee](/guides-of-data-consensus/others/operation-references/common-operations/refill-btc-for-gas-fees) (**required**)
* [Change Stake Address](/guides-of-data-consensus/others/operation-references/validator-operations/change-stake-address) (optional)
* [Change Reward Address](/guides-of-data-consensus/others/operation-references/synchronizer-operations/change-reward-address) (optional)
* [Change Commission Ratio](/guides-of-data-consensus/others/operation-references/validator-operations/change-commission-ratio) (optional)
* [Configure Display Information](/guides-of-data-consensus/others/operation-references/validator-operations/configure-display-information-for-your-validator-account) (optional)
* [Export private key](/guides-of-data-consensus/others/operation-references/common-operations/export-private-key) (optional)
* [Remove your account](/guides-of-data-consensus/others/operation-references/common-operations/remove-your-account) (optional)
* [New version check](/guides-of-data-consensus/others/operation-references/common-operations/upgrade-to-new-version) (optional)

### 3. Execute the client

Please be aware that completing [Set BTC RPC Node](/guides-of-data-consensus/others/operation-references/common-operations/set-btc-rpc-node) and [Bridge BTC for gas fee ](/guides-of-data-consensus/others/operation-references/common-operations/refill-btc-for-gas-fees)is mandatory.

Once the above operations are completed, your account and client are ready, and you can [start it for long-term running](/guides-of-data-consensus/others/operation-references/validator-operations/execute-the-validator-client).

### 4. Check and claim rewards

You could [check and claim rewards](/guides-of-data-consensus/others/operation-references/validator-operations/stake-for-validator-via-xbtc-staking-or-xsat-staking#claim-rewards) on the front-page with the reward address.


# Run with docker

Please ensure that [Docker ](/guides-of-data-consensus/others/operation-references/preparation-before-you-start/prerequisites#running-with-docker)is installed on your Linux server.

## 1. Download docker image

```
docker pull exsatnetwork/exsat-client:latest
```

## 2. Download and configure the environment variables (.env)

Please create a directory (e.g., `$HOME/.exsat/`) to store the files for running the exSat Client via Docker. We will download the `.env` file directly from GitHub into this directory, and edit it.

```
mkdir -p $HOME/.exsat/
curl -o $HOME/.exsat/.env https://raw.githubusercontent.com/exsat-network/exsat-client/main/.env.example
vim $HOME/.exsat/.env
```

Please ensure all configurations are correctly set. Some settings can also be adjusted in the next steps. Detailed configurations can be found [here](/guides-of-data-consensus/others/operation-references/common-operations/environment-variables).

## 3. Initialize the account and configure the Client

Start Docker in interactive mode：

```
docker run -it --name commander -v $HOME/.exsat/:/app/.exsat -e CLIENT_TYPE=commander exsatnetwork/exsat-client:latest
```

Perform below actions in the docker.

### 3.1 Initiate the validator account

#### Create or import the account

If you don't have a validator account, please [create a new account](/guides-of-data-consensus/others/operation-references/validator-operations/create-new-btc-validator-account).

If you already have a validator account, and wish to import it to your client, please [import seed phase](/guides-of-data-consensus/others/operation-references/common-operations/import-from-seed-phrase) or [import private key](/guides-of-data-consensus/others/operation-references/common-operations/import-from-private-key).

#### Stake for your validator account

To qualify as a BTC Validator, you must stake a minimum of 100 BTC. This can be done through either [Credit Staking](/guides-of-data-consensus/others/operation-references/validator-operations/stake-for-validator-via-credit-staking) or [XBTC Staking](/guides-of-data-consensus/others/operation-references/validator-operations/stake-for-validator-via-xbtc-staking-or-xsat-staking). Learn more about the two staking methods [here](/guides-of-data-consensus/run-a-btc-validator/credit-staking-and-xbtc-staking).

### 3.2 Configurations

You can complete some client configurations or perform operations on your account:

* [Set BTC RPC Node](/guides-of-data-consensus/others/operation-references/common-operations/set-btc-rpc-node) (**required**, can also be done by editing the .env file)
* [Bridge BTC for gas fee](/guides-of-data-consensus/others/operation-references/common-operations/refill-btc-for-gas-fees) (**required**)
* [Change Stake Address](/guides-of-data-consensus/others/operation-references/validator-operations/change-stake-address) (optional)
* [Change Reward Address](/guides-of-data-consensus/others/operation-references/synchronizer-operations/change-reward-address)(optional)
* [Change Commission Ratio](/guides-of-data-consensus/others/operation-references/validator-operations/change-commission-ratio)(optional)
* [Configure Display Information](/guides-of-data-consensus/others/operation-references/validator-operations/configure-display-information-for-your-validator-account) (optional)
* [Export private key](/guides-of-data-consensus/others/operation-references/common-operations/export-private-key) (optional)
* [Remove your account](/guides-of-data-consensus/others/operation-references/common-operations/remove-your-account) (optional)
* [New version check](/guides-of-data-consensus/others/operation-references/common-operations/upgrade-to-new-version) (optional)

## 4. Execute the Client

Please ensure that you have [configured the BTC RPC Node](/guides-of-data-consensus/others/operation-references/common-operations/set-btc-rpc-node), [bridged gas fee for your validator account](/guides-of-data-consensus/others/operation-references/common-operations/refill-btc-for-gas-fees).

There are several ways to start the client using Docker, differing in how the keystore password is provided. Choose the method you prefer.

Assuming the keystore file is stored at `$HOME/.exsat/goodvali_keystore.json`and the password is `123456` , the keystore file path in ".env" file should be look like:

```
VALIDATOR_KEYSTORE_FILE=/app/.exsat/goodvali_keystore.json
```

### Option 1 : Password stored in ".env"

&#x20;Please configure password in the `.env` file:

```
VALIDATOR_KEYSTORE_PASSWORD=123456
```

Then, start the Docker container with the following command:

```
docker run -d --restart always --name goodvali -v $HOME/.exsat/:/app/.exsat -e CLIENT_TYPE=validator exsatnetwork/exsat-client:latest
```

### Option 2 : Input password in the command

Start docker container with the password as parameter in the command:

```
docker run -d --restart always --name goodvali -v $HOME/.exsat/:/app/.exsat -e CLIENT_TYPE=validator -e VALIDATOR_KEYSTORE_PASSWORD=123456 exsatnetwork/exsat-client:latest
```

### Option 3 : Interactive Password Input

Start Docker in interactive mode and enter the password in the command line interface.

```
docker run -it --name goodvali -v $HOME/.exsat:/app/.exsat -e CLIENT_TYPE=validator exsatnetwork/exsat-client:latest
```

> Different startup methods vary in terms of security and convenience. If you start the client interactively and enter the password in the interface, the password won't be stored in plain text in the startup command or files, reducing the risk of exposure. However, if you provide the password in the `.env` file or directly in the command line, it may be more prone to leakage but offers greater convenience during startup.

If your Validator Client is running correctly, the following logs should appear on your screen:

```
2025-02-28T12:25:23.325+00:00 info: ExsatApi initialized successfully.
2025-02-28T12:25:24.051+00:00 info: Validator[btcval.sat] client configurations are correct, and the startup was successful
2025-02-28T12:25:25.499+00:00 info: Endorse task is running
2025-02-28T12:25:26.158+00:00 info: Endorse task is finished
```

Check [this guide](/guides-of-data-consensus/others/operation-references/common-operations/view-logs#running-with-docker) for detailed instructions on viewing the logs.

## 5. Check and claim rewards

You could [check and claim rewards](/guides-of-data-consensus/others/operation-references/validator-operations/stake-for-validator-via-xbtc-staking-or-xsat-staking#claim-rewards) on the front-page with the reward address.

## 6. Update to new Docker image

When exSat releases a new Docker version, you can upgrade to the latest version by running the following commands (assuming you have been following the previous steps).

```
docker pull exsatnetwork/exsat-client:latest
docker stop goodvali
docker rm goodvali
docker run -d --restart always --name goodvali -v $HOME/.exsat/:/app/.exsat -e CLIENT_TYPE=validator exsatnetwork/exsat-client:latest
```


# Run a XSAT Validator

XSAT holders can stake 2100 $XSAT to become XSAT Validators, participate in the exSat network consensus, and earn rewards.

Similar to BTC Validators, XSAT Validators are required to vote on Bitcoin block hashes. Therefore, XSAT Validator operators must have the ability to access Bitcoin block information, either by running a full Bitcoin node or using a lightweight Bitcoin node, along with operating an XSAT Validator Client.

Compared to BTC Validators, the requirements for becoming an XSAT Validator are significantly lower. This allows a large number of community members to operate as XSAT Validators, contributing to the exSat network’s high degree of decentralization and ensuring the accuracy of Bitcoin data within the network.


# Requirements and rewards for XSAT Validators

### Requirements for XSAT Validator

XSAT Validators must stake a minimum of 2100 $XSAT to qualify as a **XSAT Validator**. These XSAT token is not allowed to be raised through delegated staking from the community.

### XSAT rewards received

If the Bitcoin block hash submitted by a XSAT Validator matches the final exSat consensus, the XSAT Validator will receive the reward for that block.

XSAT Validators receive 20% of the block rewards, which are evenly distributed among all XSAT Validators submitted right block hash.

The rewards for an XSAT Validator can be [claimed ](/guides-of-data-consensus/others/operation-references/validator-operations/stake-for-validator-via-xbtc-staking-or-xsat-staking)by the EVM address that staked 2,100 $XSAT to qualify the Validator.


# Run as XSAT Validator

Please confirm that you have:

* [Prepared the necessary accounts](/guides-of-data-consensus/others/operation-references/preparation-before-you-start/account-preparation#account-preparation-for-validator)
* [Got an available BTC RPC node](/guides-of-data-consensus/others/operation-references/preparation-before-you-start/run-a-btc-node)
* [Got a server to run the client](/guides-of-data-consensus/others/operation-references/preparation-before-you-start/environment-requirements)
* [Installed the software dependencies on the server](/guides-of-data-consensus/others/operation-references/preparation-before-you-start/prerequisites)

The validator client can be:

* [Run from source code](/guides-of-data-consensus/run-a-xsat-validator/run-as-xsat-validator/run-from-source-code)
* [Run with Docker](/guides-of-data-consensus/run-a-xsat-validator/run-as-xsat-validator/run-with-docker)

Choose your preferred method, and let's get started!


# Run from source code

## Download the Client

Execute the following command to clone the repository :

```
git clone https://github.com/exsat-network/exsat-client
```

## Build the client

<pre><code>cd exsat-client
<strong>yarn install &#x26;&#x26; yarn build
</strong></code></pre>

## Edit the .env configuration file

Please generate ".env" file by coping from ".env.example":

```
cp .env.example .env
```

Please edit the ".env" file to configure the settings.

```
vim .env
```

Please ensure all configurations are correctly set. Some settings can also be adjusted by executing the Client. Detailed configurations can be found [here](/guides-of-data-consensus/others/operation-references/common-operations/environment-variables).

## Execute the client

### 1. Initiate the validator account

#### Create or import the account

If you don't have a validator account, please [create a new account](/guides-of-data-consensus/others/operation-references/validator-operations/create-new-xsat-validator-account).

If you already have a validator account, and wish to import it to your client, please [import seed phase](/guides-of-data-consensus/others/operation-references/common-operations/import-from-seed-phrase) or [import private key](/guides-of-data-consensus/others/operation-references/common-operations/import-from-private-key).

#### Stake for your validator account

Validator must stake at least 2100 $XSAT to become a qualified validator. Click [here ](/guides-of-data-consensus/others/operation-references/validator-operations/stake-for-validator-via-xbtc-staking-or-xsat-staking)to see how to stake for your validator account.&#x20;

### 2. Configurations

You can complete some client configurations or perform operations on your account:

* [Set BTC RPC Node](/guides-of-data-consensus/others/operation-references/common-operations/set-btc-rpc-node) (**required**)
* [Bridge BTC for gas fee](/guides-of-data-consensus/others/operation-references/common-operations/refill-btc-for-gas-fees) (**required**)
* [Change Stake Address](/guides-of-data-consensus/others/operation-references/validator-operations/change-stake-address) (optional)
* [Export private key](/guides-of-data-consensus/others/operation-references/common-operations/export-private-key) (optional)
* [Remove your account](/guides-of-data-consensus/others/operation-references/common-operations/remove-your-account) (optional)
* [New version check](/guides-of-data-consensus/others/operation-references/common-operations/upgrade-to-new-version) (optional)

### 3. Execute the client

Please be aware that completing [Set BTC RPC Node](/guides-of-data-consensus/others/operation-references/common-operations/set-btc-rpc-node) and [Bridge BTC for gas fee ](/guides-of-data-consensus/others/operation-references/common-operations/refill-btc-for-gas-fees)is mandatory.

Once the above operations are completed, your account and client are ready, and you can [start it for long-term running](/guides-of-data-consensus/others/operation-references/validator-operations/execute-the-validator-client).

### 4. Check and claim rewards

You could [check and claim rewards](/guides-of-data-consensus/others/operation-references/validator-operations/stake-for-validator-via-xbtc-staking-or-xsat-staking#claim-rewards) on the front-page with the reward address.


# Run with docker

Please ensure that [Docker ](/guides-of-data-consensus/others/operation-references/preparation-before-you-start/prerequisites#running-with-docker)is installed on your Linux server.

## 1. Download docker image

```
docker pull exsatnetwork/exsat-client:latest
```

## 2. Download and configure the environment variables (.env)

Please create a directory (e.g., `$HOME/.exsat/`) to store the files for running the exSat Client via Docker. We will download the `.env` file directly from GitHub into this directory, and edit it.

```
mkdir -p $HOME/.exsat/
curl -o $HOME/.exsat/.env https://raw.githubusercontent.com/exsat-network/exsat-client/main/.env.example
vim $HOME/.exsat/.env
```

Please ensure all configurations are correctly set. Some settings can also be adjusted in the next steps. Detailed configurations can be found [here](/guides-of-data-consensus/others/operation-references/common-operations/environment-variables).

## 3. Initialize the account and configure the Client

Start Docker in interactive mode：

```
docker run -it --name commander -v $HOME/.exsat/:/app/.exsat -e CLIENT_TYPE=commander exsatnetwork/exsat-client:latest
```

Perform below actions in the docker.

### 3.1 Initiate the validator account

#### Create or import the account

If you don't have a validator account, please [create a new account](/guides-of-data-consensus/others/operation-references/validator-operations/create-new-xsat-validator-account).

If you already have a validator account, and wish to import it to your client, please [import seed phase](/guides-of-data-consensus/others/operation-references/common-operations/import-from-seed-phrase) or [import private key](/guides-of-data-consensus/others/operation-references/common-operations/import-from-private-key).

#### Stake for your validator account

Validator must stake at least 2100 $XSAT to become a qualified validator. Click [here ](/guides-of-data-consensus/others/operation-references/validator-operations/stake-for-validator-via-xbtc-staking-or-xsat-staking)to see how to stake for your validator account.&#x20;

### 3.2 Configurations

You can complete some client configurations or perform operations on your account:

* [Set BTC RPC Node](/guides-of-data-consensus/others/operation-references/common-operations/set-btc-rpc-node) (**required**)
* [Bridge BTC for gas fee ](/guides-of-data-consensus/others/operation-references/common-operations/refill-btc-for-gas-fees)(**required**)
* [Change Stake Address](/guides-of-data-consensus/others/operation-references/validator-operations/change-stake-address) (optional)
* [Export private key](/guides-of-data-consensus/others/operation-references/common-operations/export-private-key) (optional)
* [Remove your account](/guides-of-data-consensus/others/operation-references/common-operations/remove-your-account) (optional)
* [New version check](/guides-of-data-consensus/others/operation-references/common-operations/upgrade-to-new-version) (optional)

## 4. Execute the Client

Please ensure that you have [configured the BTC RPC Node](/guides-of-data-consensus/others/operation-references/common-operations/set-btc-rpc-node) and [bridged gas fee for your validator account](/guides-of-data-consensus/others/operation-references/common-operations/refill-btc-for-gas-fees).

There are several ways to start the client using Docker, differing in how the keystore password is provided. Choose the method you prefer.

Assuming the keystore file is stored at `$HOME/.exsat/goodvali_keystore.json`and the password is `123456` , the keystore file path in ".env" file should be look like:

```
VALIDATOR_KEYSTORE_FILE=/app/.exsat/goodvali_keystore.json
```

### Option 1 : Password stored in ".env"

&#x20;Please configure password in the `.env` file:

```
VALIDATOR_KEYSTORE_PASSWORD=123456
```

Then, start the Docker container with the following command:

```
docker run -d --restart always --name goodvali -v $HOME/.exsat/:/app/.exsat -e CLIENT_TYPE=validator exsatnetwork/exsat-client:latest
```

### Option 2 : Input password in the command

Start docker container with the password as parameter in the command:

```
docker run -d --restart always --name goodvali -v $HOME/.exsat/:/app/.exsat -e CLIENT_TYPE=validator -e VALIDATOR_KEYSTORE_PASSWORD=123456 exsatnetwork/exsat-client:latest
```

### Option 3 : Interactive Password Input

Start Docker in interactive mode and enter the password in the command line interface.

```
docker run -it --name goodvali -v $HOME/.exsat:/app/.exsat -e CLIENT_TYPE=validator exsatnetwork/exsat-client:latest
```

> Different startup methods vary in terms of security and convenience. If you start the client interactively and enter the password in the interface, the password won't be stored in plain text in the startup command or files, reducing the risk of exposure. However, if you provide the password in the `.env` file or directly in the command line, it may be more prone to leakage but offers greater convenience during startup.

Check [this guide](/guides-of-data-consensus/others/operation-references/common-operations/view-logs#running-with-docker) for detailed instructions on viewing the logs.

## 5. Check and claim rewards

You could [check and claim rewards](/guides-of-data-consensus/others/operation-references/validator-operations/stake-for-validator-via-xbtc-staking-or-xsat-staking#claim-rewards) on the front-page with the reward address.

## 6. Update to new Docker image

When exSat releases a new Docker version, you can upgrade to the latest version by running the following commands (assuming you have been following the previous steps).

```
docker pull exsatnetwork/exsat-client:latest
docker stop goodvali
docker rm goodvali
docker run -d --restart always --name goodvali -v $HOME/.exsat/:/app/.exsat -e CLIENT_TYPE=validator exsatnetwork/exsat-client:latest
```


# Run multiple XSAT Validators

If your company plans to operate multiple XSAT Validator nodes, follow this structured approach to streamline the process:

### Roles Within the Company

* **Operations Team**: Handles the initialization of XSAT Validator accounts and manages node operations.
* **Finance Team**: Manages XSAT (for staking) and BTC (for gas fees) and oversees the collection of XSAT rewards.

### Assumptions

1. You aim to run 10 nodes named `sat1`, `sat2`, `sat3`, ..., `sata` on a single server.

### Preparations Before Operation

#### **1. Server Setup**

For running 10 XSAT Validator nodes, the recommended server configuration is:

* **CPU**: 2 cores
* **RAM**: 8 GB
* **Disk**: 40 GB

Ensure that all necessary [software ](/guides-of-data-consensus/others/operation-references/preparation-before-you-start/prerequisites)is installed on the server.

#### **2. Account Setup**

The finance team should prepare the following accounts:

* **Stake Account**:
  * Should hold at least **21,000 XSAT** (2,100 XSAT per validator) for staking.
  * Should hold sufficient BTC to cover gas fees (approximately **0.0005 BTC** per validator per month according to current gas fee level).
  * **The private key for this EVM account is retained exclusively by the finance team**.
* **Temporary Account**:
  * Used specifically to pay network resource fees for creating XSAT Validator accounts.
  * Each XSAT Validator account requires **0.000102 BTC** (0.0001 BTC for creating the exSat Validator account and 0.000002 BTC for gas fee) for creation. For 10 validators, prepare at least **0.00102 BTC**.
  * **The private key for this account should be shared with the operations team to facilitate account creation**.

**3. BTC Node Setup**

A BTC node is required to provide BTC RPC services. Both full nodes and light nodes are supported. Follow [this ](/guides-of-data-consensus/others/operation-references/preparation-before-you-start/run-a-btc-node)to set up a BTC node.

### Batch Operation Steps

#### 1. Initialize the XSAT Validator Accounts

**Clone the Repository and Configure the `.env` File**

```
git clone https://github.com/exsat-network/batch-reg-xsat-validators
cd batch-reg-xsat-validators
cp .env.example .env
vim .env
```

**Configure the `.env` File**

Below is an example `.env` file. Update the values as needed. By default, it is configured for the mainnet, but you can modify it for the Hayek testnet if required.

```
# Network name | testnet
NETWORK=mainnet

# exsat node |testnet https://chain-tst3.exactsat.io
EXSAT_RPC_URLS=["https://rpc-us.exsat.network"]

# exsat-evm node and chainId | testnet https://evm-tst3.exsat.network
EVM_RPC_URL=https://evm.exsat.network

# exsat-evm node and chainId | testnet 839999
EVM_CHAIN_ID=7200

# Private key of the Tempory account - starts with 0x,needs sufficient BTC for creating exSat Validator accounts (e.g., 10*0.0001 BTC for 10 exSat Validators)
PRIVATE_KEY=0x00000000000

# Stake Address, needs sufficient $XSAT for staking & $BTC for refilling gas fees, starts with 0x
# Only Address is needed
STAKER_REWARD_ADDRESS=0x00000000000

# Path to the keystore files exsited,e.g.,"./keystores"
KEYSTORE_PATH="."

# Password for the keystore files generated.
# All keystore files share the same password
KEYSTORE_PASSWORD=123456

# rpc url of bitcoin node, configure the username and password if needed
BTC_RPC_URL=http://your-btc-rpc:8332
BTC_RPC_USERNAME=
BTC_RPC_PASSWORD=

# XSAT Validator account prefix to generate, 
# example: ACCOUNT_PREFIX=ex, the account name will be ex1.sat, ex2.sat, ex3.sat, ...
# the prefix can't be longer than 6 characters. 
# Charaters allowed: a-z, 1-5
ACCOUNT_PREFIX=ex

# Number of XSAT Validator accounts to generate
TOTAL=10

# Amount of xsat tokens for registering one xsat staker, don't modify this.
DEPOSIT_AMOUNT=2100000000000000000000

# testnet contract 0xe9C82be5C9eD3Cee4B99465Bec857395D0d0e502
XSAT_STAKE_HELPER_CONTRACT=0x10CECB61325db0C49201Fc72c50c27AeBd0Ac523

```

**Required Parameters:**

* **`PRIVATE_KEY`**: The private key of the "[Temporary Account](#id-2.-account-setup)**"**, which holds BTC for creating XSAT Validator accounts. To create 10 XSAT Validator accounts, ensure this account has a minimum balance of a little more than 0.001 BTC (10 × 0.0001 BTC)  and a little more BTC for gas fee).\
  Provide the private key starting with "0x" here.
* **`STAKER_REWARD_ADDRESS`**: The address of the "[Stake Account](#id-2.-account-setup)", which holds XSAT for staking and BTC for Validator gas fees.\
  To operate 10 XSAT Validators, ensure this account holds at least 21,000 XSAT (10 × 2,100 XSAT) and sufficient BTC to refilling gas fees for maintaining these validators.\
  At the current gas fee level, each XSAT Validator requires approximately 0.0005 BTC per month.\
  Just provide the EVM address of the Stake Account here.
* **`KEYSTORE_PATH`**: The directory path to store keystore files. Use a relative path, such as `./keystores`, as an example. \
  The keystore file securely stores the private key of the XSAT Validator account. It is encrypted and requires the "KEYSTORE\_PASSWORD" for decryption.
* **`KEYSTORE_PASSWORD`**: The password for the keystore files. All keystore files share the same password.
* **`BTC_RPC_URL`**: The URL of your BTC RPC node. If authentication is required, also provide:
  * `BTC_RPC_USERNAME`
  * `BTC_RPC_PASSWORD`
* **`ACCOUNT_PREFIX`**: The prefix for your XSAT Validator account names. The complete account names will include this prefix followed by sequential numbers or letters. e.g., If `ACCOUNT_PREFIX` is "ex" , the XSAT Validator names will be "ex1.sat", "ex2.sat", ... "exa.sat" in our example.\
  **Notes on `ACCOUNT_PREFIX`:**
  * The total length must not exceed **6 characters**.
  * It can only include lowercase letters (`a-z`) and numbers (`1-5`).
* **`TOTAL`**: The total number of XSAT Validators to create. For example, set this to `10` to run 10 validators.

{% hint style="info" %}

#### Why Separate the Temporary Account and Stake Account? Why Provide the Private Key for the Temporary Account but Only the Address for the Stake Account?

This separation ensures both security and convenience.

Organizations operating multiple XSAT Validators need a clear division of responsibilities between the operations and financial teams.

The operations team handles the deployment and management of XSAT Validators on servers. To streamline this process, the fees for registering XSAT Validator accounts are kept in the Temporary Account. The private key for this account is provided to the script used for batch registration, simplifying operations. Since the Temporary Account contains only enough funds for account registration, it's secure to supply the private key here.

In contrast, the Stake Account holds substantial funds, including XSAT for staking and BTC for gas fees, and is managed by the financial team. For enhanced security, only the Stake Account address is required. The financial team can connect the Stake Account to the dApp interface to perform staking and top up gas fees. Thus, providing just the Stake Account address in the script is sufficient and secure.
{% endhint %}

**Generate XSAT Validator Accounts**

Create the **`KEYSTORE_PATH`**&#x66;older, take "keystores" in current folder as example.

```
mkdir keystores
```

To generate XSAT Validator accounts, execute the following commands:

```bash
yarn install  
yarn cracc
```

This command performs the following actions:

1. **Generate Keystore Files**:
   * Creates a private key for each XSAT Validator.
   * Saves the private keys as encrypted keystore files in the `KEYSTORE_PATH` folder.
   * Secures each keystore file with the `KEYSTORE_PASSWORD`.
2. **Account Creation**:
   * Uses the **Temporary Account** to cover the on-chain resources required for account creation.
   * Uses the **Temporary Account** to Create the XSAT Validator accounts on-chain, with names prefixed by `ACCOUNT_PREFIX`.

After executing these commands, you will have 10 XSAT Validator accounts on the exSat network. The private keys of these accounts will be securely stored as keystore files in the `KEYSTORE_PATH` directory, and the keystore files will be encrypted with the `KEYSTORE_PASSWORD`.

<figure><img src="/files/EvREndy31BwceCLXTCLp" alt=""><figcaption></figcaption></figure>

#### 2. Stake for Validators and Refill Gas Fees

**This task should be handled by the financial team**.

1. Open the [Validators Portal ](https://portal.exsat.network/)and connect to your [Stake Account](#id-2.-account-setup).
2. [Stake XSAT for your XSAT Validator accounts](/guides-of-data-consensus/others/operation-references/validator-operations/stake-for-validator-via-xbtc-staking-or-xsat-staking) (2100 $XSAT each) and [refill their gas fees](/guides-of-data-consensus/others/operation-references/common-operations/refill-btc-for-gas-fees). At the current gas price level, each XSAT Validator requires approximately **0.0005 BTC per month** for gas fees.
3. Use the **"Switch"** button to toggle between different XSAT Validator accounts as needed.

{% hint style="warning" %}
The finance team can also [claim XSAT rewards](/guides-of-data-consensus/others/operation-references/validator-operations/stake-for-validator-via-xbtc-staking-or-xsat-staking#claim-rewards) directly on the same page.
{% endhint %}

<figure><img src="/files/8jwqXIv6joHdgFh1qpyN" alt="" width="375"><figcaption></figcaption></figure>

#### 3. Generate Docker Compose Configuration File and Run Containers in Batch

**Modify `ognize_cli.sh` File**

```
vim ognize_cli.sh
```

Modify the red parts in the `ognize_cli.sh` file

<figure><img src="/files/zjNKx32ruTmYuHElYJso" alt=""><figcaption></figcaption></figure>

* **`BASE_DIR`**:\
  Replace the portion after `:-` with the path specified in the `.env` file for `KEYSTORE_PATH.`

  ```bash
  BASE_DIR="${1:-./keystores}"
  ```
* **`NETWORK`**:\
  Ensure the value matches the `NETWORK` setting in the `.env` file.
* **`EXSAT_RPC_URLS`**:\
  Update this value to match the `EXSAT_RPC_URLS` in the `.env` file.
* **`KEYSTORE_PASSWORD`**:\
  Set this value to match the `KEYSTORE_PASSWORD` in the `.env` file.
* **`BTC_RPC_URL`**:\
  Provide the URL of your BTC RPC node.
  * If authentication is required, replace `"user"` and `"password"` in `BTC_RPC_USERNAME` and `BTC_RPC_PASSWORD` with your BTC RPC credentials.

**Execute the Following Commands:**

```bash
chmod +x ognize_cli.sh
./ognize_cli.sh
```

This command will do below actions:

1. Organize Keystore Files:
   * Creates a folder for each XSAT Validator account under the `KEYSTORE_PATH`.
   * Moves the keystore file for each Validator into its corresponding folder.
   * Generates an `.env` configuration file for each Validator to be used by Docker, you can [edit the .env file](/guides-of-data-consensus/others/operation-references/common-operations/environment-variables) if needed.
2. Generate `docker-compose.yml`:
   * Creates a `docker-compose.yml` file in the `KEYSTORE_PATH` directory for batch deployment of Docker containers.

After running these commands, the contents of the `KEYSTORE_PATH` directory will appear as follows:

<figure><img src="/files/CWHnDMJCKTODTyA8PSZb" alt=""><figcaption></figcaption></figure>

**Start Docker Containers:**

Enter the `KEYSTORE_PATH` folder and Run the command to start the containers. Ensure both Docker and Docker Compose are installed beforehand.

```
cd keystores
docker compose up -d
```

After executing the command, your 10 XSAT Validators will be running in Docker containers. You can monitor the logs for each Validator to verify their operations.

<figure><img src="/files/jlmwjnNnsAwCefoKE5lc" alt=""><figcaption></figcaption></figure>

If your Validator Client is operating correctly, the following logs should appear in Docker. Here's [how to view the Docker logs](/guides-of-data-consensus/others/operation-references/common-operations/view-logs#running-with-docker):

```
2025-02-28T12:25:23.325+00:00 info: ExsatApi initialized successfully.
2025-02-28T12:25:24.051+00:00 info: Validator[xsatval1.sat] client configurations are correct, and the startup was successful
2025-02-28T12:25:25.499+00:00 info: Endorse task is running
2025-02-28T12:25:26.158+00:00 info: Endorse task is finished
```


# Convert from Credit Staking Validator

### **Transitioning to BTC Staking Under the New exSat Consensus Protocol**

Validators currently using Credit Staking must transition to BTC Staking to continue participating in the exSat network consensus to earn $XSAT rewards under the new consensus protocol.

Key points to note:

* The new consensus protocol offers Validators a higher proportion of $XSAT rewards compared to before. Detailed reward rules will be shared in the forthcoming whitepaper.
* Credit Staking will be removed after the new consensus protocol is activated. Validators who do not transition to BTC Staking will lose eligibility to participate in the exSat consensus and will no longer earn $XSAT rewards.
* You can begin transitioning to BTC Staking immediately. Switching now will not impact your current rewards, and once the new reward rule takes effect, you will automatically receive the higher rewards.
* The transition process takes some time to complete. We recommend initiating the switch as soon as possible. Our team will assist you through the process to ensure your rewards remain unaffected during the transition.

### **Transition Process:**

Validators currently using Credit Staking must complete the staking transition process to qualify as BTC Validators under the exSat network. The process is as follows:

1. **Upgrade the Client:**\
   [Upgrade your Client ](/guides-of-data-consensus/others/operation-references/common-operations/upgrade-to-new-version)software to the latest version.
2. **Run the Client and Set the Stake Address:** \
   Launch the upgraded Client and [configure your Stake Address](/guides-of-data-consensus/others/operation-references/validator-operations/change-stake-address). The 100 $BTC initial stake must be initiated from this **Stake Address**.
3. **Bridge 100 $BTC to the exSat Network:** \
   Bridge 100 $BTC to the exSat network to your configured **Stake Address**. Please **contact your BD Manager for assistance** in completing the cross-chain process.\
   You could use the 100 $BTC currently allocated for Credit Staking, but ensure you communicate with the exSat team beforehand. We will deactivate balance monitoring for your Credit Staking address to prevent Validator disqualification during the transition.
4. **Stake 100 $BTC:** \
   [Stake ](/guides-of-data-consensus/others/operation-references/validator-operations/stake-for-validator-via-xbtc-staking-or-xsat-staking)100 $BTC with Stake Address to your Validator.

Once the staking transition is completed, your Validator will be upgraded to a BTC Validator under the new exSat consensus protocol.

{% hint style="info" %}
When performing staking operations, make sure to connect your wallet using the ***Stake Address*** on the staking page to complete the process.&#x20;

* If your *Stake Address* is different from your *Reward Address*. In this case, you will see the *Stake Reward* displayed as 0, and the *Commission* cannot be claimed. However, if you switch to connecting with your *Reward Address*, you will be able to view the accumulated *Stake Rewards* and claim them.
* If your *Stake Address* and *Reward Address* are the same, you will see the *Stake Reward* and *Commission*, and you will be able to claim the rewards directly.
  {% endhint %}

**How to Confirm Successful Staking Conversion**\
If you are using *Credit Staking*, the [staking page](https://portal.exsat.network/) will display a notification indicating your current use of *Credit Staking* and recommending that you switch to *BTC Staking* as soon as possible. Once you have successfully completed *BTC Staking*, this notification will no longer appear on the staking page.

<figure><img src="/files/24xNPC1VV7wBvIUxOe7j" alt="" width="371"><figcaption></figcaption></figure>

### Effects

#### Important Notes on Rewards After Transition:

* **Commission Rewards:** Remain claimable by your configured [Commission Address](/guides-of-data-consensus/others/operation-references/validator-operations/change-reward-address).
* **Staking Rewards:** Claimable by your [Stake Address](/guides-of-data-consensus/others/operation-references/validator-operations/change-stake-address).

#### Important Reminder:

1. **Failure to Transition**\
   If you do not complete the above steps and participate in the new exSat BTC staking, your Credit Staking will be canceled when the exSat consensus upgrades to new version. This will disqualify you from participating in the new exSat consensus mechanism and earning further rewards.
2. **Effects of staking transition**\
   After completing the BTC staking process:
   * Your existing Credit Staking will be automatically canceled.
   * **All accumulated rewards (both commission and staking rewards) will be automatically claimed to your configured Reward Address**.

### Understand new consensus

To fully understand the upgraded consensus, please review the following documents:

* How the [Data Consensus Protocol](/approach/architecture/data-consensus-protocol) Works
* [Requirements and Rewards for BTC Validators](/guides-of-data-consensus/run-a-btc-validator/requirements-and-rewards-for-btc-validators)
* [Guide to Running a BTC Validator](/guides-of-data-consensus/run-a-btc-validator/run-as-btc-validator)


# Others


# Operation references

## Download the Client

Execute the following command to clone the repository :

```
git clone -b test https://github.com/exsat-network/exsat-client
```

## Build the client

```
cd exsat-client
yarn install && yarn build
```

## Edit the .env configuration file

Please generate ".env" file by coping from ".env.example":

```
cp .env.example .env
```

If you're following all the [below steps](#execute-the-client), you don't need to modify the .env file.

If you already have a keystore file and wish to [run the client directly](#execute-the-client), you may wish to configure below items:

```
BTC_RPC_URL=
SYNCHRONIZER_KEYSTORE_FILE=
SYNCHRONIZER_KEYSTORE_PASSWORD=
```

Please find the details of the configurations [here](/guides-of-data-consensus/others/operation-references/common-operations/environment-variables).

## Execute the client

### 1. Initiate the synchronizer account

#### Create or import the account

If you don't have a synchronizer account, please [create a new account](/guides-of-data-consensus/others/operation-references/synchronizer-operations/create-new-synchronizer-account).

If you already have a synchronizer account, and wish to import it to your client, please [import seed phase](/guides-of-data-consensus/others/operation-references/common-operations/import-from-seed-phrase) or [import private key](/guides-of-data-consensus/others/operation-references/common-operations/import-from-private-key).

#### Register account as synchronizer

If you didn't register your account as synchronizer, please [register as synchronizer.](/guides-of-data-consensus/others/operation-references/synchronizer-operations/synchronizer-registration)

#### Set Reward Address

If you didn't set reward address for your synchronizer account, please [set reward address](/guides-of-data-consensus/others/operation-references/synchronizer-operations/change-reward-address).

### 2. Configurations

You can complete some client configurations or perform operations on your account:

* [Set BTC RPC Node](/guides-of-data-consensus/others/operation-references/common-operations/set-btc-rpc-node) (**must**)
* [Bridge BTC for gas fee ](/guides-of-data-consensus/others/operation-references/common-operations/refill-btc-for-gas-fees)(optional)
* [Export private key](/guides-of-data-consensus/others/operation-references/common-operations/export-private-key) (optional)
* [Remove your account](/guides-of-data-consensus/others/operation-references/common-operations/remove-your-account) (optional)
* [New version check](/guides-of-data-consensus/others/operation-references/common-operations/upgrade-to-new-version) (optional)

### 3. Execute the client

Once the above operations are completed, your account and client are ready, and you can [start it for long-term running](#execute-the-client).

### 4. Check and claim rewards

You could [check and claim rewards ](/guides-of-data-consensus/others/operation-references/synchronizer-operations/check-and-claim-rewards-for-synchronizer)on the front-page with the reward address.


# Preparation Before You Start

Please perform and check these initializations before running the client as a Synchronizer or Validator.


# Account Preparation

You need to prepare some accounts, which will be used later for registration and running the exSat client. You can use the same EVM address for all the requirements, no registration on exSat is required for all these EVM addresses. You can use an existing EVM address from other networks, such as Ethereum. If you don't already have an EVM address, refer to [this guide](https://support.metamask.io/managing-my-wallet/accounts-and-addresses/how-to-add-accounts-in-your-wallet/) to create one using MetaMask. You can follow [this guide](/user-guides/bridge-your-assets) to bridge $BTC to your EVM address.

### For Synchronizers <a href="#account-preparation-for-synchronizer" id="account-preparation-for-synchronizer"></a>

* **An EVM address for receiving XSAT rewards**: \
  This is an EVM address, typically managed by the financial officer. All Synchronizer rewards will be distributed to this address, and the financial officer can use it to claim rewards.&#x20;

### For Validators <a href="#account-preparation-for-validator" id="account-preparation-for-validator"></a>

* **A EVM address with at least 100 $BTC for BTC validators or 2100 $XSAT for EXSAT validators**: \
  To become a validator and take part in the exSat consensus, you must stake at least 100 $BTC to become a qualified BTC validator or 2100 $EXSAT to become a qualified EXSAT validator. \
  You can [bridge $BTC to your EVM address](/user-guides/bridge-your-assets) , or buy $XSAT from the market.\
  Please note that if you wish to run both a BTC Validator and an XSAT Validator, you must register separate accounts for each.
* **An account for receiving XSAT rewards**: \
  This is an EVM address, typically managed by the financial officer. All Validator rewards will be distributed to this address, and the financial officer can use it to claim rewards. <br>


# Run a BTC node

## Hardware Requirement

Recommended Configuration:

* CPU: 4 Cores
* RAM: 8GB
* System Disk: 30GB
* Data Disk: 1TB
* Data traffic：
  * The initial sync : 600 GB, takes about 6 days.
  * Monthly: 200 GB

Refer to the AWS Virginia cloud service pricing: approximately 80 USD/month.&#x20;

Prices in Asia may be higher.

### Run the BTC node

#### BTC mainnet

Please refer to the commands [here ](https://github.com/exsat-network/exsat-initialize-data?tab=readme-ov-file#set-up-the-btc-fullnode)to run a **full** Bitcoin node.

Please refer to the commands [here ](https://github.com/exsat-network/exsat-initialize-data?tab=readme-ov-file#set-up-the-mainnet-btc-prune-node)to run a **light** Bitcoin node.

#### BTC test3 net

Please refer to the commands [here ](https://github.com/exsat-network/exsat-initialize-data?tab=readme-ov-file#set-up-the-btc-fullnode)to run a Bitcoin test3 full node. Please be aware to change the script mentioned in the notes.


# Environment requirements

## Hardware Requirement

Recommended Configuration:

* CPU: 2 Cores
* RAM: 4GB
* Disk: 50GB

## Operation System

Recommend to use Ubuntu 22.04.4 LTS. Other supported Linux OS version:

* CentOS 7
* CentOS 7.x
* CentOS 8
* Ubuntu 18.04
* Ubuntu 20.04
* Ubuntu 22.04

## Tools Required

* SSH Terminal: iTerm
* EVM Wallet: Metamask


# Prerequisites

Some commands may need the root account permission to execute, please use sudo as needed, or just start the client as root:

```
sudo -i
```

### Running from source code

If you wish to run the client from source code, please install the following dependences.

### Node.js

Running the Client requires installing Node.js.&#x20;

#### Check if Node.js is Installed

Open a terminal window.

To check if Node.js is installed, run the following command:

```
node -v
```

If Node.js is installed, the terminal will display the version number, such as `v20.15.1`.

1. If Node.js is installed, ensure that the version is `20.15.1` or higher.
2. If the installed version is lower than `20.15.1` or it is not installed, proceed to the installation below.

#### Install Node.js Version 20.15.1

To install Node.js version 20.15.1, first ensure your system is updated:

```
sudo apt update
```

Install Node.js from the NodeSource repository:

```
curl -fsSL https://deb.nodesource.com/setup_20.x | sudo -E bash -
sudo apt install -y nodejs
```

Verify the installation by checking the Node.js version again:

```
node -v
```

This should return v20.15.1 or a higher version if installed successfully.

### Git

#### Check if Git is Installed

To check if Git is installed, run the following command in the terminal:

```
git --version
```

If Git is installed, the terminal will display the version number, such as `git version 2.25.1`.

#### Install Git if Not Installed

If Git is not installed, you can install it by running the following commands:

```
sudo apt update
sudo apt install -y git
```

Verify the installation by checking the Git version:

```
git --version
```

This should return the version number of Git, confirming the installation.

​&#x20;

### Yarn

#### Check if Yarn is Installed

Open a terminal window.

Check if Yarn is installed by running:

```
yarn -v
```

#### Install Yarn if Not Installed

If Yarn is not installed, add the Yarn repository and install it:

```
npm install -g yarn
```

Verify the installation by checking the Yarn version:

```
yarn -v
```

By following these steps, you will ensure that both Node.js (version `20.15.1` or higher) ,Git and Yarn are installed and properly configured on your system.

### Running with Docker

If you wish to run the client with docker, please install docker.

1. **Download and Run the Official Installation Script**

   Docker provides a convenient installation script that you can download and run with the following commands:

   ```sh
   curl -fsSL https://get.docker.com -o get-docker.sh
   sh get-docker.sh
   ```
2. **Verify the Docker Installation**

   Check the Docker version to confirm that the installation was successful:

   ```sh
   docker --version
   ```


# Synchronizer operations


# Create New Synchronizer Account

If you're running from source code, please execute "yarn start-commander" to run the client. If you're running with docker, please skip this.

```
yarn start-commander
```

If you don't have an account, please select "Create New Account" to create one.\
If you already have an account, you could import it by choosing "[Import Seed Phase](/guides-of-data-consensus/others/operation-references/common-operations/import-from-seed-phrase)" or "[Import Private Key](/guides-of-data-consensus/others/operation-references/common-operations/import-from-private-key)".

<figure><img src="/files/G6R8cAyb9JtKcB85q0u3" alt=""><figcaption></figcaption></figure>

After selected "Create New Account", you'll be asked to input the user name. Here we take "synctest" as example.

<figure><img src="/files/JQ13CnJFev0e67nmmDhI" alt=""><figcaption></figcaption></figure>

Seed phrase will be created, the private key of your account will be generated from the seed phrase, please save it carefully , and input "yes" if you have saved it.

<figure><img src="/files/Ff3ilso8UnDS7jvJkUMp" alt=""><figcaption></figcaption></figure>

New key pair will be generated, the private key will be encrypted and stored in the keystore file. please set passward for the keystore file, you can choose whether to save the password in the ".env" file (not recommended for security) .

<figure><img src="/files/CRLR5J9vDchDZzoNQ1tL" alt=""><figcaption></figcaption></figure>

Then select a directory to store the keystore file. Please remember to **backup this file**.

You could select a directory ,choose the root directory, or mannually input a path.

If you're running the client in the **docker,** be sure that the path you choosed is mapped to the host machine. Otherwise, if you remove the Docker container, the keystore file will be lost, and you will need to regenerate the keystore file by importing the seed phrase or private key. It's suggested to choose the home path (the 1st option in the menu) .

<figure><img src="/files/YkQiEtLdkIxAS2c0kShs" alt=""><figcaption></figcaption></figure>

After selecting the path for the keystore file, you will need to enter its password to save the file. Once this is done, the following information will be displayed:

* **Account Name**: The account name of your synchronizer, which is the username you entered, ending with ".sat".
* **Public Key**: The public key associated with your synchronizer account, which's generated from the seed phrase.
* **Registration URL**: A registration URL containing all the necessary information to register a native account for your synchronizer.

**Important:** Your registration is not yet complete. You must open the "Registration URL" in a browser and pay the registration fee to finalize the account registration.  You can return to the Client and click **Enter** to proceed after completing the payment of the registration fee. If you have closed the Client, simply restart it to continue.

<figure><img src="/files/Knv9hEsJJMG1kjXemn3I" alt=""><figcaption></figcaption></figure>

After opening the Registration URL, you will see a dedicated payment interface for registering the Synchronizer account you just applied for. Connect your EVM wallet (e.g., via MetaMask) and click **"Approve and Pay"** to complete the registration payment. If you don’t yet have $BTC in your EVM address, you can [bridge BTC to the exSat network](/user-guides/bridge-your-assets) first.

<figure><img src="/files/oMlSmNWt22dLNjmNWE7k" alt="" width="355"><figcaption></figcaption></figure>

{% hint style="info" %}
**Why is there an account registration fee?**\
The registration fee is necessary because user registration on the exSat native network incurs operational costs. By requiring users to bear this cost, it also serves as a deterrent against Sybil attacks, ensuring the network's security and integrity.
{% endhint %}

After completing the account creation, follow the instructions provided [here ](/guides-of-data-consensus/others/operation-references/synchronizer-operations/synchronizer-registration)to register as Synchronizer. Once finished registering, you can run the client to view detailed information and configure your Synchronizer account further.

<figure><img src="/files/Uc1kY45qMFKB97EUv5VP" alt=""><figcaption></figcaption></figure>


# Synchronizer Registration

To register as a Synchronizer, you need to complete two steps:

1. Register for the whitelist via GitHub.
2. Add an OP\_RETURN to the coinbase transaction.

### Register for the whitelist via GitHub

Provide the following information to exSat by submitting an issue on this [GitHub repository](https://github.com/exsat-network/configurations):

* Your mining pool name
* Synchronizer account (Created [here](/guides-of-data-consensus/others/operation-references/synchronizer-operations/create-new-synchronizer-account))
* Reward address (an EVM address receives the XSAT rewards)

Once exSat verifies your informations, your Synchronizer account will be added to the whitelist. Only Bitcoin miners on this whitelist who include an [OP\_RETURN ](#register-on-chain-via-op_return-1)in the coinbase transactions of their mined blocks can submit Bitcoin block data to the exSat network.

Below is a template for the issue submission, using sample data:

```
Issue Title:[Mining Pool's Name]Submit mining pool registration information 

Content:
Please provide the following information for Synchronizer.

Registration info:
*Mining pool name: cool pool
*Synchronizer Account: coolpool.sat
Reward Account: 0xee37064f01Ec9314278F4984fF4B9B695EB91912

Display info in Frontend:
*Name: CoolPool
*Logo url: https://cool.network/img/logo.png
Homepage url: https://coolpool.com
Introduction: A cool pool.
```

All information marked with an asterisk (\*) is required.

{% hint style="info" %}
Logo Supports PNG and SVG. The recommended minimum size for Logo is 128\*128 pixels and the file size should be less than or equal to 1MB. Otherwise, the image will not be merged, and a comment will be left to remind the user to re-upload the logo.

Please use a version of your logo that is clearly visible against a black background.

If you didn't supply reward account in the "Registration info" part, you could also configure the reward account via running the client.
{% endhint %}

{% hint style="info" %}
**Why is Manual Assistance Required for Synchronizer Registration?**

The number of Bitcoin mining pools that meet exSat’s requirements is limited, and these are typically well-established, reputable pools. To become a Synchronizer, mining pools must [include specific OP\_RETURN data](/guides-of-data-consensus/others/operation-references/synchronizer-operations/synchronizer-registration) in the coinbase transactions of the Bitcoin blocks they mine—an essential step for completing registration.

Synchronizers are vital to the security and stability of the exSat network. As such, the exSat team works closely with mining pools interested in becoming Synchronizers. This collaboration ensures that all technical preparations are completed and that the pools are fully equipped to perform Synchronizer duties effectively.
{% endhint %}

### Register on-chain via OP\_RETURN

The exSat network needs to verify the following information during its operation:

1. Whether a Synchronizer has mined any Bitcoin blocks within the most recent 432 blocks, thereby qualifying as a **Qualified Synchronizer**.
2. If a Bitcoin block is mined by a specific Synchronizer, that Synchronizer could receive up to 20% of the rewards for that block.

To enable this verification, Synchronizers must include a unique **OP\_RETURN** marker in the coinbase transaction of the Bitcoin blocks they mine. This marker identifies the block as being mined by the Synchronizer. The format of the OP\_RETURN is as follows:

OP\_RETURN + LENGTH + EXSAT + VERSION + SYNCHRONIZER ACCOUNT

* **OP\_RETURN**: 0x6a
* **LENGTH**: 1 byte, 0x12, the total length (in bytes) of the content excluding OP\_RETURN and LENGTH
* **EXSAT**: 0x4558534154 (UTF-8 encoding)
* **VERSION**: 0x01
* **SYNCHRONIZER ACCOUNT**: The account registered at [this step](/guides-of-data-consensus/others/operation-references/synchronizer-operations/create-new-synchronizer-account). For example, if the account name is <mark style="color:green;">xsatsync.sat</mark>, the encoded content would be: <mark style="color:green;">1712001312180d021f120013</mark>.  [Link](https://github.com/exsat-network/bitcoin-script-test/blob/tbtc/account_encode.ts) of the reference code to this for encoding and decoding.

**Example:**

Concatenate the above content to obtain: 6a124558534154011712001312180d021f120013

Refer to an on-chain transaction:[http://mempool.regtest.exactsat.io/zh/tx/98ddd977f8b350455e26f6e2646a4fcad86d682a520f31ddfbe6e8268f6eefe](http://mempool.regtest.exactsat.io/zh/tx/98ddd977f8b350455e26f6e2646a4fcad86d682a520f31ddfbe6e8268f6eefe3)

**Online Tool** :\
[Here](https://op-return.exactsat.io/) is a online tool that can help you quickly generate the content of OP\_RETURN. You just need to enter your <mark style="color:green;">exsat synchronizer account</mark> to get the complete OP\_RETURN content.&#x20;

For example, if you enter <mark style="color:green;">xsatsync.sat</mark> and click the "Generate OP\_RETURN content" button, the complete OP\_RETURN encoded content will be generated: <mark style="color:green;">6a124558534154011712001312180d021f120013</mark>.

<figure><img src="/files/dLGUZxFb7OxbAVfR1T96" alt="" width="375"><figcaption></figcaption></figure>


# Execute the synchronizer client

Please make sure you have [initialized the account](https://docs.exsat.network/guides-of-data-consensus/others/operation-references/synchronizer-operations/pages/rMO1Rj4Sf31ScbEKKq64#id-1.-initiate-the-synchronizer-account) and [configured the BTC RPC node](/guides-of-data-consensus/others/operation-references/common-operations/set-btc-rpc-node).

### **Simple Execution**

You can start the Synchronizer Client with the following command:

```
yarn start-synchronizer
```

Since the Synchronizer Client requires the private key of the Synchronizer account (encrypted in the keystore file) to sign the transactions, you need to provide the keystore file's password at runtime. There are many ways to input the password:

1. **Using the `--pwdFile` parameter**\
   Save the password in a file, then pass the file path using the `--pwdFile` parameter when starting the client.\
   For example, if the password `123456` is saved in `/home/exsat/password`, you can start the client with:

   ```bash
   yarn start-synchronizer --pwdFile=/home/exsat/password
   ```
2. **Storing it in the `.env` file**\
   Save the keystore password directly in the `.env` file. For example:

   ```bash
   SYNCHRONIZER_KEYSTORE_PASSWORD=123456
   ```

   Then directly start the Client：

   ```bash
   yarn start-synchronizer
   ```
3. **Inputting it during runtime**\
   Simply run the Client:

   ```bash
   yarn start-synchronizer
   ```

   The Client will prompt you to enter the keystore file password manually.

**Considerations**

* Options 1 and 2 expose the keystore password directly, making them less secure.
* Option 3 does not expose the password but requires manual input each time the client is restarted, which is complicated for auto execution.

Choose the password input method that best suits your security and operational requirements.

{% hint style="info" %}
While running the Client directly is straightforward, it is rarely used in practice. This is because processes running on Linux can sometimes be terminated by the system for various reasons. To ensure the Client runs continuously over an extended period, it is recommended to use tools that keep programs running in the background. Common tools for this purpose include **pm2** and **screen**.
{% endhint %}

### Using pm2

PM2 is a process manager for Node.js applications on Linux, allowing you to easily manage, monitor, and keep applications running in the background. You could execute below command to run the Synchronizer client using pm2.

Please ensure that the password of the kesytore is properly configured.

```
pm2 start ecosystem.config.js --only synchronizer
```

### Using Screen

The `Screen` command in Linux allows you to run commands in the background, keeping them active even after you disconnect from the terminal session.&#x20;

You could execute below command to run the Synchronizer client , and manully input the password of the keystore. This approach helps prevent your password from appearing in plain text in configuration files or command lines, reducing the risk of password exposure.

```
screen -R synchronizer
yarn start-synchronizer
#input the password
```

You can also start the Synchronizer Client using Screen with the keystore password saved in a file or in the .env file. Take using `--pwdFile`parameter as an example:

```
screen -R synchronizer
yarn start-synchronizer --pwdFile=/root/.exsat/synchronizer/password
```

### Verify Execution

If your Synchronizer Client is running correctly, the following logs should appear on your screen:

```
2025-02-28T12:34:59.176+00:00 info: ExsatApi initialized successfully.
2025-02-28T12:34:59.934+00:00 info: synchronizer[synctest.sat] client configurations are correct, and the startup was successful
2025-02-28T12:35:00.939+00:00 info: Upload block task is running
2025-02-28T12:35:00.942+00:00 info: Verify block task is running
2025-02-28T12:35:00.945+00:00 info: Parse block task is running
```

### View Logs

Refer to [this guide](https://docs.exsat.network/guides-of-data-consensus/others/operation-references/synchronizer-operations/pages/2dVzpmzARYY6glEExKva#configuring-.env-to-save-logs-to-file) to learn how to save logs to file.


# Revote For Consensus

When the consensus between BTC Validators and XSAT Validators is inconsistent, the system halts at the block height where the divergence occurs until the issue is resolved. In such cases, Synchronizers must determine whether to initiate [a re-vote for the current block](/approach/architecture/data-consensus-protocol/hybrid-consensus-mechanism#solutions-to-address-consensus-issues). If more than half of the Synchronizers agree that a re-vote is necessary, the exSat network will initiate a re-vote. During this process, new BTC and XSAT Validator nodes can join and participate in the voting, enabling the system to resolve the disagreement and achieve consensus. Synchronizers can initiate the re-vote request through their clients.

#### 1. Navigate to the "Revote For Consensus" menu <a href="#id-1.-navigate-to-the-set-donation-ratio-menu" id="id-1.-navigate-to-the-set-donation-ratio-menu"></a>

If you're running from source code, please execute "yarn start-commander" to run the client.

```
yarn start-commander
```

If you're running with Docker, please use the following commands to run it in interactive mode (assume the container name is commander)

```
docker rm commander
docker run -it --name commander -v $HOME/.exsat/:/app/.exsat -e CLIENT_TYPE=commander exsatnetwork/exsat-client:latest
```

Select the "Revote For Consensus" option from the menu.

Synchronizer -> Revote For Consensus

<figure><img src="/files/BjuHJr38cVJ8dqtHJXzT" alt=""><figcaption></figcaption></figure>

#### 2. Perform the "Revote For Consensus" action <a href="#id-2.-perform-the-set-donation-ratio-action" id="id-2.-perform-the-set-donation-ratio-action"></a>

You can input the Bitcoin block height for which you want to initiate a re-vote and press Enter to submit the request. Once more than half of the Synchronizers submit a re-vote request for the same block height, the re-vote will be executed.

<figure><img src="/files/ePIJuf5bNU7tVZ8SRGKf" alt=""><figcaption></figcaption></figure>


# Change Reward Address

### 1. Navigate to the "Set Reward Address" menu

If you're running from source code, please execute "yarn start-commander" to run the client.&#x20;

```
yarn start-commander
```

If you're running with Docker, please use the following commands to run it in interactive mode (assume the container name is commander)

```
docker rm commander
docker run -it --name commander -v $HOME/.exsat/:/app/.exsat -e CLIENT_TYPE=commander exsatnetwork/exsat-client:latest
```

Then perform the "Change Reward Address" action by choose :&#x20;

Synchronizer -> Change Reward Address

### 2. Perform the "Change Reward Address" action

After registered , Synchronizer can change the Reward Address, and all XSAT rewards will be distributed to this account. The Reward Address is an **EVM format address**, and the owner of the Reward Address can claim XSAT rewards on the front-end page.

<figure><img src="/files/0pwPqqTviktPfQdp6xje" alt=""><figcaption></figcaption></figure>


# Check and claim rewards for synchronizer

## Before the "BTC & XSAT Staking" phase

XSAT rewards are distributed to the Reward Address set [here](/guides-of-data-consensus/others/operation-references/synchronizer-operations/change-reward-address).&#x20;

You can connect your Reward Address to the exSat dApp [using MetaMask](/user-guides/wallet-setup).

Please visit [https://exsat.network/app/synchronizers/<mark style="color:red;">a</mark>](https://exsat.network/app/synchronizers/spider.sat)<mark style="color:red;">ccount.sat</mark> to check and claim your rewards.\
Please note to replace <mark style="color:red;">`account.sat`</mark> with your synchronizer account.

Alternatively, you can find your account on [this page](https://exsat.network/app/synchronizers) and click on it to view your rewards, and click on the "Claim" button to claim it.

<figure><img src="/files/aNa3RRdWqHGmjuA9QWIP" alt=""><figcaption></figcaption></figure>

## After the "BTC & XSAT Staking" phase

XSAT rewards are distributed to the Reward Address set [here](/guides-of-data-consensus/others/operation-references/synchronizer-operations/change-reward-address).&#x20;

Please visit <https://portal.exsat.network/> with your reward address to check and claim your rewards. You could also recharge gas fee for your Synchronizer account on this page.

<figure><img src="/files/1dBZr1VKhyXUKgw0pBGy" alt="" width="282"><figcaption></figcaption></figure>


# Update to new Docker version for Synchronizer

Synchronizer Docker has two operating modes:

1. **Interactive mode** (e.g., for creating a new account)
2. **Long-running mode** (for continuous background operation)

Both modes use the same Docker image. After updating the Docker image, use the appropriate commands to restart each mode.

#### Interactive Mode

To upgrade to the latest exSat Docker version and perform interactive operations (assuming the container is named "commander"), run the following:

```bash
docker pull exsatnetwork/exsat-client:latest
docker stop commander
docker rm commander
docker run -it --name commander -v $HOME/.exsat/:/app/.exsat -e CLIENT_TYPE=commander exsatnetwork/exsat-client:latest
```

#### Long-Running Mode

For continuous operation (assuming the container is named "synchronizer"), use these commands to update Docker:

```bash
docker pull exsatnetwork/exsat-client:latest
docker stop synchronizer
docker rm synchronizer
docker run -d --restart always --name synchronizer -v $HOME/.exsat/:/app/.exsat -e CLIENT_TYPE=synchronizer exsatnetwork/exsat-client:latest
```


# Validator operations


# Create New BTC Validator Account

If you're running from source code, please execute "yarn start-commander" to run the client. If you're running with docker, please skip this.

```
yarn start-commander
```

If you don't have an account, please select "Create New Account" to create one.\
If you already have an account, you could import it by choosing "[Import Seed Phase](/guides-of-data-consensus/others/operation-references/common-operations/import-from-seed-phrase)" or "[Import Private Key](/guides-of-data-consensus/others/operation-references/common-operations/import-from-private-key)".

<figure><img src="/files/pELoVpgOLYGHpEIGb3CT" alt=""><figcaption></figcaption></figure>

After selected "Create New Account", you'll be asked to input the user name. Here we take "btcvali" as example.

<figure><img src="/files/Qj7gSTtAazFY9LuPY38a" alt=""><figcaption></figcaption></figure>

Seed phrase will be created, the private key of your account will be generated from the seed phrase, please save it carefully , and input "yes" if you have saved it.

<figure><img src="/files/kU8ljZo8dWMCMNtrZBxB" alt=""><figcaption></figcaption></figure>

New key pair will be generated, the private key will be encrypted and stored in the keystore file. please set passward for the keystore file, you can choose whether to save the password in the ".env" file (not recommended for security) .

<figure><img src="/files/1sNGkaeX62YmzpHOtcfH" alt=""><figcaption></figcaption></figure>

Then select a directory to store the keystore file. Please remember to **backup this file**.

You could select a directory ,choose the root directory, or mannually input a path.

If you're running the client in the **docker,** be sure that the path you choosed is mapped to the host machine. Otherwise, if you remove the Docker container, the keystore file will be lost, and you will need to regenerate the keystore file by importing the seed phrase or private key. It's suggested to choose the home path (the 1st option in the menu) .

<figure><img src="/files/6QAXDlMQBhJyOaL8GAgD" alt=""><figcaption></figcaption></figure>

After selecting the path for the keystore file, you will need to enter its password to save the file. Once this is done, the following information will be displayed:

* **Account Name**: The account name of your BTC validator, which is the username you entered, ending with ".sat".
* **Public Key**: The public key associated with your synchronizer account, which's generated from the seed phrase.
* **Registration URL**: A registration URL containing all the necessary information to register a native account for your synchronizer.

**Important:** Your registration is not yet complete. You must open the "Registration URL" in a browser and pay the registration fee to finalize the account registration. You can return to the Client and press **Enter** to proceed after completing the payment of the registration fee. If you have closed the Client, simply restart it to continue.

<figure><img src="/files/MaZqlOuDFITRnBZUQYqB" alt=""><figcaption></figcaption></figure>

After opening the Registration URL, you will see a dedicated payment interface for registering the BTC Validator account you just applied for. Connect your EVM wallet (e.g., via MetaMask) and click **"Approve and Pay"** to complete the registration payment. If you don’t yet have $BTC in your EVM address, you can [bridge BTC to the exSat network](/user-guides/bridge-your-assets) first.

<figure><img src="/files/57T4gXeIt7PRxow7ZgRU" alt="" width="356"><figcaption></figcaption></figure>

To complete creating account on the Registeration URL, you need to pay the registration fee from any EVM-compatible address with sufficient BTC balance. If you don’t yet have $BTC on exSat, you can [bridge BTC to the exSat network](/user-guides/bridge-your-assets) first.

{% hint style="info" %}
**Why is there an account registration fee?**\
The registration fee is necessary because user registration on the exSat native network incurs operational costs. By requiring users to bear this cost, it also serves as a deterrent against Sybil attacks, ensuring the network's security and integrity.
{% endhint %}

After created the BTC Validator account, return to the exsat client to register the account as a BTC Validator. If you have closed it, just run it again. After selected the role of **BTC Validator**, confirm to proceed with setting up your Validator profile:

<figure><img src="/files/FXyiv5MIWlBwIivjWrZ8" alt=""><figcaption></figcaption></figure>

<figure><img src="/files/vvSgy8qNtbHBiVEXfhGL" alt=""><figcaption></figcaption></figure>

Please provide the following configurations for your BTC Validator (these settings can be updated later if necessary):

* **Staking Address**: An EVM address with a minimum balance of 100 $BTC on the exSat network. This address will be used for the initial 100 $BTC staking required to qualify your Validator.
* **Commission Address**: An EVM address where commissions collected from delegate stakers will be sent. Click [here ](/guides-of-data-consensus/run-a-btc-validator/requirements-and-rewards-for-btc-validators#xsat-rewards-distribution)for more details about commission.
* **Commission Rate**: The percentage of rewards retained by the Validator as commission from delegate stakers, adjustable from 0% to 100%.

Once you have entered these parameters and pressed Enter, your BTC Validator will be successfully registered on the exSat network. You will then be able to access detailed information about your BTC Validator account and perform additional actions as needed.

<figure><img src="/files/zIEhPNvkYoiEvHstXOZE" alt=""><figcaption></figcaption></figure>


# Create New XSAT Validator Account

If you're running from source code, please execute "yarn start-commander" to run the client. If you're running with docker, please skip this.

```
yarn start-commander
```

If you don't have an account, please select "Create New Account" to create one.\
If you already have an account, you could import it by choosing "[Import Seed Phase](/guides-of-data-consensus/others/operation-references/common-operations/import-from-seed-phrase)" or "[Import Private Key](/guides-of-data-consensus/others/operation-references/common-operations/import-from-private-key)".

<figure><img src="/files/v4jdbiypV9vAygYxpZPB" alt=""><figcaption></figcaption></figure>

After selected "Create New Account", you'll be asked to input the user name. Here we take "xsatvali" as example.

<figure><img src="/files/g0maE7bAtjNnLxusDJ0a" alt=""><figcaption></figcaption></figure>

Seed phrase will be created, the private key of your account will be generated from the seed phrase, please save it carefully , and input "yes" if you have saved it.

<figure><img src="/files/o6pjNWm9Kb44OQNGcZKE" alt=""><figcaption></figcaption></figure>

New key pair will be generated, the private key will be encrypted and stored in the keystore file. please set passward for the keystore file, you can choose whether to save the password in the ".env" file (not recommended for security) .

<figure><img src="/files/QVscXfwTwcIYlLdw7NiO" alt=""><figcaption></figcaption></figure>

Then select a directory to store the keystore file. Please remember to **backup this file**.

You could select a directory ,choose the root directory, or mannually input a path.

If you're running the client in the **docker,** be sure that the path you choosed is mapped to the host machine. Otherwise, if you remove the Docker container, the keystore file will be lost, and you will need to regenerate the keystore file by importing the seed phrase or private key. It's suggested to choose the home path (the 1st option in the menu) .

<figure><img src="/files/6QAXDlMQBhJyOaL8GAgD" alt=""><figcaption></figcaption></figure>

After selecting the path for the keystore file, you will need to enter its password to save the file. Once this is done, the following information will be displayed:

* **Account Name**: The account name of your XSAT validator, which is the username you entered, ending with ".sat".
* **Public Key**: The public key associated with your synchronizer account, which's generated from the seed phrase.
* **Registration URL**: A registration URL containing all the necessary information to register a native account for your synchronizer.

**Important:** Your registration is not yet complete. You must open the "Registration URL" in a browser and pay the registration fee to finalize the account registration. You can return to the Client and press **Enter** to proceed after completing the payment of the registration fee. If you have closed the Client, simply restart it to continue.

<figure><img src="/files/Qt9bP9t0UkKALS0c145C" alt=""><figcaption></figcaption></figure>

After opening the Registration URL, you will see a dedicated payment interface for registering the XSAT Validator account you just applied for. Connect your EVM wallet (e.g., via MetaMask) and click **"Approve and Pay"** to complete the registration payment. If you don’t yet have $BTC in your EVM address, you can [bridge BTC to the exSat network](/user-guides/bridge-your-assets) first.

<figure><img src="/files/Bt81rpJePWFLFZWKzkXG" alt="" width="353"><figcaption></figcaption></figure>

{% hint style="info" %}
**Why is there an account registration fee?**\
The registration fee is necessary because user registration on the exSat native network incurs operational costs. By requiring users to bear this cost, it also serves as a deterrent against Sybil attacks, ensuring the network's security and integrity.
{% endhint %}

After created the account, return to the exSat client to register the account as a XSAT Validator.  If you have closed it, just run it again. After selected the role of **Validator**, confirm to proceed with setting up your XSAT Validator profile:

<figure><img src="/files/FXyiv5MIWlBwIivjWrZ8" alt=""><figcaption></figcaption></figure>

<figure><img src="/files/SYx7On3gKReu9A71Q1hN" alt=""><figcaption></figcaption></figure>

Please provide the following configurations for your XSAT Validator (these settings can be updated later if necessary):

* **Stake Address**: An EVM address with a minimum balance of 2100 $XSAT on the exSat network. This address will be used for the initial 2100 $XSAT staking required to qualify your Validator.

Once you have entered these parameters and pressed Enter, your XSAT Validator will be successfully registered on the exSat network. You will then be able to access detailed information about your XSAT Validator account and perform additional actions as needed.

<figure><img src="/files/FCXOgMYAUuK02SjaRjZo" alt=""><figcaption></figcaption></figure>


# Stake for Validator via Credit Staking

## **Preparation**

* Please prepare a Bitcoin wallet on the Bitcoin network with a minimum balance of **100 #BTC**.
* Assuming you’ve already [created your BTC Validator account](/guides-of-data-consensus/others/operation-references/validator-operations/create-new-btc-validator-account).

## Prove Wallet Ownership

To complete Credit Staking, you must use the Bitcoin wallet holding at least 100 #BTC to perform a transfer of a **specified random amount** on the Bitcoin network. This transfer serves as proof of ownership and control over the wallet.

### 1. Generate the Random Transfer Amount

If you're running from source code, please execute "yarn start-commander" to run the client.

```
yarn start-commander
```

If you're running with Docker, please use the following commands to run it in interactive mode (assume the container name is commander)

```
docker rm commander
docker run -it --name commander -v $HOME/.exsat/:/app/.exsat -e CLIENT_TYPE=commander exsatnetwork/exsat-client:latest
```

In the menu, navigate to and select “**Self-Custodied BTC Staking**”

<figure><img src="/files/FYVqBhQ4i25kcRcruzYc" alt="" width="563"><figcaption></figcaption></figure>

<figure><img src="/files/tIjgC3P0rHg87B2XOROY" alt=""><figcaption></figcaption></figure>

<figure><img src="/files/NEyVbSNWEnIBw286Nl1w" alt=""><figcaption></figcaption></figure>

<figure><img src="/files/WCPlbc6ebNlE7riTsUuv" alt=""><figcaption></figcaption></figure>

Setup your [Reward Address](/guides-of-data-consensus/run-a-btc-validator/requirements-and-rewards-for-btc-validators#reward-types) and Commission Rate

<figure><img src="/files/mjG4bpQ6uFM2YbOro7Xl" alt=""><figcaption></figcaption></figure>

The smart contract will generate a **randomized amount** to verify your ownership of the BTC address used for Credit Staking. This amount looks like **x.xxxx9399 BTC**, where 9399 is the random amount , and *x* can be decided by you, it can be any digit—for example, **0.00009399 BTC** or **1.00009399 BTC**.

To complete the verification, use your BTC address (which must hold at least 100 BTC) to send **x.xxxx9399 BTC** to **any** address on the Bitcoin network. Then, submit your BTC address along with the **transaction ID (txid)** of this transfer.

{% hint style="info" %}
The randomized amount is valid for **1,008 Bitcoin blocks** (approximately **7 days**).\
Please ensure the transfer is completed and the verification submitted **before the expiration period**.
{% endhint %}

<figure><img src="/files/5ZUvrW7zJ9GuNQ73N57b" alt=""><figcaption></figcaption></figure>

The system contract will verify your transaction. Once the verification is successful, you can start running the exSat Client to participate in consensus and earn rewards.

Please note that the verification process may take some time, as it depends on your transaction being finalized on the Bitcoin network and the verification contract being triggered. You can either check back later for the result or optionally provide your email address to receive a notification once the verification is complete.

<figure><img src="/files/N9L6c4XfoiKSFBUQVAW5" alt=""><figcaption></figcaption></figure>

### **Check Verification Status**

You can check the verification result using the client. After starting the client, navigate to the menu **“Check Transaction Verification Status”** to view the result.&#x20;

If you encounter any issues during the process, please don’t hesitate to [contact us](/contact-us).

<figure><img src="/files/5q7DlI8FwNlxzuPof5hD" alt="" width="364"><figcaption></figcaption></figure>

<figure><img src="/files/9c1ZQB1vD9MonpuPbDgE" alt=""><figcaption></figcaption></figure>

Congratulations on completing Credit Staking!\
You can now visit the [**portal** ](https://portal.exsat.network/)to top up gas fees for your BTC Validator account, view your rewards, [configure your BTC RPC node](/guides-of-data-consensus/others/operation-references/common-operations/set-btc-rpc-node), and start [running the client](/guides-of-data-consensus/run-a-btc-validator/run-as-btc-validator) to participate in consensus.

**Important:** The exSat contract continuously monitors the balance of the Bitcoin wallet. If the balance falls below 100 #BTC, your Credit Staking will be automatically revoked, and your Validator will lose its eligibility to participate in consensus.\
To remain a **qualified BTC Validator**, please ensure that your Bitcoin wallet maintains a balance of **at least 100 #BTC** at all times.


# Stake for Validator via XBTC Staking or XSAT Staking

### Stake for your Validator account

To become a qualified Validator in the exSat consensus, a candidate Validator must stake at least 100 $BTC or 2,100 $XSAT as the initial stake to participate in the network consensus.

Follow these steps to perform the initial staking:

1. Open [this page](https://portal.exsat.network/) and navigate to the **"BTC Validator"** or **"XSAT Validator"** tab.
2. Connect your **Stake Address** to the page.
   * **Important:** The initial stake must be completed using the Stake Address. Staking from any other address will not be recognized as an initial stake. You can [update your Stake Address](/guides-of-data-consensus/others/operation-references/validator-operations/change-stake-address) in the client if needed.
3. Click the **Stake** button, sign the transaction, and submit it. Once submitted, your initial stake is finished.

If you have multiple Validators, you can switch between accounts by clicking the 'Switch' button.

If your Stake Address lacks sufficient $BTC, you can first [bridge your BTC to exSat](/user-guides/bridge-your-assets) to fund your Stake Address.

<figure><img src="/files/qV5h2xSisEt5Uv992M8W" alt="" width="293"><figcaption></figcaption></figure>

<figure><img src="/files/2Lo11TIXHthcthZ53yr2" alt="" width="281"><figcaption></figcaption></figure>

<figure><img src="/files/H1podCy3V8eG6biyYkPf" alt="" width="243"><figcaption></figcaption></figure>

<figure><img src="/files/Lt5cGhMTzlJoRiadtMfr" alt="" width="281"><figcaption></figcaption></figure>

### Unstake

If you wish to unstake and withdraw your BTC/XSAT, you can also do it from [this page](https://portal.exsat.network/), just click the Unstake button. However, please note that after submitting an unstake request, you will need to wait **7 days** before claiming your staked BTC/XSAT. This waiting period is a protective measure designed to ensure the security of the exSat network's consensus.

<figure><img src="/files/GaV7yQijZyFLbCZD6SGd" alt="" width="281"><figcaption></figcaption></figure>

<figure><img src="/files/3o2fwWWuFcHy0ciZOFtD" alt="" width="281"><figcaption></figcaption></figure>

<figure><img src="/files/9xcCtFbALLL7HVUJKdvb" alt="" width="260"><figcaption></figcaption></figure>

<figure><img src="/files/BmmZQ2wlDctXewn4yWeR" alt="" width="248"><figcaption></figcaption></figure>

You can see your unstaking here:

<figure><img src="/files/yXrMBmtlzZVvD6fpUsNU" alt="" width="278"><figcaption></figcaption></figure>

<figure><img src="/files/7ov9Qy8rKoKoaz69niZx" alt="" width="278"><figcaption></figcaption></figure>

After waiting time completed , it's withdrawable, you can click on it to withdraw it to your wallet.

<figure><img src="/files/LFH4CVsqZYI7gJtQez8e" alt="" width="282"><figcaption></figcaption></figure>

<figure><img src="/files/6nsqYmNV8M3UYsSbCwte" alt="" width="290"><figcaption></figcaption></figure>

<figure><img src="/files/1ujJTkTWhG8bWjipVK2e" alt="" width="245"><figcaption></figcaption></figure>


# Claim rewards for Validator

Validators can claim XSAT rewards on [this page](https://portal.exsat.network/) by connecting your EVM wallet for collecting the rewards.

### For BTC Validators via Credit Staking

For BTC Validators using **Credit Staking**, both the **staking rewards** and **commission** are distributed to the **Reward Address**.\
Please connect to your Reward Address to claim your rewards.

### For BTC Validators via XBTC Staking

* When connected to your **Commission Address**, you can view and claim commissions.
* When connected to your **Stake Address**, you can view and claim staking rewards.

<figure><img src="/files/puh9fW1oDOWNENFpdwic" alt="" width="279"><figcaption></figcaption></figure>

### For XSAT Validators:

* Connect to your **Stake Address** to view and claim staking rewards.


# Change Stake Address

To become a qualified BTC/XSAT Validator, a Validator must stake 100 $BTC or 2,100 $XSAT. This initial staking is critical to the security of the exSat network and must be completed directly by the Validator operator. Delegate staking cannot be used for this case. Validators must designate a staking address (an EVM address with sufficient tokens), and only this address can be used to complete the initial staking. You can change the stake address if needed.

### 1. Navigate to the "Change Stake Address" menu

If you're running from source code, please execute "yarn start-commander" to run the client.&#x20;

```
yarn start-commander
```

If you're running with Docker, please use the following commands to run it in interactive mode (assume the container name is commander)

```
docker rm commander
docker run -it --name commander -v $HOME/.exsat/:/app/.exsat -e CLIENT_TYPE=commander exsatnetwork/exsat-client:latest
```

Then perform the "Change Stake Address" action by choose :&#x20;

Validator -> Change Stake Address

<figure><img src="/files/eixsETystXSdo5qh589X" alt=""><figcaption></figcaption></figure>

### 2. Perform the "Change Stake Address" action

Enter the EVM address to be used for the initial staking and press Enter to set the stake address. The stake address can be modified multiple times before the initial staking is completed. However, once the initial staking is finalized, changing the stake address becomes irrelevant.

<figure><img src="/files/71p92LWITWixD7zP483l" alt=""><figcaption></figcaption></figure>


# Change Reward Address

For Validators using **Credit Staking**, both **staking rewards** and **commissions** are distributed to the **Reward Address**.\
For Validators using **XBTC Staking**, only **commissions** are distributed to the **Reward Address**.

### 1. Navigate to the "Change Reward Address" menu

If you're running from source code, please execute "yarn start-commander" to run the client.&#x20;

```
yarn start-commander
```

If you're running with Docker, please use the following commands to run it in interactive mode (assume the container name is commander)

```
docker rm commander
docker run -it --name commander -v $HOME/.exsat/:/app/.exsat -e CLIENT_TYPE=commander exsatnetwork/exsat-client:latest
```

Then perform the "Change Reward Address" action by choose :&#x20;

BTC Validator -> Change Reward Address

### 2. Perform the "Change Reward Address" action

<figure><img src="/files/QZ7DnohHrrpV4mjN08PS" alt=""><figcaption></figcaption></figure>


# Change Commission Ratio

### 1. Navigate to the "Change Commission Ratio" menu

If you're running from source code, please execute "yarn start-commander" to run the client.&#x20;

```
yarn start-commander
```

If you're running with Docker, please use the following commands to run it in interactive mode (assume the container name is commander)

<pre><code><strong>docker rm commander
</strong>docker run -it --name commander -v $HOME/.exsat/:/app/.exsat -e CLIENT_TYPE=commander exsatnetwork/exsat-client:latest
</code></pre>

Then perform the "Change Commission Ratio" action by choose :&#x20;

Validator -> Change Commission Ratio

<figure><img src="/files/GK1Ipwg9cne36nkgT8UI" alt=""><figcaption></figcaption></figure>

### 2. Perform the "Change Commission Ratio" action

Enter new commission rate and confirm.

<figure><img src="/files/ZDJyyMXgsLkmXhxDtUmB" alt=""><figcaption></figcaption></figure>


# Configure Display Information for Your Validator Account

You can set up display information for your validator account to help community members better understand your Validator when browsing the exSat pages. To configure this information, submit an issue on the [GitHub repository](https://github.com/exsat-network/configurations), including details such as your group's name, logo, URL, and a brief description.

Here’s an example:

```
Issue Title:[trustgp.sat] Submit validator information 

Content:
Please provide the following information for validator.

*Account:trustgp.sat
*Name: TrustGP
*Logo url: https://trustgp.network/img/logo.png
Homepage url: https://trustgp.com
Introduction: TrustGP is a great asset management groupt.
```

> All information marked with an \* is required.&#x20;
>
> Logo Supports PNG and SVG. The recommended minimum size for Logo is 128\*128 pixels and the file size should be less than or equal to 1MB. Otherwise, the image will not be merged, and a comment will be left to remind the user to re-upload the logo.
>
> Please use a version of your logo that is clearly visible against a black background.


# Execute the validator client

Please make sure you have [initialized the account](https://docs.exsat.network/guides-of-data-consensus/others/operation-references/validator-operations/pages/hNaa0872paxM1cz2JFjs#id-1.-initiate-the-validator-account) and [configured the BTC RPC node](/guides-of-data-consensus/others/operation-references/common-operations/set-btc-rpc-node).

### **Simple Execution**

You can start the Validator Client with the following command:

```
yarn start-validator
```

Since the Validator Client requires the private key of the Validator account (encrypted in the keystore file) to sign the transactions, you need to provide the keystore file's password at runtime. There are many ways to input the password:

1. **Using the `--pwdFile` parameter**\
   Save the password in a file, then pass the file path using the `--pwdFile` parameter when starting the client.\
   For example, if the password `123456` is saved in `/home/exsat/password`, you can start the client with:

   ```bash
   yarn start-validator --pwdFile=/home/exsat/password
   ```
2. **Storing it in the `.env` file**\
   Save the keystore password directly in the `.env` file. For example:

   ```bash
   VALIDATOR_KEYSTORE_PASSWORD=123456
   ```

   Then directly start the Client：

   ```bash
   yarn start-validator
   ```
3. **Inputting it during runtime**\
   Simply run the Client:

   ```bash
   yarn start-validator
   ```

   The Client will prompt you to enter the keystore file password manually.

**Considerations**

* Options 1 and 2 expose the keystore password directly, making them less secure.
* Option 3 does not expose the password but requires manual input each time the client is restarted, which is complicated for auto execution.

Choose the password input method that best suits your security and operational requirements.

{% hint style="info" %}
While running the Client directly is straightforward, it is rarely used in practice. This is because processes running on Linux can sometimes be terminated by the system for various reasons. To ensure the Client runs continuously over an extended period, it is recommended to use tools that keep programs running in the background. Common tools for this purpose include **pm2** and **screen**.
{% endhint %}

### Using pm2

PM2 is a process manager for Node.js applications on Linux, allowing you to easily manage, monitor, and keep applications running in the background. You could execute below command to run the Validator client using pm2.

Please ensure that the password of the keystore is properly configured in the .env file by setting VALIDATOR\_KEYSTORE\_PASSWORD.

```
pm2 start ecosystem.config.js --only validator
```

### Using Screen

The `Screen` command in Linux allows you to run commands in the background, keeping them active even after you disconnect from the terminal session.&#x20;

You could execute below command to run the Validator client , and manully input the password of the keystore. This approach helps prevent your password from appearing in plain text in configuration files or command lines, reducing the risk of password exposure.

```
screen -R validator
yarn start-validator
#input the password
```

You can also start the Validator Client using Screen with the keystore password saved in a file or in the .env file. Take using `--pwdFile`parameter as an example:

```
screen -R validator
yarn start-validator --pwdFile=/root/.exsat/validator/password
```

### Execution verification

If your Validator Client is running correctly, the following logs should appear on your screen:

```
2025-02-28T12:25:23.325+00:00 info: ExsatApi initialized successfully.
2025-02-28T12:25:24.051+00:00 info: Validator[btcval.sat] client configurations are correct, and the startup was successful
2025-02-28T12:25:25.499+00:00 info: Endorse task is running
2025-02-28T12:25:26.158+00:00 info: Endorse task is finished
```

### View Logs

Refer to [this guide](/guides-of-data-consensus/others/operation-references/common-operations/view-logs) to learn how to save logs to file.


# Update to new Docker version for Validator

Validator Docker has two operating modes:

1. **Interactive mode** (e.g., for creating a new account)
2. **Long-running mode** (for continuous background operation)

Both modes use the same Docker image. After updating the Docker image, use the appropriate commands to restart each mode.

#### Interactive Mode

To upgrade to the latest exSat Docker version and perform interactive operations (assuming the container is named "commander"), run the following:

```bash
docker pull exsatnetwork/exsat-client:latest
docker stop commander
docker rm commander
docker run -it --name commander -v $HOME/.exsat/:/app/.exsat -e CLIENT_TYPE=commander exsatnetwork/exsat-client:latest
```

#### Long-Running Mode

For continuous operation (assuming the container is named "validator"), use these commands to update Docker:

```bash
docker pull exsatnetwork/exsat-client:latest
docker stop validator
docker rm validator
docker run -d --restart always --name validator -v $HOME/.exsat/:/app/.exsat -e CLIENT_TYPE=validator exsatnetwork/exsat-client:latest
```


# Compete to win a Validator quota

### 1. Navigate to the "Compete to win a Validator quota" menu

If you're running from source code, please execute "yarn start-commander" to run the client.&#x20;

```
yarn start-commander
```

If you're running with Docker, please use the following commands to run it in interactive mode (assume the name of the container is "commander")

```
docker rm commander
docker run -it --name commander -v $HOME/.exsat/:/app/.exsat -e CLIENT_TYPE=commander exsatnetwork/exsat-client:latest
```

Then you can perform the "Compete to win a Validator quota" action by choose :&#x20;

Validator -> Compete to win a Validator quota

### 2. Execute "Compete to win a Validator quota"

When selecting "Compete for a Validator Quota," you may encounter the following scenarios:

1. **If quotas are available**, you will see a message: "Please confirm to participate in the competition." Press "Enter" to confirm.
   * The system will then attempt to call the Compete Contract for a validator quota. If successful, you’ll receive a congratulatory message as below. If unsuccessful, refer to scenario 2.<br>

     <figure><img src="/files/JDQJxGWCiLZdmYfGWLLD" alt=""><figcaption></figcaption></figure>
2. **If no quotas are available**, the message will state: "All quotas have been claimed. Please wait for the next round." Press "Enter" to exit, and wait for the next competition round to try again.<br>

   <figure><img src="/files/nIEKvdphOlqhigRHaGcG" alt=""><figcaption></figcaption></figure>

If you successfully obtain a validator quota, you can become a Validator and participate in exSat consensus by keeping your client running. If you do not receive a quota, you can wait for the bridge to go live, bridge BTC to exSat, and complete the [staking ](/guides-of-data-consensus/others/operation-references/validator-operations/stake-for-validator-via-xbtc-staking-or-xsat-staking)process to become a Validator.


# Common operations


# Import from seed phrase

### 1. Navigate to the "Import Seed Phrase" menu

If you're running from source code, please execute "yarn start-commander" to run the client.&#x20;

```
yarn start-commander
```

If you're running with Docker, please use the following commands to run it in interactive mode (assume the container name is commander)

```
docker rm commander
docker run -it --name commander -v $HOME/.exsat/:/app/.exsat -e CLIENT_TYPE=commander exsatnetwork/exsat-client:latest
```

Then perform the "Import Seed Phrase" action by choose :&#x20;

Synchronizer/Validator -> Import Seed Phrase

### 2. Perform the "Import Seed Phrase" action

Enter your seed phrase (12 words)

<figure><img src="/files/XanxF6594llKI3tyKJr9" alt="" width="470"><figcaption></figcaption></figure>

After entering the seed phrase, click \[Enter] to generate the keystore. At this point, you need to enter and verify the account name (note: do not include `.sat` in the account name).

<figure><img src="/files/MdU7DDKsE3QYNUQ9x3iA" alt="" width="422"><figcaption></figcaption></figure>

Keystore will be generated from the seed phrase, please set up the password for unlocking the keystore.  And choose a path to store the keystore file at the end of importing the account. You could select a directory ,choose the root directory, or mannually input a path.

If you're running the client in the **docker,** be sure that the path you choosed is mapped to the host machine. Otherwise, if you remove the Docker container, the keystore file will be lost, and you will need to regenerate the keystore file by importing the seed phrase or private key. It's suggested to choose the home path (the 1st option in the menu) .

<figure><img src="/files/3ApsvpRFB07Nt28TIfoS" alt=""><figcaption></figcaption></figure>


# Import from Private Key

### 1. Navigate to the "Import Private Key" menu

If you're running from source code, please execute "yarn start-commander" to run the client.&#x20;

```
yarn start-commander
```

If you're running with Docker, please use the following commands to run it in interactive mode (assume the container name is commander)

```
docker rm commander
docker run -it --name commander -v $HOME/.exsat/:/app/.exsat -e CLIENT_TYPE=commander exsatnetwork/exsat-client:latest
```

Then perform the "Import Private Key" action by choose :&#x20;

Synchronizer/Validator -> Import Private Key

### 2. Perform the "Import Private Key" action

Enter the private key of the account

<figure><img src="/files/S4QW95kYq8AYm92VTqT2" alt=""><figcaption></figcaption></figure>

After entering the private key, click \[Enter] to generate the keystore. At this point, you need to enter and verify the account name (note: do not include `.sat` in the account name).

<figure><img src="/files/MdU7DDKsE3QYNUQ9x3iA" alt="" width="422"><figcaption></figcaption></figure>

Keystore will be generated from the private key, please set up the password for unlocking the keystore.  And choose a path to store the keystore file at the end of importing the account. You could select a directory ,choose the root directory, or mannually input a path.

If you're running the client in the **docker,** be sure that the path you choosed is mapped to the host machine. Otherwise, if you remove the Docker container, the keystore file will be lost, and you will need to regenerate the keystore file by importing the seed phrase or private key. It's suggested to choose the home path (the 1st option in the menu) .

<figure><img src="/files/3ApsvpRFB07Nt28TIfoS" alt=""><figcaption></figcaption></figure>


# Set BTC RPC Node

The Client will access the BTC Node and get BTC block data, such as the latest BTC block header, block body, Segwit data, and more.&#x20;

There're two ways to set BTC RPC node , and they have the same result.

1. Edit the .env file
2. Through the "Set BTC RPC Node" menu

### 1. Edit the .env file

Suppose you're in the "exsat-client" folder, and had executed "cp .env.example .env", then you could edit the ".env" file. e.g, by vim.

```
vim .env
```

Please edit the "BTC\_RPC\_URL" item , and save it. If your BTC RPC Node needs authentication, please define the username and password.

```
BTC_RPC_URL=
BTC_RPC_USERNAME=
BTC_RPC_PASSWORD=
```

### 2. Through the "Set BTC RPC Node" menu

If it's the first time you're running the client, the "Set BTC RPC Node" menu will appear after you finished [Set Reward Address](/guides-of-data-consensus/others/operation-references/synchronizer-operations/change-reward-address).

If you wish to reset the BTC RPC Node, you could navigate to it by choosing:

Synchronizer/Validator -> Reset BTC RPC Node

If your BTC RPC Node needs authentication, please enter the username and password.

<figure><img src="/files/pcUrwiXAPrpHS1CERzCI" alt=""><figcaption></figcaption></figure>

<figure><img src="/files/ulOCTv3su81pQuL4l2pX" alt=""><figcaption></figcaption></figure>


# Refill BTC for Gas Fees

Executing Synchronizer and Validator actions requires paying gas fees in exSat. These gas fees are deducted from the Synchronizer/Validator account. When the balance is low, you will need to recharge with more BTC as gas fee.

## Check BTC balance for gas fee

You have two ways to check your gas fee balance:

1. Via the web page
2. Using the Client

### 1. Check BTC balance for gas fee via web page

To check the BTC balance for gas fees associated with your Validator account, connect using your **Stake Address** on [this page](https://portal.exsat.network/). If you manage multiple Validators, you can switch between accounts by clicking the 'Switch' button.

<figure><img src="/files/od8Anp2VIti7TeK7frej" alt="" width="280"><figcaption></figcaption></figure>

### 2. Check BTC balance for gas fee via Client

If you're running from source code, please execute "yarn start-commander" to run the client.&#x20;

```
yarn start-commander
```

If you're running with Docker, please use the following commands to run it in interactive mode (assume the container name is commander)

```
docker rm commander
docker run -it --name commander -v $HOME/.exsat/:/app/.exsat -e CLIENT_TYPE=commander exsatnetwork/exsat-client:latest
```

Simply select your role as Synchronizer or Validator to view the details of your account, such as:

<figure><img src="/files/qjcW2rN50aOLPLdeXRao" alt=""><figcaption></figcaption></figure>

## Refill BTC for gas fees

#### Refill BTC by Stake Address

Typically, you can use [this page](https://portal.exsat.network/) to connect your **Stake Address** and top up the gas fee for your Validator Account by clicking on "Recharge" button. If you have multiple Validators, you can switch between them using the "**Switch**" button to top up the gas fee for each one.

<figure><img src="/files/5LEfDK3Zc1Nwp6O6ENsc" alt="" width="279"><figcaption></figcaption></figure>

#### Refill BTC by any EVM address

If you prefer to connect to a different EVM address to top up the gas fee for your Validator, please use this webpage to complete the process.

<figure><img src="/files/FzQU306ylGezLd7JkqfV" alt="" width="288"><figcaption></figcaption></figure>


# Export private key

You can export private key to backup it if necessary.

If you're running from source code, please execute "yarn start-commander" to run the client.&#x20;

```
yarn start-commander
```

If you're running with Docker, please use the following commands to run it in interactive mode (assume the container name is commander)

```
docker rm commander
docker run -it --name commander -v $HOME/.exsat/:/app/.exsat -e CLIENT_TYPE=commander exsatnetwork/exsat-client:latest
```

Then perform the "Export Private Key" action by choose :&#x20;

Synchronizer/Validator -> Export Private Key

<figure><img src="/files/k0OtIv2o4u8jL0XtdiJT" alt=""><figcaption></figcaption></figure>


# Remove Your Account

If you're running from source code, please execute "yarn start-commander" to run the client.&#x20;

```
yarn start-commander
```

If you're running with Docker, please use the following commands to run it in interactive mode (assume the container name is commander)

```
docker rm commander
docker run -it --name commander -v $HOME/.exsat/:/app/.exsat -e CLIENT_TYPE=commander exsatnetwork/exsat-client:latest
```

Then perform the "Remove Account" action by choose :&#x20;

Synchronizer/Validator -> Remove Account

<figure><img src="/files/iTWY3j6PtALR6ufpJeRZ" alt=""><figcaption></figcaption></figure>

This's a dangerous action, it will delete the keystore file from your server, so please make sure you had backed up the private key or seed phrase before perform it. You'll be asked to input password of the keystore before execute.

<figure><img src="/files/FuB9RUj84VytSrZZqYzE" alt=""><figcaption></figcaption></figure>


# Upgrade to new version

### New version check

Everytime you run the client by "yarn start-commander", It'll check the available updates, if there's a new version, a reminder menu will be displayed. You may choose "Get Upgrade Method" to see how to upgrade to the new version, or "Skip" to proceed to the next step.

<figure><img src="/files/rXNQTG8U9obUW3rL7SVe" alt="" width="509"><figcaption></figcaption></figure>

### **Updating to the Latest Version**

* **For Source Code Users:**\
  To upgrade to the latest version, execute the following commands:

  ```bash
  cd exsat-client  
  git pull 
  yarn build 
  ```
* **For Docker Users:**
  * Synchronizers [upgrade to latest version](/guides-of-data-consensus/others/operation-references/synchronizer-operations/update-to-new-docker-version-for-synchronizer).
  * Validators [upgrade to latest version](/guides-of-data-consensus/others/operation-references/validator-operations/update-to-new-docker-version-for-validator).


# View Logs

### **Running from Source Code**

If you are running the Client using the source code, you can view the logs directly without additional configuration.\
Alternatively, you can configure the `.env` file to [save logs to file](#configuring-.env-to-ave-logs-to-file).

### **Running with Docker**

If you are running the Client using Docker, there are several ways to view the logs:

1. **Interactive Mode**\
   If you start Docker in interactive mode, the logs will be displayed directly in the terminal.
2. **Other Modes**\
   Assuming your Docker container is named `btcvali`, you can view the logs in two ways:
   * Use the command `docker logs -f btcvali` to see the latest logs.
   * Configure the `.env` file to [save logs to file](#configuring-.env-to-save-logs-to-file).

### Configuring `.env` to save logs to file

To save logs to a file, modify the following parameters in your `.env` file:

* **`LOGGER_MAX_SIZE=30m`**\
  Specifies the maximum size of the log file.
* **`LOGGER_DIR=/app/.exsat/logs`**\
  Defines the directory where log files will be stored.

  > **Note:** If you are running the Client with Docker, ensure this directory is mapped to your server. If you follow the example commands provided in the documentation, you can find the logs in the directory: `~/.exsat/logs/`.
* **`LOGGER_MAX_FILES=30d`**\
  Sets the maximum number of days to retain log files.

With these configurations, logs will be properly stored and managed according to your specified settings.


# Environment variables

The client's configuration is managed through the `.env` file. Generally, you will need to configure the **BTC\_RPC\_URL**, which can be set either through the [client's menu](/guides-of-data-consensus/others/operation-references/common-operations/set-btc-rpc-node) or by directly editing the `.env` file.

* **Synchronizer**: Requires a Bitcoin full node.
* **Validator**: Both Bitcoin full node and light node works.

Other configurations can be adjusted as needed.

```
# network configurations mainnet or testnet
NETWORK=mainnet

# Logger configurations
# Maximum size for each log file (30 MB)
# LOGGER_MAX_SIZE=30m

# Directory where log files are stored
# LOGGER_DIR=logs

# Maximum age for log files (30 days)
# LOGGER_MAX_FILES=30d

# ExSat RPC URLs configurations
# You can leave it empty to use the default exSat configuration.
# Configure this as an array, with the best-performing URL as the first element to serve as the primary node.
# For testnet use: ["https://chain-tst3.exactsat.io"]
# For mainnet use: ["https://rpc-us.exsat.network", "https://rpc-sg.exsat.network"], or other custom nodes.
EXSAT_RPC_URLS=[]

# Bitcoin RPC URL
BTC_RPC_URL=

# Bitcoin RPC username
BTC_RPC_USERNAME=

# Bitcoin RPC password
BTC_RPC_PASSWORD=

################################################################################

# Synchronizer configurations(is required only for the synchronizer)
# Size of each upload chunk (256 KB). Be careful! Modifying this configuration may cause block uploading failure. It must not be less than 100 KB.
# CHUNK_SIZE=262144

# Scheduler for block upload jobs (every second)
# SYNCHRONIZER_JOBS_BLOCK_UPLOAD=*/1 * * * * *

# Scheduler for block verify jobs (every second)
# SYNCHRONIZER_JOBS_BLOCK_VERIFY=*/1 * * * * *

# Scheduler for block parse jobs (every 5 seconds)
# SYNCHRONIZER_JOBS_BLOCK_PARSE=*/5 * * * * *

# File path to the synchronizer's keystore
SYNCHRONIZER_KEYSTORE_FILE=

# Password for the synchronizer's keystore
SYNCHRONIZER_KEYSTORE_PASSWORD=

################################################################################

# Validator configurations(is required only for the validator)
# Scheduler for endorsement jobs (every second)
# VALIDATOR_JOBS_ENDORSE=*/1 * * * * *

# Scheduler for endorsement check jobs (every 1 minute)
# VALIDATOR_JOBS_ENDORSE_CHECK=0 * * * * *

# File path to the validator's keystore
VALIDATOR_KEYSTORE_FILE=

# Password for the validator's keystore
VALIDATOR_KEYSTORE_PASSWORD=

################################################################################

# Enable prometheus
PROMETHEUS=false

# Prometheus listen address
PROMETHEUS_ADDRESS=0.0.0.0:9900

################################################################################
```


# Quick Start

exSat consists of two layers: the Native Layer and the EVM Layer

### **Native Layer**

The Native Layer is built using [Spring technology](https://eosnetwork.com/blog/spring-1-0-rc1-released/), with smart contracts written in C++ and running on the WebAssembly (WASM) runtime. It provides high performance and instant finality (blocks become irreversible in just 1 second). Data is managed in a database format, making it suitable for large-scale data processing and high-performance operations.\
Bitcoin data is stored in the database on the native layer. Developers working on this layer can directly read UTXOs, block headers, and the exSat consensus state, facilitating the creation of high-performance Bitcoin DApps.

### **EVM Layer**

The EVM Layer is fully compatible with Ethereum's Shanghai upgrade and supports smart contract development using Solidity, a widely adopted language among blockchain developers. Most smart contracts running on Ethereum can be seamlessly executed on exSat's EVM Layer without modification. In the near future, smart contracts on the EVM Layer will also be able to access Bitcoin UTXOs, block headers, and other Bitcoin data from the exSat Native Layer.

### **Trustless Bridge between the Native and EVM Layers**

The Native and EVM Layers can communicate seamlessly through a trustless bridge, enabling bi-directional token and message transfers. Contracts on both layers can interact with one another. By using this trustless bridge, developers can store DApp data and core logic on the Native Layer while managing user interactions on the EVM Layer, optimizing the full potential of exSat.


# Native Layer Developer Guides

Learn more about developing DApps on the Native Layer:

* [Introduction to Spring](https://docs.eosnetwork.com/docs/latest/quick-start/introduction)
* [Developing Smart Contracts on the Native Layer](https://docs.eosnetwork.com/docs/latest/smart-contracts/contract-anatomy)
* [Interacting with Smart Contracts via SDK](https://docs.eosnetwork.com/docs/latest/web-applications/beginner-concepts)
* [Interacting with exSat via RESTful API](https://docs.eosnetwork.com/apis/spring/latest/)

You can access the native layer using the [RPC node provided by exSat ](/#native-layer-of-exsat-mainnet)or by [running your own RPC node](/developer-guides/native-layer-developer-guides/run-exsat-native-layer-rpc-node).

### Read data from contracts

exSat native layer stores data in tables, which are similar to database tables. Each table has a name and a set of fields. Tables are organized into scopes, which are defined by the smart contract that created the table.

To retrieve data from a table, you need to know its name, scope, and the name of the smart contract that created it. You can also specify a lower and upper bound to limit the amount of data returned.&#x20;

To retrive data from a exSat native contract, all you need is :&#x20;

* A command-line interface to run curl commands.
* Access to an exSat native layer RPC node.\
  You could get the public [RPC node](/#native-layer-of-exsat-mainnet) here, or build your own RPC node.
* The name of the contract, the table name, scope, and maybe the indexes.

#### use "get\_table\_rows" to get data from contract

The `get_table_rows` function retrieves rows from a table. It takes the following parameters in JSON format:

<table data-header-hidden><thead><tr><th width="164">Name</th><th width="95">Needed</th><th>Description</th></tr></thead><tbody><tr><td>code</td><td>must</td><td><p>string</p><p>The name of the smart contract that controls the provided table</p></td></tr><tr><td>table</td><td>must</td><td><p>string</p><p>The name of the table to query</p></td></tr><tr><td>scope</td><td>must</td><td><p>string</p><p>The account to which this data belongs</p></td></tr><tr><td>index_position</td><td>optional</td><td><p>string</p><p>Position of the index used, accepted parameters <code>primary</code>, <code>secondary</code>, <code>tertiary</code>, <code>fourth</code>, <code>fifth</code>, <code>sixth</code>, <code>seventh</code>, <code>eighth</code>, <code>ninth</code> , <code>tenth</code></p></td></tr><tr><td>key_type</td><td>optional</td><td><p>string</p><p>Type of key specified by index_position (for example - <code>uint64_t</code> or <code>name</code>)</p></td></tr><tr><td>encode_type</td><td>optional</td><td>string<br>representing the encoded type of the key_type parameter, either <code>dec</code> or <code>hex</code>, defaults to <code>dec</code>.</td></tr><tr><td>lower_bound</td><td>optional</td><td><p>string</p><p>Filters results to return the first element that is not less than provided value in set</p></td></tr><tr><td>upper_bound</td><td>optional</td><td><p>string</p><p>Filters results to return the first element that is greater than provided value in set</p></td></tr><tr><td>limit</td><td>optional</td><td><p>integer &#x3C;int32>Default: 10</p><p>Limit number of results returned.</p></td></tr><tr><td>reverse</td><td>optional</td><td><p>boolean Default: false</p><p>Reverse the order of returned results</p></td></tr><tr><td>show_payer</td><td>optional</td><td><p>boolean Default: false</p><p>Show RAM payer</p></td></tr></tbody></table>

Below is an example that retrieves rows from `validators` table, owned by the `endrmng.xsat` account and having `endrmng.xsat` as `scope`. which aims to get the registration information of the first validator.

```
curl --request POST \
--url https://rpc-sg.exsat.network/v1/chain/get_table_rows \
--header 'content-type: application/json'  \
--data '{ 
"json": true, 
"code": "endrmng.xsat", 
"scope": "endrmng.xsat", 
"table": "validators", 
"lower_bound": "0", 
"limit": 1, 
"reverse": false 
}'
```

In the example above:

* The rows values are returned as JSON, set by the `json` parameter.
* The table is owned by the account `endrmng.xsat`, set by the `code` parameter.
* The table scope is `endrmng.xsat`, set by the `scope` parameter.
* The table name is `validators`, set by the `table` parameter.
* The query uses the primary index to search the rows and starts from the lower bound index value, set by the `lower_bound` parameter.
* The function will fetch a maximum of 1 rows, set by the `limit` parameter.
* The retrieved rows will be in ascending order, set by the `reverse` parameter.

**The get\_table\_rows Result**[**​**](https://docs.eosnetwork.com/docs/latest/web-applications/reading-state#the-get_table_rows-result)

The JSON returned by the `get_table_rows` has the following structure:

```
{
  "rows": [
    { },
    ...
    { }
  ],
  "more": true,
  "next_key": ""
}
```

The `"rows"` field is an array of table row objects in JSON representation. The `"more"` field indicates that there are additional rows beyond the ones returned. The `"next_key"` field contains the key to be used as the lower bound in the next request to retrieve the next set of rows.

For example, the result from the previous section command contains one row, and looks similar to the one below (for privacy, the sensitive informations of the validator is replaced by "-":

```
{
    "rows": [
        {
            "owner": "-----.sat",
            "reward_recipient": "erc2o.xsat",
            "memo": "0x--------------------",
            "commission_rate": 1000,
            "quantity": "0.00000000 BTC",
            "qualification": "0.00000000 BTC",
            "xsat_quantity": "0.00000000 XSAT",
            "donate_rate": 0,
            "total_donated": "0.00000000 XSAT",
            "stake_acc_per_share": "0",
            "consensus_acc_per_share": "0",
            "staking_reward_unclaimed": "0.00000000 XSAT",
            "staking_reward_claimed": "0.00000000 XSAT",
            "consensus_reward_unclaimed": "0.00000000 XSAT",
            "consensus_reward_claimed": "0.00000000 XSAT",
            "total_consensus_reward": "0.00000000 XSAT",
            "consensus_reward_balance": "0.00000000 XSAT",
            "total_staking_reward": "0.00000000 XSAT",
            "staking_reward_balance": "0.00000000 XSAT",
            "latest_staking_time": "1970-01-01T00:00:00",
            "latest_reward_block": 0,
            "latest_reward_time": "1970-01-01T00:00:00",
            "disabled_staking": 0
        }
    ],
    "more": true,
    "next_key": "3815492618318908816"
}
```


# exSat consensus contracts

exSat leverages a series of smart contracts to import and process Bitcoin data, as well as manage the distribution of $XSAT.

<figure><img src="/files/QLhYdxWvfXboUpeK0wDU" alt=""><figcaption></figcaption></figure>

You can find details of the contracts:

| name         | description                    | docs                                                                                                                              |
| ------------ | ------------------------------ | --------------------------------------------------------------------------------------------------------------------------------- |
| btc.xsat     | BTC Token Contract             |                                                                                                                                   |
| exsat.xsat   | XSAT Contract                  |                                                                                                                                   |
| poolreg.xsat | Pool Register Contract         | [poolreg.xsat document](/developer-guides/native-layer-developer-guides/exsat-consensus-contracts/pool-register-contract)         |
| rescmng.xsat | Resource Manage Contract       | rescmng.xsat document                                                                                                             |
| utxomng.xsat | UTXO Manage Contract           | [utxomng.xsat document](/developer-guides/native-layer-developer-guides/exsat-consensus-contracts/utxo-management-contract)       |
| rwddist.xsat | Reward Distribution Contract   | rwddist.xsat document                                                                                                             |
| blkendt.xsat | Block Consensus Contract       | [blkendt.xsat document](/developer-guides/native-layer-developer-guides/exsat-consensus-contracts/block-consensus-contract)       |
| blksync.xsat | Block Synchronization Contract | [blksync.xsat document](/developer-guides/native-layer-developer-guides/exsat-consensus-contracts/block-synchronization-contract) |
| endrmng.xsat | Validator Manage Contract      | [endrmng.xsat document](/developer-guides/native-layer-developer-guides/exsat-consensus-contracts/validator-management-contract)  |
| staking.xsat | Staking Contract               | [staking.xsat document](/developer-guides/native-layer-developer-guides/exsat-consensus-contracts/staking-contract)               |
| custody.xsat | Custody Contract               | custody.xsat document                                                                                                             |


# Pool Register Contract

## poolreg.xsat

### Actions

* Initialize the synchronizer
* Delete the synchronizer
* Unbind the miner
* Configure financial account and commission rate for the synchronizer
* Purchase a slot
* Claim rewards for validating blocks
* Update the synchronizer with the latest block height

### Quickstart

```bash
# setdonateacc @poolreg.xsat
$ cleos push action poolreg.xsat setdonateacc '{"donation_account": "alice", "min_donate_rate": 2000}' -p poolreg.xsat

# setdonate @synchronizer
$ cleos push action poolreg.xsat setdonate '{"synchronizer": "alice", "donate_rate": 100}' -p alice

# updateheight @utxomng.xsat
$ cleos push action poolreg.xsat updateheight '{"synchronizer": "alice", "height": 839999, "miners": ["3PiyiAezRdSUQub3ewUXsgw5M6mv6tskGv", "bc1p8k4v4xuz55dv49svzjg43qjxq2whur7ync9tm0xgl5t4wjl9ca9snxgmlt"]}' -p utxomng.xsat

# initpool @poolreg.xsat
$ cleos push action poolreg.xsat initpool '{"synchronizer": "alice", "latest_produced_block_height": 839999, "financial_account": "alice", "miners": [""]}' -p poolreg.xsat

# delpool @poolreg.xsat
$ cleos push action poolreg.xsat delpool '{"synchronizer": "alice"}' -p poolreg.xsat

# unbundle @poolreg.xsat
$ cleos push action poolreg.xsat unbundle '{"id": 1}' -p poolreg.xsat

# config @poolreg.xsat
$ cleos push action poolreg.xsat config '{"synchronizer": "alice", "produced_block_limit": 432}' -p poolreg.xsat

# setfinacct @synchronizer
$ cleos push action poolreg.xsat setfinacct '{"synchronizer": "alice", "financial_account": "alice"}' -p alice

# buyslot @synchronizer
$ cleos push action poolreg.xsat buyslot '{"synchronizer": "alice", "receiver": "alice", "num_slots": 2}' -p alice

# claim @evmutil.xsat or @financial_account
$ cleos push action poolreg.xsat claim '{"synchronizer": "alice"}' -p alice
```

### Table Information

```bash
$ cleos get table poolreg.xsat poolreg.xsat synchronizer
$ cleos get table poolreg.xsat poolreg.xsat miners
$ cleos get table poolreg.xsat poolreg.xsat config
$ cleos get table poolreg.xsat poolreg.xsat stat
```

### TABLE `config`

#### scope&#x20;

poolreg.xsat

#### params

* `{string} donation_account` - the account designated for receiving donations
* `{binary_extension<uint16_t>} min_donate_rate` - minimum donation rate

#### example

```json
{
  "donation_account": "donate.xsat",
  "min_donate_rate": 2000
}
```

### TABLE `synchronizer`

#### scope&#x20;

poolreg.xsat

#### params

* `{name} synchronizer` - synchronizer account
* `{name} reward_recipient` - receiving account for receiving rewards
* `{string} memo` - memo when receiving reward transfer
* `{uint16_t} num_slots` - number of slots owned
* `{uint64_t} latest_produced_block_height` - the latest block number
* `{uint16_t} produced_block_limit` - upload block limit, for example, if 432 is set, the upload height needs to be a synchronizer that has produced blocks in 432 blocks before it can be uploaded.
* `{uint16_t} donate_rate` - the donation rate, represented as a percentage, ex: 500 means 5.00%
* `{asset} total_donated` - the total amount of XSAT that has been donated
* `{asset} unclaimed` - unclaimed rewards
* `{asset} claimed` - rewards claimed
* `{uint64_t} latest_reward_block` - the latest block number to receive rewards
* `{time_point_sec} latest_reward_time` - latest reward time

#### example

```json
{
   "synchronizer": "test.xsat",
   "reward_recipient": "erc2o.xsat",
   "memo": "0x4838b106fce9647bdf1e7877bf73ce8b0bad5f97",
   "num_slots": 2,
   "latest_produced_block_height": 840000,
   "produced_block_limit": 432,
   "donate_rate": 100,
   "total_donated": "100.00000000 XSAT",
   "unclaimed": "5.00000000 XSAT",
   "claimed": "0.00000000 XSAT",
   "latest_reward_block": 840001,
   "latest_reward_time": "2024-07-13T14:29:32"
}
```

### TABLE `miners`

#### scope&#x20;

poolreg.xsat

#### params

* `{uint64_t} id` - primary key
* `{name} synchronizer` - synchronizer account
* `{string} miner` - associated btc miner account

#### example

```json
{
   "id": 1,
   "synchronizer": "alice",
   "miner": "3PiyiAezRdSUQub3ewUXsgw5M6mv6tskGv"
}
```

### TABLE `stat`

#### scope&#x20;

poolreg.xsat

#### params

* `{asset} xsat_total_donated` - the cumulative amount of XSAT donated

#### example

```json
{
  "xsat_total_donated": "100.40000000 XSAT"
}
```

### ACTION `setdonateacc`

* **authority**: poolreg.xsat

> Update donation account.

#### params

* `{string} donation_account` - account to receive donations
* `{uint16_t} min_donate_rate` - minimum donation rate

#### example

```bash
$ cleos push action poolreg.xsat setdonateacc '["alice", 2000]' -p poolreg.xsat
```

### ACTION `updateheight`

* **authority**: `utxomng.xsat`

> Update synchronizer’s latest block height and add associated btc miners.

#### params

* `{name} synchronizer` - synchronizer account
* `{uint64_t} latest_produced_block_height` - the height of the latest mined block
* `{std::vector<string>} miners` - list of btc accounts corresponding to synchronizer

#### example

```bash
$ cleos push action poolreg.xsat updateheight '["alice", 839999, ["3PiyiAezRdSUQub3ewUXsgw5M6mv6tskGv", "bc1p8k4v4xuz55dv49svzjg43qjxq2whur7ync9tm0xgl5t4wjl9ca9snxgmlt"]]' -p poolreg.xsat
```

### ACTION `initpool`

* **authority**: poolreg.xsat

> Unbind the association between synchronizer and btc miner.

#### params

* `{name} synchronizer` - synchronizer account
* `{uint64_t} latest_produced_block_height` - the height of the latest mined block
* `{string} financial_account` - financial account to receive rewards
* `{std::vector<string>} miners` - list of btc accounts corresponding to synchronizer

#### example

```bash
$ cleos push action poolreg.xsat initpool '["alice", 839997, "alice", ["37jKPSmbEGwgfacCr2nayn1wTaqMAbA94Z", "39C7fxSzEACPjM78Z7xdPxhf7mKxJwvfMJ"]]' -p poolreg.xsat
```

### ACTION `delpool`

* **authority**: poolreg.xsat

> Erase synchronizer.

#### params

* `{name} synchronizer` - synchronizer account

#### example

```bash
$ cleos push action poolreg.xsat delpool '["alice"]' -p poolreg.xsat
```

### ACTION `unbundle`

* **authority**: poolreg.xsat

> Unbind the association between synchronizer and btc miner.

#### params

* `{uint64_t} id` - primary key of miners table

#### example

```bash
$ cleos push action poolreg.xsat unbundle '[1]' -p poolreg.xsat
```

### ACTION `config`

* **authority**: poolreg.xsat

> Configure synchronizer block output limit.

#### params

* `{name} synchronizer` - synchronizer account
* `{uint16_t} produced_block_limit` - upload block limit, for example, if 432 is set, the upload height needs to be a synchronizer that has produced blocks in 432 blocks before it can be uploaded.

#### example

```bash
$ cleos push action poolreg.xsat config '["alice", 432]' -p poolreg.xsat
```

### ACTION `buyslot`

* **authority**: `synchronizer`

> Buy slot.

#### params

* `{name} synchronizer` - synchronizer account
* `{name} receiver` - the account of the receiving slot
* `{uint16_t} num_slots` - number of slots

#### example

```bash
$ cleos push action poolreg.xsat buyslot '["alice", "alice", 2]' -p alice
```

### ACTION `setdonate`

* **authority**: `synchronizer`

> Configure donate rate.

#### params

* `{name} synchronizer` - synchronizer account
* `{uint16_t} donate_rate` - the donation rate, represented as a percentage, ex: 500 means 5.00%

#### example

```bash
$ cleos push action poolreg.xsat setdonate '["alice", 100]' -p alice
```

### ACTION `setfinacct`

* **authority**: `synchronizer`

> Configure financial account.

#### params

* `{name} synchronizer` - synchronizer account
* `{string} financial_account` - financial account to receive rewards

#### example

```bash
$ cleos push action poolreg.xsat setfinacct '["alice", "alice"]' -p alice
```

### ACTION `claim`

* **authority**: `synchronizer->to` or `evmutil.xsat`

> Receive award.

#### params

* `{name} synchronizer` - synchronizer account

#### example

```bash
$ cleos push action poolreg.xsat claim '["alice"]' -p alice
```


# UTXO Management Contract

## utxomng.xsat

### Actions

* Initialize configuration
* Add UTXO
* Delete UTXO
* Add block header
* Delete block header
* Parse UTXO

### Quickstart

```bash
# init @utxomng.xsat
$ cleos push action utxo.xsat init '{"height": 840000, "hash": "0000000000000000000320283a032748cef8227873ff4872689bf23f1cda83a5", "cumulative_work": "0.00000020 BTC"}' -p utxomng.xsat

# config @utxomng.xsat
$ cleos push action utxo.xsat config '{"parse_timeout_seconds": 600, "num_validators_per_distribution": 100, "retained_spent_utxo_blocks": 5000, "num_retain_data_blocks": 100, "num_merkle_layer": 10, "num_miner_priority_blocks": 10}' -p utxomng.xsat

# addutxo @utxomng.xsat
$ cleos push action utxo.xsat addutxo '{"id": 1, "txid": "76a914536ffa992491508dca0354e52f32a3a7a679a53a88ac", "index": 1, "to": "18cBEMRxXHqzWWCxZNtU91F5sbUNKhL5PX", "value": 4075061499}' -p utxomng.xsat

# delutxo @utxomng.xsat
$ cleos push action utxo.xsat delutxo '{"id": 1}' -p utxomng.xsat

# addblock @utxomng.xsat
$ cleos push action utxo.xsat addblock '{"height":839999,"hash":"000000000000000003e251c7387c2cd5aeac480327a234ec11c9b8382455db0d","cumulative_work":"0000000000000000000000000000000000000000002fa415a1793f473a706960","version":536870912,"previous_block_hash":"000000000000000003e6820666f1a47c7771f18b03f9d24c2896a3d7356a5e3c","merkle":"da1dcebe6d631251a31969b7ed6ba55258d113be3e7ef3ef3343d8f7fc9c1702","timestamp":1479777318,"bits":386089497,"nonce":2635095261}' -p utxomng.xsat

# delblock @utxomng.xsat
$ cleos push action utxo.xsat delblock '{"height":839999}' -p utxomng.xsat

# processblock @alice
$ cleos push action utxo.xsat processblock '{"synchronizer": "alice", "height": 840000, "hash": "0000000000000000000320283a032748cef8227873ff4872689bf23f1cda83a5", "process_rows":1024, "nonce": 1}' -p utxomng.xsat
```

### Table Information

```bash
$ cleos get table utxomng.xsat utxomng.xsat chainstate
$ cleos get table utxomng.xsat utxomng.xsat config
$ cleos get table utxomng.xsat utxomng.xsat utxos
$ cleos get table utxomng.xsat utxomng.xsat blocks
$ cleos get table utxomng.xsat utxomng.xsat consensusblk
```

### ENUM `parsing_status`

```
typedef uint8_t parsing_status;
static const parsing_status waiting = 1;
static const parsing_status parsing = 2;
static const parsing_status deleting_data = 3;
static const parsing_status distributing_rewards = 4;
static const parsing_status migrating = 5;
```

### STRUCT `parsing_progress_row`

#### params

* `{uint64_t} bucket_id` - the bucket\_id currently being parsed
* `{uint64_t} num_transactions` - the number of transactions currently parsing the block
* `{uint64_t} parsed_transactions` - number of transactions currently resolved
* `{uint64_t} parsed_position` - the position of the currently parsed block
* `{uint64_t} parsed_vin` - the current transaction has been resolved to the vin index
* `{uint64_t} parsed_vout` - the current transaction has been resolved to the vout index
* `{name} parser` - the account number of the parsing block
* `{time_point_sec} parsed_expiration_time` - timeout for parsing chunks

#### example

```json
{
    "bucket_id": 3,
    "num_transactions": 0,
    "parsed_transactions": 0,
    "parsed_position": 0,
    "parsed_vin": 0,
    "parsed_vout": 0,
    "parser": "alice",
    "parsed_expiration_time": "2024-07-13T14:39:32"
}
```

### TABLE `chainstate`

#### scope

utxomng.xsat

#### params

* `{uint64_t} num_utxos` - total number of UTXOs
* `{uint64_t} head_height` - header block height for consensus success
* `{uint64_t} irreversible_height` - irreversible block height
* `{uint64_t} irreversible_hash` - irreversible block hash
* `{uint64_t} migrating_height` - block height in migration
* `{uint64_t} migrating_hash` - block hash in migration
* `{uint64_t} migrating_num_utxos` - the total number of UTXOs in the migration
* `{uint64_t} migrated_num_utxos` - number of UTXOs that have been migrated
* `{uint32_t} num_provider_validators` - the number of validators that have endorsed the current parsed block
* `{uint32_t} num_validators_assigned` - the number of validators that have been allocated rewards
* `{name} miner` - block miner account
* `{name} synchronizer` - block synchronizer account
* `{name} parser` - the account number of the parsing block
* `{uint64_t} parsed_height` - parsed block height
* `{uint64_t} parsing_height` - the current height being parsed
* `{map<checksum256, parsing_progress_row>} parsing_progress_of` - parsing progress @see `parsing_progress_row`
* `{uint8_t} status` - parsing status @see `parsing_status`

#### example

```json
{
    "num_utxos": 26240,
    "head_height": 840031,
    "irreversible_height": 840002,
    "irreversible_hash": "00000000000000000002c0cc73626b56fb3ee1ce605b0ce125cc4fb58775a0a9",
    "migrating_height": 840003,
    "migrating_hash": "00000000000000000001cfe8671cb9269dfeded2c4e900e365fffae09b34b119",
    "migrating_num_utxos": 16278,
    "migrated_num_utxos": 10000,
    "num_provider_validators": 2,
    "num_validators_assigned": 0,
    "miner": "",
    "synchronizer": "alice",
    "parser": "alice",
    "parsed_height": 840008,
    "parsing_height": 840009,
    "parsing_progress_of": [
        {
            "first": "00000000000000000000c6075e66b667adcdb8935e6d9a877f5cf140c806ae87",
            "second": {
                "bucket_id": 11,
                "num_utxos": 0,
                "num_transactions": 0,
                "parsed_transactions": 0,
                "parsed_position": 0,
                "parsed_vin": 0,
                "parsed_vout": 0,
                "parser": "alice",
                "parse_expiration_time": "2024-08-08T02:44:43"
            }
        }
    ],
    "status": 5
}
```

### TABLE `config`

#### scope&#x20;

utxomng.xsat

#### params

* `{uint16_t} parse_timeout_seconds` - parsing timeout duration
* `{uint16_t} num_validators_per_distribution` - number of endorsing users each time rewards are distributed
* `{uint16_t} num_retain_data_blocks` - number of blocks to retain data
* `{uint16_t} retained_spent_utxo_blocks` - number of blocks to retained spent utxo
* `{uint16_t} num_txs_per_verification` - the number of tx for each verification (2^n)
* `{uint8_t} num_merkle_layer` - verify the number of merkle levels (log(num\_txs\_per\_verification))
* `{uint16_t} num_miner_priority_blocks` - miners who produce blocks give priority to verifying the number of blocks

#### example

```json
{
    "parse_timeout_seconds": 600,
    "num_validators_per_distribution": 100,
    "num_retain_data_blocks": 100,
    "retained_spent_utxo_blocks": 5000,
    "num_txs_per_verification": 1024,
    "num_merkle_layer": 10,
    "num_miner_priority_blocks": 10
}
```

### TABLE `utxos`

#### scope&#x20;

utxomng.xsat

#### params

* `{uint64_t} id` - primary key
* `{checksum256} txid` - transaction id
* `{uint32_t} index` - vout index
* `{std::vector<uint8_t>} scriptpubkey` - vout's script public key
* `{uint32_t} value` - utxo quantity

#### example

```json
{
    "id": 2,
    "txid": "2bb85f4b004be6da54f766c17c1e855187327112c231ef2ff35ebad0ea67c69e",
    "index": 0,
    "scriptpubkey": "51203b8b3ab1453eb47e2d4903b963776680e30863df3625d3e74292338ae7928da1",
    "value": 1797928002
}
```

### TABLE `pendingutxos`

#### scope&#x20;

utxomng.xsat

#### params

* `{uint64_t} id` - primary key
* `{uint64_t} height` - block height
* `{checksum256} hash` - block hash
* `{checksum256} txid` - transaction id
* `{uint32_t} index` - vout index
* `{std::vector<uint8_t>} scriptpubkey` - script public key
* `{uint32_t} value` - utxo quantity
* `{name} type` - utxo type (`vin` or `vout`)

#### example

```json
{
    "id": 2,
    "height": 840000,
    "hash": "0000000000000000000320283a032748cef8227873ff4872689bf23f1cda83a5",
    "txid": "2bb85f4b004be6da54f766c17c1e855187327112c231ef2ff35ebad0ea67c69e",
    "index": 0,
    "scriptpubkey": "51203b8b3ab1453eb47e2d4903b963776680e30863df3625d3e74292338ae7928da1",
    "value": 1797928002,
    "type": "vout"
}
```

### TABLE `spentutxos`

#### scope&#x20;

utxomng.xsat

#### params

* `{uint64_t} id` - primary key
* `{uint64_t} height` - block height
* `{checksum256} txid` - transaction id
* `{uint32_t} index` - vout index
* `{std::vector<uint8_t>} scriptpubkey` - script public key
* `{uint32_t} value` - utxo quantity

#### example

```json
{
    "id": 2,
    "height": 840000,
    "txid": "2bb85f4b004be6da54f766c17c1e855187327112c231ef2ff35ebad0ea67c69e",
    "index": 0,
    "scriptpubkey": "51203b8b3ab1453eb47e2d4903b963776680e30863df3625d3e74292338ae7928da1",
    "value": 1797928002
}
```

### TABLE `blocks`

#### scope&#x20;

utxomng.xsat

#### params

* `{uint64_t} height` - block height
* `{checksum256} hash` - block hash
* `{checksum256} cumulative_work` - the cumulative workload of the block
* `{uint32_t} version` - block version
* `{checksum256} previous_block_hash` - hash in internal byte order of the previous block’s header
* `{checksum256} merkle` - the merkle root is derived from the hashes of all transactions included in this block
* `{uint32_t} timestamp` - the block time is a Unix epoch time
* `{uint32_t} bits` - an encoded version of the target threshold this block’s header hash must be less than or equal to
* `{uint32_t} nonce` - an arbitrary number miners change to modify the header hash in order to produce a hash less than or

#### example

```json
{
    "height": 840011,
    "hash": "00000000000000000002d12efb02bcf70580b2eebf4b775578844640512e30f3",
    "cumulative_work": "0000000000000000000000000000000000000000753f3af9322a2a893cb6ece4",
    "version": 747323392,
    "previous_block_hash": "00000000000000000000da20f7d8e9e6412d4f1d8b62d88264cddbdd48256ba0",
    "merkle": "476eac37dd22a59952c5812f715a3e39b68663e40d80d756ba44d7d59e7d6a0a",
    "timestamp": 1713576761,
    "bits": 386089497,
    "nonce": 1492849681
}
```

### TABLE `block.extra`

#### scope&#x20;

utxomng.xsat

#### params

* `{uint64_t} height` - block height
* `{uint64_t} bucket_id` - the associated bucket number is used to obtain block data

#### example

```json
{
    "height": 840001,
    "bucket_id": 1
}
```

### TABLE `consensusblk`

#### scope&#x20;

utxomng.xsat

#### params

* `{uint64_t} bucket_id` - the associated bucket number is used to obtain block data
* `{uint64_t} height` - block height
* `{checksum256} hash` - block hash
* `{checksum256} cumulative_work` - the cumulative workload of the block
* `{uint32_t} version` - block version
* `{checksum256} previous_block_hash` - hash in internal byte order of the previous block’s header
* `{checksum256} merkle` - the merkle root is derived from the hashes of all transactions included in this block
* `{uint32_t} timestamp` - the block time is a Unix epoch time
* `{uint32_t} bits` - an encoded version of the target threshold this block’s header hash must be less than or equal to
* `{uint32_t} nonce` - an arbitrary number miners change to modify the header hash in order to produce a hash less than or
* `{name} miner` - block miner account
* `{name} synchronizer` - block synchronizer account
* `{name} parser` - the last parser of the parsing block
* `{uint64_t} num_utxos` - the total number of vin and vout of the block
* `{bool} parse` - is it an parsed block
* `{bool} irreversible` - is it an irreversible block
* `{time_point_sec} created_at` - created at time

#### example

```json
{
    "bucket_id": 5,
    "height": 840003,
    "hash": "00000000000000000001cfe8671cb9269dfeded2c4e900e365fffae09b34b119",
    "cumulative_work": "0000000000000000000000000000000000000000753cc66782a80f6f099fe68c",
    "version": 704643072,
    "previous_block_hash": "00000000000000000002c0cc73626b56fb3ee1ce605b0ce125cc4fb58775a0a9",
    "merkle": "2daee999cac85a7663bbc3a0e24bd7c86e009c005e7d801ef104d134b420179b",
    "timestamp": 1713572633,
    "bits": 386089497,
    "nonce": 213198539,
    "miner": "",
    "synchronizer": "alice",
    "parser": "alice",
    "num_utxos": 16278,
    "parse": 1,
    "irreversible": 1,
    "created_at": "2024-08-13T00:00:00"
}
```

### STRUCT `process_block_result`

#### params

* `{string} status` - current parsing status (waiting, migrating, deleting\_data, distributing\_rewards, parsing, parsing\_completed)
* `{uint64_t} height` - block height
* `{checksum256} block_hash` - block hash

#### example

```json
{
    "status": "parsing",
    "height": 840000,
    "block_hash": "0000000000000000000320283a032748cef8227873ff4872689bf23f1cda83a5"
}
```

### ACTION `init`

* **authority**: utxomng.xsat

> Initialize block information to start parsing.

#### params

* `{uint64_t} height` - block height
* `{checksum256} hash` - block hash
* `{checksum256} cumulative_work` - the cumulative workload of the block

#### example

```bash
$ cleos push action utxomng.xsat init '[839999, "0000000000000000000172014ba58d66455762add0512355ad651207918494ab", "0000000000000000000000000000000000000000753b8c1eaae701e1f0146360"]' -p utxomng.xsat
```

### ACTION `config`

* **authority**: utxomng.xsat

> Setting parameters.

#### params

* `{uint16_t} parse_timeout_seconds` - parsing timeout duration
* `{uint16_t} num_validators_per_distribution` - number of endorsing users each time rewards are distributed
* `{uint16_t} retained_spent_utxo_blocks` - number of blocks to retain utxo
* `{uint16_t} num_retain_data_blocks` - number of blocks to retain data
* `{uint8_t} num_merkle_layer` - verify the number of merkle levels (log(num\_txs\_per\_verification))
* `{uint16_t} num_miner_priority_blocks` - miners who produce blocks give priority to verifying the number of blocks

#### example

```bash
$ cleos push action utxomng.xsat config '[600, 100, 5000, 100, 11, 10]' -p utxomng.xsat
```

### ACTION `addutxo`

* **authority**: utxomng.xsat

> Add utxo data.

#### params

* `{uint64_t} id` - primary id
* `{checksum256} txid` - transaction id
* `{uint32_t} index` - vout index
* `{vector<uint8_t>} scriptpubkey` - script public key
* `{uint64_t} value` - utxo quantity

#### example

```bash
$ cleos push action utxomng.xsat addutxo '[1, "c323eae524ce3b49f0868396eb9a61bea0e5fb3dc2e52cb46e04c2dba28a3c0d", 1, "001435f6de260c9f3bdee47524c473a6016c0c055cb9", 636813647]' -p utxomng.xsat
```

### ACTION `delutxo`

* **authority**: utxomng.xsat

> Delete utxo data.

#### params

* `{uint64_t} id` - utxo id

#### example

```bash
$ cleos push action utxomng.xsat delutxo '[1]' -p utxomng.xsat
```

### ACTION `addblock`

* **authority**: utxomng.xsat

> Add history block header.

#### params

* `{uint64_t} height` - block height
* `{checksum256} hash` - block hash
* `{checksum256} cumulative_work` - the cumulative workload of the block
* `{uint32_t} version` - block version
* `{checksum256} previous_block_hash` - hash in internal byte order of the previous block’s header
* `{checksum256} merkle` - the merkle root is derived from the hashes of all transactions included in this block
* `{uint32_t} timestamp` - the block time is a Unix epoch time
* `{uint32_t} bits` - an encoded version of the target threshold this block’s header hash must be less than or equal to
* `{uint32_t} nonce` - an arbitrary number miners change to modify the header hash in order to produce a hash less than or

#### example

```bash
$ cleos push action utxomng.xsat addblock '[840000, "0000000000000000000320283a032748cef8227873ff4872689bf23f1cda83a5", "0000000000000000000172014ba58d66455762add0512355ad651207918494ab", 710926336,
"0000000000000000000172014ba58d66455762add0512355ad651207918494ab", "031b417c3a1828ddf3d6527fc210daafcc9218e81f98257f88d4d43bd7a5894f", 1713571767, 3932395645, 386089497 ]' -p utxomng.xsat
```

### ACTION `delblock`

* **authority**: utxomng.xsat

> Delete block header.

#### params

* `{uint64_t} height` - block height

#### example

```bash
$ cleos push action utxomng.xsat delblock '[840000]' -p utxomng.xsat
```

### ACTION `delspentutxo`

* **authority**: utxomng.xsat

> Delete spent utxo.

#### params

* `{uint64_t} row` - number of rows to delete utxo
* `{uint64_t} nonce` - unique value for each call to prevent duplicate transactions

#### example

```bash
$ cleos push action utxomng.xsat delspentutxo '[1000, 1]' -p utxomng.xsat
```

### ACTION `delblockdata`

* **authority**: utxomng.xsat

> Delete block data.

#### params

* `{uint64_t} row` - number of rows of block data to delete
* `{uint64_t} nonce` - unique value for each call to prevent duplicate transactions

#### example

```bash
$ cleos push action utxomng.xsat delblockdata '[1000, 1]' -p utxomng.xsat
```

### ACTION `processblock`

* **authority**: `synchronizer`

> Parse utxo

#### params

* `{name} synchronizer` - synchronizer account
* `{uint64_t} process_rows` - number of vins and vouts to be parsed
* `{uint64_t} nonce` - unique value for each call to prevent duplicate transactions

#### example

```bash
$ cleos push action utxomng.xsat processblock '["alice", 1000, 1]' -p alice
```

### ACTION `consensus`

* **authority**: `blksync.xsat` or `blkendt.xsat`

> Reach consensus logic

#### params

* `{uint64_t} height` - block height
* `{checksum256} hash` - block hash

#### example

```bash
$ cleos push action utxomng.xsat consensus '[840000, "0000000000000000000320283a032748cef8227873ff4872689bf23f1cda83a5"]' -p blksync.xsat
```


# Reward Distribution Contract

## rwddist.xsat

### Actions

* Mint XSAT and distribute it to validators

### Quickstart

```bash
# distribute @utxomng.xsat
$ cleos push action rwddist.xsat distribute '{"height": 840000}' -p utxomng.xsat

# endtreward @utxomng.xsat
$ cleos push action rwddist.xsat endtreward '{"height": 840000, "from_index": 0, "to_index": 10}' -p utxomng.xsat

# endtreward2 @utxomng.xsat - XSAT
$ cleos push action rwddist.xsat endtreward2 '{"height": 840000, "from_index": 0, "to_index": 10}' -p utxomng.xsat

# setrwdconfig @auth get_self()
$ cleos push action rwddist.xsat setrwdconfig '{"v1": {"miner_reward_rate": 1000, "synchronizer_reward_rate": 1000, "btc_consensus_reward_rate": 1000, "xsat_consensus_reward_rate": 1000, "xsat_staking_reward_rate": 1000}, "v2": {"miner_reward_rate": 2000, "synchronizer_reward_rate": 500, "btc_consensus_reward_rate": 0, "xsat_consensus_reward_rate": 500}}' -p rwddist.xsat
```

### Table Information

```bash
$ cleos get table rwddist.xsat rwddist.xsat rewardlogs
$ cleos get table rwddist.xsat rwddist.xsat rewardbal 
$ cleos get table rwddist.xsat rwddist.xsat rewardconfig
```

### STRUCT `validator_info`

* `{name} account` - validator account
* `{uint64_t} staking` - the validator's staking amount
* `{time_point_sec} created_at` - created at time

#### example

```json
{
  "account": "test.xsat",
  "staking": "10200000000",
  "created_at": "2024-08-13T00:00:00"
}
```

### TABLE `rewardlogs`

#### scope `height`

#### params

* `{uint64_t} height` - block height
* `{checksum256} hash` - block hash
* `{asset} synchronizer_rewards` - the synchronizer assigns the number of rewards
* `{asset} consensus_rewards` - the consensus validator allocates the number of rewards
* `{asset} staking_rewards` - the validator assigns the number of rewards
* `{uint32_t} num_validators` - the number of validators who pledge more than 100 BTC
* `{std::vector<validator_info> } provider_validators` - list of endorsed validators
* `{uint64_t} endorsed_staking` - total endorsed staking amount
* `{uint64_t} reached_consensus_staking` - the total staking amount to reach consensus is `(number of validators * 2/3+ 1 staking amount)`
* `{uint32_t} num_validators_assigned` - the number of validators that have been allocated rewards
* `{name} synchronizer` -synchronizer account
* `{name} miner` - miner account
* `{name} parser` - parse the account of the block
* `{checksum256} tx_id` - tx\_id of the reward after distribution
* `{time_point_sec} latest_exec_time` - latest reward distribution time

#### example

```json
{
  "height": 840000,
  "hash": "0000000000000000000320283a032748cef8227873ff4872689bf23f1cda83a5",
  "synchronizer_rewards": "5.00000000 XSAT",
  "consensus_rewards": "5.00000000 XSAT",
  "staking_rewards": "40.00000000 XSAT",
  "num_validators": 2,
  "provider_validators": [{
      "account": "alice",
      "staking": "10010000000"
      },{
      "account": "bob",
      "staking": "10200000000"
      }
  ],
  "endorsed_staking": "20210000000",
  "reached_consensus_staking": "20210000000",
  "num_validators_assigned": 2,
  "synchronizer": "alice",
  "miner": "",
  "parser": "alice",
  "tx_id": "0000000000000000000000000000000000000000000000000000000000000000",
  "latest_exec_time": "2024-07-13T09:06:56"
}
```

### TABLE `rewardbal`

#### scope

rwddist.xsat

#### params

* `{uint64_t} height` - block height
* `{asset} synchronizer_rewards_unclaimed` - unclaimed synchronizer rewards
* `{asset} consensus_rewards_unclaimed` - unclaimed consensus rewards
* `{asset} staking_rewards_unclaimed` - unclaimed staking rewards

#### example

```json
{
  "height": 840000,
  "synchronizer_rewards_unclaimed": "5.00000000 XSAT",
  "consensus_rewards_unclaimed": "5.00000000 XSAT",
  "staking_rewards_unclaimed": "40.00000000 XSAT"
}
```

### STRUCT `reward_rate_t`

#### params

* `{uint64_t} miner_reward_rate` - reward rate for miners
* `{uint64_t} synchronizer_reward_rate` - reward rate for synchronizers
* `{uint64_t} btc_consensus_reward_rate` - reward rate for BTC consensus
* `{uint64_t} xsat_consensus_reward_rate` - reward rate for XSAT consensus
* `{uint64_t} xsat_staking_reward_rate` - reward rate for XSAT staking
* `{uint64_t} reserve1` - reserved for future use
* `{uint64_t} reserve2` - reserved for future use
* `{std::optional<int>} reserved3` - reserved for future use

#### example

```json
{
  "miner_reward_rate": 1000,
  "synchronizer_reward_rate": 1000,
  "btc_consensus_reward_rate": 1000,
  "xsat_consensus_reward_rate": 1000,
  "xsat_staking_reward_rate": 1000,
  "reserve1": 0,
  "reserve2": 0,
  "reserved3": null
}
```

### TABLE `rewardconfig`

#### scope&#x20;

rwddist.xsat

#### params

* `{uint16_t} cached_version` - cached version (0 - unset)
* `{reward_rate_t} v1` - reward rate configuration version 1
* `{reward_rate_t} v2` - reward rate configuration version 2

#### example

```json
{
  "cached_version": 0,
  "v1": {
    "miner_reward_rate": 1000,
    "synchronizer_reward_rate": 1000,
    "btc_consensus_reward_rate": 1000,
    "xsat_consensus_reward_rate": 1000,
    "xsat_staking_reward_rate": 1000,
    "reserve1": 0,
    "reserve2": 0,
    "reserved3": null
  },
  "v2": {
    "miner_reward_rate": 2000,
    "synchronizer_reward_rate": 500,
    "btc_consensus_reward_rate": 0,
    "xsat_consensus_reward_rate": 500,
    "xsat_staking_reward_rate": 0,
    "reserve1": 0,
    "reserve2": 0,
    "reserved3": null
  }
}
```

### ACTION `distribute`

* **authority**: `utxomng.xsat`

> Allocate rewards and record allocation information.

#### params

* `{uint64_t} height` - Block height for allocating rewards

#### example

```bash
$ cleos push action rwddist.xsat distribute '[840000]' -p utxomng.xsat
```

### ACTION `endtreward`

* **authority**: `utxomng.xsat`

> Allocate rewards and record allocation information.

#### params

* `{uint64_t} height` - block height
* `{uint32_t} from_index` - the starting reward index of provider\_validators
* `{uint32_t} to_index` - end reward index of provider\_validators

#### example

```bash
$ cleos push action rwddist.xsat endtreward '[840000, 0, 10]' -p utxomng.xsat
```

### ACTION `endtreward2`

* **authority**: `utxomng.xsat`

> Allocate XSAT rewards and record allocation information.

#### params

* `{uint64_t} height` - block height
* `{uint32_t} from_index` - the starting reward index of provider\_validators
* `{uint32_t} to_index` - end reward index of provider\_validators

#### example

```bash
$ cleos push action rwddist.xsat endtreward2 '[840000, 0, 10]' -p utxomng.xsat
```

### ACTION `setrwdconfig`

* **authority**: rwddist.xsat

> Set reward configuration.

#### params

* `{reward_config_row} config` - reward configuration

#### example

```bash
$ cleos push action rwddist.xsat setrwdconfig '{"v1": {"miner_reward_rate": 1000, "synchronizer_reward_rate": 1000, "btc_consensus_reward_rate": 1000, "xsat_consensus_reward_rate": 1000, "xsat_staking_reward_rate": 1000}, "v2": {"miner_reward_rate": 2000, "synchronizer_reward_rate": 500, "btc_consensus_reward_rate": 0, "xsat_consensus_reward_rate": 500}}' -p rwddist.xsat
```


# Block Consensus Contract

## blkendt.xsat

This contract processes votes from validators on the hash of each Bitcoin block. When more than two-thirds of the validators submit the same hash for a block, and it matches the hash of the block data submitted by the Synchronizer, the block is considered to have reached consensus.

### Actions

* Endorse a block

### QuickStart

```
# config @blkendt.xsat
$ cleos push action blkendt.xsat config '{"limit_endorse_height": 840000, "limit_num_endorsed_blocks": 4, "min_validators": 15, "consensus_interval_seconds": 480, "xsat_stake_activation_height": 860000}' -p blkendt.xsat

# erase @utxomng.xsat
$ cleos push action blkendt.xsat erase '{"height": 840000}' -p utxomng.xsat

# endorse @validator
$ cleos push action blkendt.xsat endorse '{"validator": "alice", "height": 840000, "hash": "0000000000000000000320283a032748cef8227873ff4872689bf23f1cda83a5"}' -p alice

# setqualify @auth get_self()
$ cleos push action blkendt.xsat setqualify '{"min_xsat_qualification": "2100.00000000 XSAT", "min_btc_qualification": "100.00000000 BTC"}' -p blkendt.xsat

# setconheight @auth get_self()
$ cleos push action blkendt.xsat setconheight '{"xsat_stake_activation_height": 890000, "xsat_reward_height": 890000}' -p blkendt.xsat  

# revote @auth synchronizer
$ cleos push action blkendt.xsat revote '{"synchronizer": "synchronizer", "height": 840000}' -p synchronizer
```

### Table Information

```
$ cleos get table blkendt.xsat <height> endorsements

# by hash
$ cleos get table blkendt.xsat <height> endorsements --index 2 --key-type sha256 -L <hash> -U <hash>
```

### STRUCT `requested_validator_info`

* `{name} account` - validator account
* `{uint64_t} staking` - the validator's staking amount

```
{
  "account": "test.xsat",
  "staking": "10200000000"
}
```

### STRUCT `provider_validator_info`

* `{name} account` - validator account
* `{uint64_t} staking` - the validator's staking amount
* `{time_point_sec} created_at` - created at time

#### example

```
{
  "account": "test.xsat",
  "staking": "10200000000",
  "created_at": "2024-08-13T00:00:00"
}
```

### TABLE `config`

#### scope &#x20;

blkendt.xsat

#### params

* `{uint64_t} limit_endorse_height` - limit the endorsement height. If it is 0, there will be no limit. If it is greater than this height, endorsement will not be allowed.
* `{uint16_t} limit_num_endorsed_blocks` - limit the endorsement height to no more than the number of blocks of the parsed height. If it is 0, there will be no limit.
* `{uint16_t} min_validators` - the minimum number of validators, which limits the number of validators that pledge more than 100 BTC at the time of first endorsement.
* `{uint16_t} consensus_interval_seconds` - the interval in seconds between consensus rounds.
* `{uint64_t} xsat_stake_activation_height` - block height at which XSAT staking feature is activated
* `{asset} min_xsat_qualification` - minimum XSAT amount required for qualification
* `{asset} min_btc_qualification` - minimum BTC amount required for qualification
* `{uint64_t} xsat_reward_height` - block height at which XSAT rewards are activated
* `{uint64_t} validator_active_vote_count` - count of active validator votes

#### example

```
{
  "limit_endorse_height": 840000,
  "limit_num_endorsed_blocks": 10,
  "min_validators": 15,
  "consensus_interval_seconds": 480,
  "xsat_stake_activation_height": 860000,
  "min_xsat_qualification": "2100.00000000 XSAT",
  "min_btc_qualification": "100.00000000 BTC",
  "xsat_reward_height": 890000,
  "validator_active_vote_count": 0
}
```

### TABLE `endorsements`

#### scope&#x20;

height

#### params

* `{uint64_t} id` - primary key
* `{checksum256} hash` - endorsement block hash
* `{std::vector<requested_validator_info>} requested_validators` - list of unendorsed validators
* `{std::vector<provider_validator_info>} provider_validators` - list of endorsed validators

#### example

```
{
  "id": 0,
  "hash": "00000000000000000000da20f7d8e9e6412d4f1d8b62d88264cddbdd48256ba0",
  "requested_validators": [{
      "account": "alice",
      "staking": "10000000000"
   }
  ],
  "provider_validators": [{
      "account": "test.xsat",
      "staking": "10200000000",
      "created_at": "2024-08-13T00:00:00"
     }
  ]
}
```

### TABLE `revote_record`

#### scope&#x20;

blkendt.xsat

#### params

* `{uint64_t} id` - primary key
* `{uint64_t} height` - height
* `{std::vector<name>} synchronizers` - synchronizers
* `{uint8_t} status` - status
* `{time_point_sec} created_at` - created at time
* `{time_point_sec} updated_at` - updated at time

#### example

```
{
  "id": 0,
  "height": 840000,
  "synchronizers": ["alice", "bob"],
  "status": 0,
  "created_at": "2024-08-13T00:00:00",
  "updated_at": "2024-08-13T00:00:00"
}
```

### ACTION `config`

* **authority**: blkendt.xsat

> Configure endorsement status

#### params

* `{uint64_t} limit_endorse_height` - limit the endorsement height. If it is 0, there will be no limit. If it is greater than this height, endorsement will not be allowed.
* `{uint16_t} limit_num_endorsed_blocks` - limit the endorsement height to no more than the number of blocks of the parsed height. If it is 0, there will be no limit.
* `{uint16_t} min_validators` - the minimum number of validators, which limits the number of validators that pledge more than 100 BTC at the time of first endorsement.
* `{uint64_t} xsat_stake_activation_height` - block height at which XSAT staking feature is activated
* `{uint16_t} consensus_interval_seconds` - the interval in seconds between consensus rounds.

#### example

```
$ cleos push action blkendt.xsat config '[840003, 10, 15, 860000, 480]' -p blkendt.xsat
```

### ACTION `endorse`

* **authority**: `validator`

> Endorsement block

#### params

* `{name} validator` - validator account
* `{uint64_t} height` - to endorse the height of the block
* `{checksum256} hash` - to endorse the hash of the block

#### example

```
$ cleos push action blkendt.xsat endorse '["alice", 840000, "0000000000000000000320283a032748cef8227873ff4872689bf23f1cda83a5"]' -p alice
```

### ACTION `erase`

* **authority**: `utxomng.xsat`

> To erase high endorsements

#### params

* `{uint64_t} height` - to endorse the height of the block

#### example

```
$ cleos push action blkendt.xsat erase '[840000]' -p utxomng.xsat
```

### ACTION `revote`

* **authority**: `synchronizer`

> To initiate a revote for a specific height

#### params

* `{name} synchronizer` - synchronizer account
* `{uint64_t} height` - height

#### example

```
$ cleos push action blkendt.xsat revote '["alice", 840000]' -p alice
```

### ACTION `setqualify`

* **authority**: `endrmng.xsat` or `blkendt.sat`

> Set the minimum pledge amount of xast to become a validator

#### params

* `{asset} min_xsat_qualification` - the minimum pledge amount of xast to become a validator
* `{asset} min_btc_qualification` - the minimum pledge amount of btc to become a validator

#### example

```
$ cleos push action blkendt.xsat setqualify '["21000.00000000 XSAT", "100.00000000 BTC"]' -p endrmng.xsat
```

### ACTION `setconheight`

* **authority**: `blkendt.sat`

> Set the XSAT stake activation height and XSAT reward height

#### params

* `{uint64_t} xsat_stake_activation_height` - block height at which XSAT staking feature is activated
* `{uint64_t} xsat_reward_height` - block height at which XSAT reward feature is activated

#### example

```
$ cleos push action blkendt.xsat setconheight '[860000, 870000]' -p blkendt.xsat
```


# Block Synchronization Contract

## blksync.xsat

### Actions

* Initialize block bucket
* Sharding of upload chunks
* Delete block shards
* Verify the validity of the block

### Quickstart

```bash
# initbucket @synchronizer
$ cleos push action blksync.xsat initbucket '{"synchronizer": "alice", "height": 840000, "hash": "0000000000000000000320283a032748cef8227873ff4872689bf23f1cda83a5", "block_size": 2325617, "num_chunks": 11}' -p alice

# pushchunk @synchronizer
$ cleos push action blksync.xsat pushchunk '{"synchronizer": "alice", "height": 840000, "hash": "0000000000000000000320283a032748cef8227873ff4872689bf23f1cda83a5", "chunk_id": 0, "data": "<data>"}' -p alice

# delchunk @synchronizer
$ cleos push action blksync.xsat delchunk '{"synchronizer": "alice", "height": 840000, "hash": "0000000000000000000320283a032748cef8227873ff4872689bf23f1cda83a5", "chunk_id": 0}' -p alice

# delbucket @synchronizer
$ cleos push action blksync.xsat delbucket '{"synchronizer": "alice", "height": 840000, "hash": "0000000000000000000320283a032748cef8227873ff4872689bf23f1cda83a5"}' -p alice

# verify @synchronizer
$ cleos push action blksync.xsat verify '{"synchronizer": "alice", "height": 840000, "hash": "0000000000000000000320283a032748cef8227873ff4872689bf23f1cda83a5", "nonce": 1}' -p alice
```

### Table Information

```bash
$ cleos get table blksync.xsat <synchronizer> blockbuckets
# by status
$ cleos get table blksync.xsat <synchronizer> blockbuckets --index 2 --key-type uint64_t -U <status> -L <status>
# by blockid
$ cleos get table blksync.xsat <synchronizer> blockbuckets --index 3 --key-type sha256 -U <blockid> -L <blockid>

$ cleos get table blksync.xsat <height> passedindexs
# by hash
$ cleos get table blksync.xsat <height> block.chunk  --index 3 --key-type sha256 -U <hash> -L <hash>

$ cleos get table blksync.xsat <height> blockminer
```

### ENUM `block_status`

```
typedef uint8_t block_status;
static const block_status uploading = 1;
static const block_status upload_complete = 2;
static const block_status verify_merkle = 3;
static const block_status verify_parent_hash = 4;
static const block_status waiting_miner_verification = 5;
static const block_status verify_fail = 6;
static const block_status verify_pass = 7;
```

### TABLE `globalid`

#### scope&#x20;

blksync.xsat

#### params

* `{uint64_t} bucket_id` - latest bucket\_id

#### example

```json
{
  "bucket_id": 1
}
```

### STRUCT `verify_info_data`

#### params

* `{name} miner` - block miner account
* `{vector<string>} btc_miners` - btc miner account
* `{checksum256} previous_block_hash` - hash in internal byte order of the previous block’s header
* `{checksum256} work` - block workload
* `{checksum256} witness_reserve_value` - witness reserve value in the block
* `{std::optional<checksum256>}` - witness commitment in the block
* `{bool} has_witness` - whether any of the transactions in the block contains witness
* `{checksum256} header_merkle` - the merkle root of the block
* `{std::vector<checksum256>} relay_header_merkle` - check header merkle relay data
* `{std::vector<checksum256>} relay_witness_merkle` - check witness merkle relay data
* `{uint64_t} num_transactions` - the number of transactions in the block
* `{uint64_t} processed_position` - the location of the block that has been resolved
* `{uint64_t} processed_transactions` - the number of processed transactions
* `{uint32_t} timestamp` - the block time in seconds since epoch (Jan 1 1970 GMT)
* `{uint32_t} bits` - the bits

#### example

```json
{
  "miner": "",
  "btc_miners": [
      "1BM1sAcrfV6d4zPKytzziu4McLQDsFC2Qc"
  ],
  "previous_block_hash": "000000000000000000029bfa01a7cee248f85425e0d0b198f4947717d4d3441e",
  "work": "000000000000000000000000000000000000000000004e9235f043634662e0cb",
  "witness_reserve_value": "0000000000000000000000000000000000000000000000000000000000000000",
  "witness_commitment": "aeaa22969e5aac88afd1ac14b19a3ad3a58f5eb0dd151ddddfc749297ebfb020",
  "has_witness": 1,
  "header_merkle": "f3f07d3e4636fa1ae5300b3bc148c361beafd7b3309d30b7ba136d0e59a9a0e5",
  "relay_header_merkle": [
     "d1c9861b0d129b34bb6b733c624bbe0a9b10ff01c6047dced64586ef584987f4",
     "bd95f641a29379f0b5a26961de4bb36bd9568a67ca0615be3fb0a28152ff1806",
     "667eb5d36c67667ae4f10bd30a62e3797e8700e1fbb5e3f754a7526f2b7db1e2",
     "5193ac78b5ef8f570ed24946fbcb96d71284faa27b86296093a93eb5c1cfac06"
  ],
  "relay_witness_merkle": [
     "8a080509ebf6baca260d466c2669200d9b4de750f6a190382c4e8ab6ab6859db",
     "d65d4261be51ca1193e718a6f0cfe6415b6f122f4c3df87861e7452916b45d78",
     "95aa96164225b76afa32a9b2903241067b0ea71228cc2d51b9321148c4e37dd3",
     "0dfca7530a6e950ecdec67c60e5d9574404cc97b333a4e24e3cf2eadd5eb76bd"
  ],
  "num_transactions": 4899,
  "processed_transactions": 4096,
  "processed_position": 1197889,
  "timestamp": 1713608213,
  "bits": 386089497
}
```

### TABLE `blockbuckets`

#### scope `validator`

#### params

* `{uint64_t} bucket_id` - primary key, bucket\_id is the scope associated with block.bucket
* `{uint64_t} height` - block height
* `{uint32_t} size` -block size
* `{uint32_t} uploaded_size` - the latest release id
* `{uint8_t} num_chunks` - number of chunks
* `{uint8_t} uploaded_num_chunks` - number of chunks that have been uploaded
* `{uint32_t} chunk_size` - the size of each chunk
* `{vector<uint8_t>} chunk_ids` - the uploaded chunk\_id
* `{string} reason` - reason for verification failure
* `{block_status} status` - current block status
* `{time_point_sec} updated_at` - updated at time
* `{std::optional<verify_info_data>} verify_info` - @see struct `verify_info_data`

#### example

```json
{
  "bucket_id": 81,
  "height": 840062,
  "hash": "00000000000000000002fc5099a59501b26c34819ac52cc16141275f158c3c6a",
  "size": 1434031,
  "uploaded_size": 1434031,
  "num_chunks": 11,
  "uploaded_num_chunks": 11,
  "chunk_size": 256000,
  "chunk_ids": [0, 1, 2, 3, 4, 5, 6, 7, 8, 9, 10],
  "reason": "",
  "status": 3,
  "updated_at": "2024-08-19T00:00:00",
  "verify_info": {
      "miner": "",
      "btc_miners": [
          "1BM1sAcrfV6d4zPKytzziu4McLQDsFC2Qc"
      ],
      "previous_block_hash": "000000000000000000029bfa01a7cee248f85425e0d0b198f4947717d4d3441e",
      "work": "000000000000000000000000000000000000000000004e9235f043634662e0cb",
      "witness_reserve_value": "0000000000000000000000000000000000000000000000000000000000000000",
      "witness_commitment": "aeaa22969e5aac88afd1ac14b19a3ad3a58f5eb0dd151ddddfc749297ebfb020",
      "has_witness": 1,
      "header_merkle": "f3f07d3e4636fa1ae5300b3bc148c361beafd7b3309d30b7ba136d0e59a9a0e5",
      "relay_header_merkle": [
         "d1c9861b0d129b34bb6b733c624bbe0a9b10ff01c6047dced64586ef584987f4",
         "bd95f641a29379f0b5a26961de4bb36bd9568a67ca0615be3fb0a28152ff1806",
         "667eb5d36c67667ae4f10bd30a62e3797e8700e1fbb5e3f754a7526f2b7db1e2",
         "5193ac78b5ef8f570ed24946fbcb96d71284faa27b86296093a93eb5c1cfac06"
      ],
      "relay_witness_merkle": [
          "8a080509ebf6baca260d466c2669200d9b4de750f6a190382c4e8ab6ab6859db",
          "d65d4261be51ca1193e718a6f0cfe6415b6f122f4c3df87861e7452916b45d78",
          "95aa96164225b76afa32a9b2903241067b0ea71228cc2d51b9321148c4e37dd3",
          "0dfca7530a6e950ecdec67c60e5d9574404cc97b333a4e24e3cf2eadd5eb76bd"
      ],
      "num_transactions": 4899,
      "processed_transactions": 4096,
      "processed_position": 1197889,
      "timestamp": 1713608213,
      "bits": 386089497
  }
}
```

### TABLE `passedindexs`

#### scope `height`

#### params

* `{uint64_t} id` - primary key
* `{checksum256} hash` - block hash
* `{checksum256} cumulative_work` - the cumulative workload of the block
* `{uint64_t} bucket_id` - bucket\_id is used to obtain block data
* `{name} synchronizer` - synchronizer account
* `{name} miner` - miner account
* `{time_point_sec} created_at` - created at time

#### example

```json
{
  "id": 0,
  "hash": "000000000000000000029bfa01a7cee248f85425e0d0b198f4947717d4d3441e",
  "cumulative_work": "0000000000000000000000000000000000000000753f3af9322a2a893cb6ece4",
  "bucket_id": 80,
  "synchronizer": "test.xsat",
  "miner": "alice",
  "created_at": "2024-08-13T00:00:00"
}
```

### TABLE `blockminer`

#### scope `height`

#### params

* `{uint64_t} id` - primary key
* `{checksum256} hash` - block hash
* `{name} miner` - block miner account
* `{uint32_t} block_num` - the block number that passed the first verification

#### example

```json
{
  "id": 0,
  "hash": "000000000000000000029bfa01a7cee248f85425e0d0b198f4947717d4d3441e",
  "miner": "alice",
  "expired_block_num": 210000
}
```

### TABLE `block.chunk`

#### scope `bucket_id`

#### params

* `{std::vector<char>} data` - the block chunk for block

#### example

```json
{
  "data": ""
}
```

### STRUCT `verify_block_result`

#### params

* `{string} status` - verification status (uploading, upload\_complete, verify\_merkle, verify\_parent\_hash, waiting\_miner\_verification, verify\_pass, verify\_fail)
* `{string} reason` - reason for verification failure
* `{checksum256} block_hash` - block hash

#### example

```json
{
  "status": "verify_pass",
  "reason": "",
  "block_hash": "000000000000000000029bfa01a7cee248f85425e0d0b198f4947717d4d3441e"
}
```

### ACTION `consensus`

* **authority**: `utxomng.xsat`

> Consensus completion processing logic

#### params

* `{uint64_t} height` - block height
* `{name} synchronizer` - synchronizer account
* `{uint64_t} bucket_id` - bucket id

#### example

```bash
$ cleos push action blksync.xsat consensus '[840000, "alice", 1]' -p utxomng.xsat
```

### ACTION `delchunks`

* **authority**: `utxomng.xsat`

> Deletion of historical block data after parsing is completed

#### params

* `{uint64_t} bucket_id` - bucket\_id of block data to be deleted

#### example

```bash
$ cleos push action blksync.xsat delchunks '[1]' -p utxomng.xsat
```

### ACTION `initbucket`

* **authority**: `synchronizer`

> Initialize the block information to be uploaded

#### params

* `{name} synchronizer` - synchronizer account
* `{uint64_t} height` - block height
* `{checksum256} hash` - block hash
* `{uint32_t} size` -block size
* `{uint8_t} num_chunks` - number of chunks
* `{uint32_t} chunk_size` - the size of each chunk

#### example

```bash
$ cleos push action blksync.xsat initbucket '["alice", 840000, "0000000000000000000320283a032748cef8227873ff4872689bf23f1cda83a5", 2325617, 9, 25600]' -p alice
```

### ACTION `pushchunk`

* **authority**: `synchronizer`

> Upload block shard data

#### params

* `{name} synchronizer` - synchronizer account
* `{uint64_t} height` - block height
* `{checksum256} hash` - block hash
* `{uint8_t} chunk_id` - chunk id
* `{std::vector<char>} data` - block data to be uploaded

#### example

```bash
$ cleos push action blksync.xsat pushchunk '["alice", 840000, "0000000000000000000320283a032748cef8227873ff4872689bf23f1cda83a5", 0, ""]' -p alice
```

### ACTION `delchunk`

* **authority**: `synchronizer`

> Delete block shard data

#### params

* `{name} synchronizer` - synchronizer account
* `{uint64_t} height` - block height
* `{checksum256} hash` - block hash
* `{uint8_t} chunk_id` - chunk id

#### example

```bash
$ cleos push action blksync.xsat delchunk '["alice", 840000, "0000000000000000000320283a032748cef8227873ff4872689bf23f1cda83a5", 0]' -p alice
```

### ACTION `delbucket`

* **authority**: `synchronizer`

> Delete the entire block data

#### params

* `{name} synchronizer` - synchronizer account
* `{uint64_t} height` - block height
* `{checksum256} hash` - block hash

#### example

```bash
$ cleos push action blksync.xsat delbucket '["alice", 840000, "0000000000000000000320283a032748cef8227873ff4872689bf23f1cda83a5"]' -p alice
```

### ACTION `verify`

* **authority**: `synchronizer`

> Verify block data

#### params

* `{name} synchronizer` - synchronizer account
* `{uint64_t} height` - block height
* `{checksum256} hash` - block hash
* `{uint64_t} nonce` - unique value for each call to prevent duplicate transactions

#### example

```bash
$ cleos push action blksync.xsat verify '["alice", 840000, "0000000000000000000320283a032748cef8227873ff4872689bf23f1cda83a5", 1]' -p alice
```


# Validator Management Contract

## endrmng.sat

### Actions

* Add evm proxy account
* Delete evm proxy account
* Add whitelist (`proxyreg` or `evmcaller`)
* Delete whitelist (`proxyreg` or `evmcaller`)
* Staking, unstaking, changing staking, and claiming rewards on native chains and EVM
* Validator claiming rewards
* Batch allocation of validator rewards from rwddist.xsat

### Quickstart

```bash
# setdonateacc @endrmng.xsat
$ cleos push action endrmng.xsat setdonateacc '{"donation_account": "alice", "min_donate_rate": 2000}' -p endrmng.xsat

# setdonate @validator
$ cleos push action endrmng.xsat setdonate '{"validator": "alice", "donate_rate": 100}' -p alice

# addevmproxy @endrmng.xsat
$ cleos push action endrmng.xsat addevmproxy '{"caller": "caller1", "proxy": "e4d68a77714d9d388d8233bee18d578559950cf5"}' -p endrmng.xsat

# delevmproxy @endrmng.xsat
$ cleos push action endrmng.xsat delevmproxy '{"caller": "caller1", "proxy": "e4d68a77714d9d388d8233bee18d578559950cf5"}' -p endrmng.xsat

# addcrdtproxy @endrmng.xsat
$ cleos push action endrmng.xsat addcrdtproxy '{"proxy": "e4d68a77714d9d388d8233bee18d578559950cf5"}' -p endrmng.xsat

# delcrdtproxy @endrmng.xsat
$ cleos push action endrmng.xsat delcrdtproxy '{"proxy": "e4d68a77714d9d388d8233bee18d578559950cf5"}' -p endrmng.xsat

# addwhitelist @endrmng.xsat type = ["proxyreg", "evmcaller"]
$ cleos push action endrmng.xsat addwhitelist '{"type": "proxyreg", "account": "alice"}' -p endrmng.xsat

# delwhitelist @endrmng.xsat type = ["proxyreg", "evmcaller"]
$ cleos push action endrmng.xsat delwhitelist '{"type": "proxyreg", "account": "alice"}' -p endrmng.xsat

# setstatus @endrmng.xsat
$ cleos push action endrmng.xsat setstatus '{"validator": "alice", "disabled_staking": true}' -p endrmng.xsat

# regvalidator @validator
$ cleos push action endrmng.xsat regvalidator '{"validator": "alice", "financial_account": "alice"}' -p alice

# proxyreg @proxy
$ cleos push action endrmng.xsat proxyreg '{"proxy": "alice", "validator": "alice", "financial_account": "alice"}' -p alice

# config @validator decimal = 10000
$ cleos push action endrmng.xsat config '{"validator": "alice", "commission_rate": 2000, "financial_account": "alice"}' -p alice

# stake @staking.xsat
$ cleos push action endrmng.xsat stake '{"staker": "alice", "validator": "alice", "quantity": "0.00000020 BTC"}' -p staking.xsat

# unstake @staking.xsat
$ cleos push action endrmng.xsat unstake '{"staker": "alice", "validator": "alice", "quantity": "0.00000020 BTC"}' -p staking.xsat

# newstake @staker
$ cleos push action endrmng.xsat newstake '{"staker": "alice", "old_validator": "alice", "new_validator": "bob", "quantity": "0.00000020 BTC"}' -p alice

# claim @staker
$ cleos push action endrmng.xsat claim '{"staker": "alice", "validator": "alice"}' -p alice

# evmstake @auth scope is `evmcaller` evmproxies account
$ cleos push action endrmng.xsat evmstake '{"caller": "evmutil.xsat", "proxy": "e4d68a77714d9d388d8233bee18d578559950cf5", "staker": "bbbbbbbbbbbbbbbbbbbbbbbb5530ea015b900000",  "validator": "alice", "quantity": "0.00000020 BTC"}' -p alice

# evmunstake @auth scope is `evmcaller` evmproxies account
$ cleos push action endrmng.xsat evmunstake '{"caller": "evmutil.xsat", "proxy": "e4d68a77714d9d388d8233bee18d578559950cf5", "staker": "bbbbbbbbbbbbbbbbbbbbbbbb5530ea015b900000",  "validator": "alice", "quantity": "0.00000020 BTC"}' -p evmutil.xsat 

# evmnewstake @auth scope is `evmcaller` evmproxies account
$ cleos push action endrmng.xsat evmnewstake '{"caller": "evmutil.xsat", "proxy": "e4d68a77714d9d388d8233bee18d578559950cf5", "staker": "bbbbbbbbbbbbbbbbbbbbbbbb5530ea015b900000",  "old_validator": "alice", "new_validator": "bob", "quantity": "0.00000020 BTC"}' -p evmutil.xsat

# evmclaim @caller whitelist["evmcaller"] 
$ cleos push action endrmng.xsat evmclaim '{"caller": "evmutil.xsat", "proxy": "e4d68a77714d9d388d8233bee18d578559950cf5", "staker": "bbbbbbbbbbbbbbbbbbbbbbbb5530ea015b900000",  "validator": "alice"}' -p evmutil.xsat

# evmclaim2 @caller whitelist["evmcaller"] 
$ cleos push action endrmng.xsat evmclaim2 '{"caller": "evmutil.xsat", "proxy": "e4d68a77714d9d388d8233bee18d578559950cf5", "staker": "bbbbbbbbbbbbbbbbbbbbbbbb5530ea015b900000",  "validator": "alice", "donate_rate": 100}' -p evmutil.xsat

# vdrclaim @validator
$ cleos push action endrmng.xsat vdrclaim '{"validator": "alice"}' -p alice 

# distribute @rwddist.xsat
$ cleos push action endrmng.xsat distribute '{"height": 840000, [{"validator": "alice", "staking_rewards": "0.00000020 XSAT", "consensus_rewards": "0.00000020 XSAT"}]}' -p rwddist.xsat

# stakexsat
$ cleos push action endrmng.xsat stakexsat '{"staker": "alice", "validator": "alice", "quantity": "0.00000020 XSAT"}' -p xsatstk.xsat

# unstakexsat 
$ cleos push action endrmng.xsat unstakexsat '{"staker": "alice", "validator": "alice", "quantity": "0.00000020 XSAT"}' -p xsatstk.xsat

# restakexsat 
$ cleos push action endrmng.xsat restakexsat '{"staker": "alice", "old_validator": "alice", "new_validator": "bob", "quantity": "0.00000020 XSAT"}' -p alice

# evmstakexsat @auth scope is `evmcaller` evmproxies account
$ cleos push action endrmng.xsat evmstakexsat '{"caller": "evmutil.xsat", "proxy": "e4d68a77714d9d388d8233bee18d578559950cf5", "staker": "bbbbbbbbbbbbbbbbbbbbbbbb5530ea015b900000",  "validator": "alice", "quantity": "0.00000020 XSAT"}' -p evmutil.xsat

# evmunstkxsat @auth scope is `evmcaller` evmproxies account
$ cleos push action endrmng.xsat evmunstkxsat '{"caller": "evmutil.xsat", "proxy": "e4d68a77714d9d388d8233bee18d578559950cf5", "staker": "bbbbbbbbbbbbbbbbbbbbbbbb5530ea015b900000",  "validator": "alice", "quantity": "0.00000020 XSAT"}' -p evmutil.xsat 

# evmrestkxsat @auth scope is `evmcaller` evmproxies account
$ cleos push action endrmng.xsat evmrestkxsat '{"caller": "evmutil.xsat", "proxy": "e4d68a77714d9d388d8233bee18d578559950cf5", "staker": "bbbbbbbbbbbbbbbbbbbbbbbb5530ea015b900000",  "old_validator": "alice", "new_validator": "bob", "quantity": "0.00000020 XSAT"}' -p evmutil.xsat

# creditstake @auth custody.xsat 
$ cleos push action endrmng.xsat creditstake '{"proxy": "e4d68a77714d9d388d8233bee18d578559950cf5", "staker": "bbbbbbbbbbbbbbbbbbbbbbbb5530ea015b900000",  "validator": "alice", "quantity": "0.00000020 XSAT"}' -p custody.xsat

# newregvalidator @auth validator
$ cleos push action endrmng.xsat newregvldtor '{"validator": "alice", "role": 0, "stake_addr": "e4d68a77714d9d388d8233bee18d578559950cf5", "reward_addr": "e4d68a77714d9d388d8233bee18d578559950cf5", "commission_rate": 2000}' -p alice

# evmconfigvald @auth validator
$ cleos push action endrmng.xsat evmconfigvald '{"validator": "alice", "commission_rate": 2000, "donate_rate": 100}' -p alice

# evmsetstaker @auth validator
$ cleos push action endrmng.xsat evmsetstaker '{"validator": "alice", "stake_addr": "e4d68a77714d9d388d8233bee18d578559950cf5"}' -p alice

# setrwdaddr @auth validator
$ cleos push action endrmng.xsat setrwdaddr '{"validator": "alice", "reward_addr": "e4d68a77714d9d388d8233bee18d578559950cf5"}' -p alice

# setstakebase @auth get_self()
$ cleos push action endrmng.xsat setstakebase '{"xsat_base_stake": "2100 XSAT", "btc_base_stake": "100 BTC"}' -p endrmng.xsat

# updcreditstk @auth get_self()
$ cleos push action endrmng.xsat updcreditstk '{"is_close": true}' -p endrmng.xsat

# endorse @auth BLOCK_ENDORSE_CONTRACT
$ cleos push action endrmng.xsat endorse '{"validator": "alice", "height": 840000}' -p block_endorse.xsat
```

### Table Information

```bash
$ cleos get table endrmng.xsat endrmng.xsat config
$ cleos get table endrmng.xsat evmcaller whitelist 
$ cleos get table endrmng.xsat proxyreg whitelist 
$ cleos get table endrmng.xsat <evmcaller> evmproxies
$ cleos get table endrmng.xsat endrmng.xsat creditproxy 
$ cleos get table endrmng.xsat endrmng.xsat evmstakers 
$ cleos get table endrmng.xsat endrmng.xsat stakers 
$ cleos get table endrmng.xsat endrmng.xsat validators 
$ cleos get table endrmng.xsat endrmng.xsat stat
```

### TABLE `globalid`

#### scope&#x20;

endrmng.sat

#### params

* `{uint64_t} staking_id` - the latest staking id

#### example

```json
{
  "staking_id": 1
}
```

### TABLE `config`

#### scope&#x20;

endrmng.sat

#### params

* `{string} donation_account` - the account designated for receiving donations
* `{binary_extension<uint16_t>} min_donate_rate` - minimum donation rate

#### example

```json
{
  "donation_account": "donate.xsat",
  "min_donate_rate": 2000
}
```

### TABLE `whitelist`

#### scope `proxyreg` or `evmcaller`

#### params

* `{name} account` - whitelist account

#### example

```json
{
  "account": "alice"
}
```

### TABLE `evmproxies`

#### scope&#x20;

whitelist of type evmcaller

#### params

* `{uint64_t} id` - evm proxy id
* `{checksum160} proxy` - evm proxy account

#### example

```json
{
  "id": 1,
  "proxy": "bb776ae86d5996908af46482f24be8ccde2d4c41"
}
```

### TABLE `creditproxy`

#### scope&#x20;

the account whose scope is evmcaller in the `whitelist` table

#### params

* `{uint64_t} id` - evm proxy id
* `{checksum160} proxy` - evm proxy account

#### example

```json
{
  "id": 1,
  "proxy": "bb776ae86d5996908af46482f24be8ccde2d4c41"
}
```

### TABLE `evmstakers`

#### scope

endrmng.sat

#### params

* `{uint64_t} id` - evm staker id
* `{checksum160} proxy` - proxy account
* `{checksum160} staker` - staker account
* `{name} validator` - validator account
* `{asset} quantity` - total number of staking
* `{asset} xsat_quantity` - the amount of XSAT tokens staked
* `{asset} total_donated` - the total amount of XSAT that has been donated
* `{uint64_t} stake_debt` - amount of requested stake debt
* `{asset} staking_reward_unclaimed` - amount of stake unclaimed rewards
* `{asset} staking_reward_claimed` - amount of stake claimed rewards
* `{uint64_t} consensus_debt` - amount of requested consensus debt
* `{asset} consensus_reward_unclaimed` - amount of consensus unclaimed rewards
* `{asset} consensus_reward_claimed` - amount of consensus claimed rewards

#### example

```json
{
  "id": 4,
  "proxy": "bb776ae86d5996908af46482f24be8ccde2d4c41",
  "staker": "e4d68a77714d9d388d8233bee18d578559950cf5",
  "validator": "alice",
  "quantity": "0.10000000 BTC",
  "xsat_quantity": "0.10000000 XSAT",
  "total_donated": "1.00000000 XSAT",
  "stake_debt": 1385452,
  "staking_reward_unclaimed": "0.00000000 XSAT",
  "staking_reward_claimed": "0.00000000 XSAT",
  "consensus_debt": 173181,
  "consensus_reward_unclaimed": "0.00000000 XSAT",
  "consensus_reward_claimed": "0.00000000 XSAT"
}
```

### TABLE `stakers`

#### scope

endrmng.sat

#### params

* `{uint64_t} id` - staker id
* `{name} staker` - staker account
* `{name} validator` - validator account
* `{asset} quantity` - total number of staking
* `{asset} xsat_quantity` - the amount of XSAT tokens staked
* `{asset} total_donated` - the total amount of XSAT that has been donated
* `{uint64_t} stake_debt` - amount of requested stake debt
* `{asset} staking_reward_unclaimed` - amount of stake unclaimed rewards
* `{asset} staking_reward_claimed` - amount of stake claimed rewards
* `{uint64_t} consensus_debt` - amount of requested consensus debt
* `{asset} consensus_reward_unclaimed` - amount of consensus unclaimed rewards
* `{asset} consensus_reward_claimed` - amount of consensus claimed rewards

#### example

```json
{
  "id": 2,
  "staker": "alice",
  "validator": "alice",
  "quantity": "0.10000000 BTC",
  "xsat_quantity": "0.10000000 XSAT",
  "total_donated": "1.00000000 XSAT",
  "stake_debt": 1385452,
  "staking_reward_unclaimed": "0.00000000 XSAT",
  "staking_reward_claimed": "0.00000000 XSAT",
  "consensus_debt": 173181,
  "consensus_reward_unclaimed": "0.00000000 XSAT",
  "consensus_reward_claimed": "0.00000000 XSAT"
}
```

### TABLE `validators`

#### scope&#x20;

endrmng.sat

#### params

* `{name} owner` - staker id
* `{name} reward_recipient` - receiving account for receiving rewards
* `{string} memo` - memo when receiving reward transfer
* `{uint16_t} commission_rate` - commission ratio, decimal is 10^4
* `{asset} quantity` - the amount of BTC staked by the validator
* `{asset} qualification` - the qualification of the validator
* `{asset} xsat_quantity` - the amount of XSAT tokens staked by the validator
* `{uint16_t} donate_rate` - the donation rate, represented as a percentage, ex: 500 means 5.00%
* `{asset} total_donated` - the total amount of XSAT that has been donated
* `{uint128_t} stake_acc_per_share` - staking rewards earnings per share
* `{uint128_t} consensus_acc_per_share` - consensus reward earnings per share
* `{asset} staking_reward_unclaimed` - unclaimed staking rewards
* `{asset} staking_reward_claimed` - amount of stake claimed rewards
* `{asset} consensus_reward_unclaimed` - amount of consensus unclaimed rewards
* `{asset} consensus_reward_claimed` - amount of consensus claimed rewards
* `{asset} total_consensus_reward` - total consensus rewards
* `{asset} consensus_reward_balance` - consensus reward balance
* `{asset} total_staking_reward` - total staking rewards
* `{asset} staking_reward_balance` - staking reward balance
* `{time_point_sec} latest_staking_time` - latest staking or unstaking time
* `{uint64_t} latest_reward_block` - latest reward block
* `{time_point_sec} latest_reward_time` - latest reward time
* `{bool} disabled_staking` - whether to disable staking
* `{checksum160} stake_address` - stake address
* `{checksum160} reward_address` - reward address
* `{uint64_t} consecutive_vote_count` - consecutive vote count
* `{uint64_t} latest_consensus_block` - latest consensus block
* `{uint8_t} active_flag` - active flag
* `{uint8_t} role` - role

#### example

```json
{
  "owner": "alice",
  "reward_recipient": "erc2o.xsat",
  "memo": "0x5EB954fB68159e0b7950936C6e1947615b75C895",
  "commission_rate": 0,
  "quantity": "102.10000000 BTC",
  "qualification": "102.10000000 BTC",
  "xsat_quantity": "1000.10000000 XSAT",
  "donate_rate": 100,
  "total_donated": "100.00000000 XSAT",
  "stake_acc_per_share": "39564978",
  "consensus_acc_per_share": "4945621",
  "staking_reward_unclaimed": "0.00000000 XSAT",
  "staking_reward_claimed": "0.00000000 XSAT",
  "consensus_reward_unclaimed": "0.00000000 XSAT",
  "consensus_reward_claimed": "0.00000000 XSAT",
  "total_consensus_reward": "5.04700642 XSAT",
  "consensus_reward_balance": "5.04700642 XSAT",
  "total_staking_reward": "40.37605144 XSAT",
  "staking_reward_balance": "40.37605144 XSAT",
  "latest_staking_time": "2024-07-13T09:16:26",
  "latest_reward_block": 840001,
  "latest_reward_time": "2024-07-13T14:29:32",
  "disabled_staking": 0,
  "stake_address": "e4d68a77714d9d388d8233bee18d578559950cf5",
  "reward_address": "e4d68a77714d9d388d8233bee18d578559950cf5",
  "consecutive_vote_count": 1,
  "latest_consensus_block": 840000,
  "active_flag": 1,
  "role": 0
 }
```

### TABLE `stat`

#### scope&#x20;

endrmng.sat

#### params

* `{asset} total_staking` - btc total staking amount
* `{asset} xsat_total_staking` - the total amount of XSAT staked
* `{asset} xsat_total_donated` - the cumulative amount of XSAT donated

#### example

```json
{
  "total_staking": "100.40000000 BTC",
  "xsat_total_staking": "100.40000000 XSAT",
  "xsat_total_donated": "100.40000000 XSAT"
}
```

### ACTION `setdonateacc`

* **authority**: endrmng.sat

> Update donation account.

#### params

* `{string} donation_account` - account to receive donations
* `{uint16_t} min_donate_rate` - minimum donation rate

#### example

```bash
$ cleos push action endrmng.xsat setdonateacc '["alice", 2000]' -p endrmng.xsat
```

### ACTION `addwhitelist`

* **authority**: endrmng.sat

> Add whitelist account

#### params

* `{name} type` - whitelist type @see `WHITELIST_TYPES`
* `{name} account` - whitelist account

#### example

```bash
$ cleos push action endrmng.xsat addwhitelist '["proxyreg", "alice"]' -p endrmng.xsat
```

### ACTION `delwhitelist`

* **authority**: endrmng.sat

> Delete whitelist account

#### params

* `{name} type` - whitelist type @see `WHITELIST_TYPES`
* `{name} account` - whitelist account

#### example

```bash
$ cleos push action endrmng.xsat addwhitelist '["proxyreg", "alice"]' -p endrmng.xsat
```

### ACTION `addevmproxy`

* **authority**: endrmng.sat

> Add evm proxy account

#### params

* `{name} caller` - caller account
* `{checksum160} proxy` - proxy account

#### example

```bash
$ cleos push action endrmng.xsat addevmproxy '["evmcaller", "bb776ae86d5996908af46482f24be8ccde2d4c41"]' -p endrmng.xsat
```

### ACTION `delevmproxy`

* **authority**: endrmng.sat

> Delete evm proxy account

#### params

* `{name} caller` - caller account
* `{checksum160} proxy` - proxy account

#### example

```bash
$ cleos push action endrmng.xsat delevmproxy '["evmcaller", "bb776ae86d5996908af46482f24be8ccde2d4c41"]' -p endrmng.xsat
```

### ACTION `addcrdtproxy`

* **authority**: endrmng.sat

> Add credit proxy account

#### params

* `{checksum160} proxy` - proxy account

#### example

```bash
$ cleos push action endrmng.xsat addcrdtproxy '["bb776ae86d5996908af46482f24be8ccde2d4c41"]' -p endrmng.xsat
```

### ACTION `delcrdtproxy`

* **authority**: endrmng.sat

> Delete credit proxy account

#### params

* `{checksum160} proxy` - proxy account

#### example

```bash
$ cleos push action endrmng.xsat delcrdtproxy '["bb776ae86d5996908af46482f24be8ccde2d4c41"]' -p endrmng.xsat
```

### ACTION `setstatus`

* **authority**: endrmng.sat

> Set validator staking status

#### params

* `{name} validator` - validator account
* `{bool} disabled_staking` - whether to disable staking

#### example

```bash
$ cleos push action endrmng.xsat setstatus '["alice",  true]' -p alice
```

### ACTION `regvalidator`

* **authority**: `validator`

> Registering a validator

#### params

* `{name} validator` - validator account
* `{name} financial_account` - financial accounts
* `{uint16_t} commission_rate` - commission ratio, decimal is 10^4

#### example

```bash
$ cleos push action endrmng.xsat regvalidator '["alice", "alice", 1000]' -p alice
```

### ACTION `proxyreg`

* **authority**: `proxy`

> Proxy account registration validator

#### params

* `{name} proxy` - proxy account
* `{name} validator` - validator account
* `{string} financial_account` - financial accounts
* `{uint16_t} commission_rate` - commission ratio, decimal is 10^4

#### example

```bash
$ cleos push action endrmng.xsat proxyreg '["test.xsat", "alice", "alice",  1000]' -p test.xsat
```

### ACTION `config`

* **authority**: `validator`

> Validator sets commission ratio and financial account

#### params

* `{name} validator` - validator account
* `{optional<uint16_t>} commission_rate` - commission ratio, decimal is 10^4
* `{optional<string>} financial_account` - financial accounts

#### example

```bash
$ cleos push action endrmng.xsat config '["alice",  1000, "alice"]' -p alice
```

### ACTION `setdonate`

* **authority**: `validator`

> Configure donate rate.

#### params

* `{name} validator` - synchronizer account
* `{uint16_t} donate_rate` - the donation rate, represented as a percentage, ex: 500 means 5.00%

#### example

```bash
$ cleos push action endrmng.xsat setdonate '["alice", 100]' -p alice
```

### ACTION `stake`

* **authority**: `staking.xsat`

> Staking BTC to validator

#### params

* `{name} staker` - staker account
* `{name} validator` - validator account
* `{asset} quantity` - staking amount

#### example

```bash
$ cleos push action endrmng.xsat stake '["alice",  "alice", "1.00000000 BTC"]' -p staking.xsat
```

### ACTION `unstake`

* **authority**: `staking.xsat`

> Unstaking BTC from a validator

#### params

* `{name} staker` - staker account
* `{name} validator` - validator account
* `{asset} quantity` - cancel staking amount

#### example

```bash
$ cleos push action endrmng.xsat unstake '["alice",  "alice", "1.00000000 BTC"]' -p staking.xsat
```

### ACTION `newstake`

* **authority**: `staker`

> Staking BTC to a new validator

#### params

* `{name} staker` - staker account
* `{name} old_validator` - old validator account
* `{name} new_validator` - new validator account
* `{asset} quantity` - the amount of stake transferred to the new validator

#### example

```bash
$ cleos push action endrmng.xsat newstake '["alice",  "alice", "bob", "1.00000000 BTC"]' -p alice
```

### ACTION `claim`

* **authority**: `staker`

> Claim staking rewards

#### params

* `{name} staker` - staker account
* `{name} validator` - validator account

#### example

```bash
$ cleos push action endrmng.xsat claim '["alice",  "bob"]' -p alice
```

### ACTION `evmstake`

* **authority**: `caller`

> Staking BTC to validator via evm

#### params

* `{name} caller` - caller account
* `{checksum160} proxy` - evm proxy account
* `{checksum160} staker` - evm staker account
* `{name} validator` - validator account
* `{asset} quantity` - staking amount

#### example

```bash
$ cleos push action endrmng.xsat evmstake '["evmutil.xsat", "bb776ae86d5996908af46482f24be8ccde2d4c41", "e4d68a77714d9d388d8233bee18d578559950cf5",  "alice", "1.00000000 BTC"]' -p evmutil.xsat
```

### ACTION `evmunstake`

* **authority**: `caller`

> Unstake BTC from validator via evm

#### params

* `{name} caller` - caller account
* `{checksum160} proxy` - evm proxy account
* `{checksum160} staker` - evm staker account
* `{name} validator` - validator account
* `{asset} quantity` - staking amount

#### example

```bash
$ cleos push action endrmng.xsat evmunstake '["evmutil.xsat", "bb776ae86d5996908af46482f24be8ccde2d4c41", "e4d68a77714d9d388d8233bee18d578559950cf5",  "alice", "1.00000000 BTC"]' -p evmutil.xsat
```

### ACTION `evmnewstake`

* **authority**: `caller`

> Staking BTC to a new validator via evm

#### params

* `{name} caller` - caller account
* `{checksum160} proxy` - evm proxy account
* `{checksum160} staker` - evm staker account
* `{name} old_validator` - old validator account
* `{name} new_validator` - new validator account
* `{asset} quantity` - staking amount

#### example

```bash
$ cleos push action endrmng.xsat evmnewstake '["evmutil.xsat", "bb776ae86d5996908af46482f24be8ccde2d4c41", "e4d68a77714d9d388d8233bee18d578559950cf5",  "alice", "bob", "1.00000000 BTC"]' -p evmutil.xsat
```

### ACTION `evmclaim`

* **authority**: `caller`

> Claim staking rewards through evm

#### params

* `{name} caller` - caller account
* `{checksum160} proxy` - evm proxy account
* `{checksum160} staker` - evm staker account
* `{name} validator` - validator account

#### example

```bash
$ cleos push action endrmng.xsat evmclaim '["evmutil.xsat", "bb776ae86d5996908af46482f24be8ccde2d4c41", "e4d68a77714d9d388d8233bee18d578559950cf5",  "alice"]' -p evmutil.xsat
```

### ACTION `evmclaim2`

* **authority**: `caller`

> Claim staking rewards through evm

#### params

* `{name} caller` - caller account
* `{checksum160} proxy` - evm proxy account
* `{checksum160} staker` - evm staker account
* `{name} validator` - validator account
* `{uint16_t} donate_rate` - the donation rate, represented as a percentage, ex: 500 means 5.00%

#### example

```bash
$ cleos push action endrmng.xsat evmclaim2 '["evmutil.xsat", "bb776ae86d5996908af46482f24be8ccde2d4c41", "e4d68a77714d9d388d8233bee18d578559950cf5",  "alice", 100]' -p evmutil.xsat
```

### ACTION `vdrclaim`

* **authority**: `validator->reward_recipient` or `evmutil.xsat`

> Validator Receive Rewards

#### params

* `{name} validator` - validator account

#### example

```bash
$ cleos push action endrmng.xsat vdrclaim '["alice"]' -p alice
```

### STRUCT `reward_details_row`

#### params

* `{name} validator` - validator account
* `{asset} staking_rewards` - staking rewards
* `{asset} consensus_rewards` - consensus rewards

#### example

```json
{
  "validator": "alice",
  "staking_rewards": "0.00000010 XSAT",
  "consensus_rewards": "0.00000020 XSAT"
}
```

### ACTION `distribute`

* **authority**: `rwddist.xsat`

> Distributing validator rewards

#### params

* `{uint64_t} height` - validator account
* `{vector<reward_details_row>} rewards` - validator account

#### example

```bash
$ cleos push action endrmng.xsat distribute '[840000, [{"validator": "alice", "staking_rewards": "0.00000020 XSAT", "consensus_rewards": "0.00000020 XSAT"}]]' -p rwddist.xsat
```

### ACTION `stakexsat`

* **authority**: `xsatstk.xsat`

> Staking XSAT to validator

#### params

* `{name} staker` - staker account
* `{name} validator` - validator account
* `{asset} quantity` - staking amount

#### example

```bash
$ cleos push action endrmng.xsat stakexsat '["alice",  "alice", "1.00000000 XSAT"]' -p xsatstk.xsat
```

### ACTION `unstakexsat`

* **authority**: `xsatstk.xsat`

> Unstaking XSAT from a validator

#### params

* `{name} staker` - staker account
* `{name} validator` - validator account
* `{asset} quantity` - cancel staking amount

#### example

```bash
$ cleos push action endrmng.xsat unstakexsat '["alice",  "alice", "1.00000000 XSAT"]' -p xsatstk.xsat
```

### ACTION `restakexsat`

* **authority**: `staker`

> Staking XSAT to a new validator

#### params

* `{name} staker` - staker account
* `{name} old_validator` - old validator account
* `{name} new_validator` - new validator account
* `{asset} quantity` - the amount of stake transferred to the new validator

#### example

```bash
$ cleos push action endrmng.xsat restakexsat '["alice",  "alice", "bob", "1.00000000 XSAT"]' -p alice
```

### ACTION `evmstakexsat`

* **authority**: `caller`

> Staking XSAT to validator via evm

#### params

* `{name} caller` - caller account
* `{checksum160} proxy` - evm proxy account
* `{checksum160} staker` - evm staker account
* `{name} validator` - validator account
* `{asset} quantity` - staking amount

#### example

```bash
$ cleos push action endrmng.xsat evmstakexsat '["evmutil.xsat", "bb776ae86d5996908af46482f24be8ccde2d4c41", "e4d68a77714d9d388d8233bee18d578559950cf5",  "alice", "1.00000000 XSAT"]' -p evmutil.xsat
```

### ACTION `evmunstkxsat`

* **authority**: `caller`

> Unstake XSAT from validator via evm

#### params

* `{name} caller` - caller account
* `{checksum160} proxy` - evm proxy account
* `{checksum160} staker` - evm staker account
* `{name} validator` - validator account
* `{asset} quantity` - staking amount

#### example

```bash
$ cleos push action endrmng.xsat evmunstkxsat '["evmutil.xsat", "bb776ae86d5996908af46482f24be8ccde2d4c41", "e4d68a77714d9d388d8233bee18d578559950cf5",  "alice", "1.00000000 XSAT"]' -p evmutil.xsat
```

### ACTION `evmrestkxsat`

* **authority**: `caller`

> Staking XSAT to a new validator via evm

#### params

* `{name} caller` - caller account
* `{checksum160} proxy` - evm proxy account
* `{checksum160} staker` - evm staker account
* `{name} old_validator` - old validator account
* `{name} new_validator` - new validator account
* `{asset} quantity` - staking amount

#### example

```bash
$ cleos push action endrmng.xsat evmrestkxsat '["evmutil.xsat", "bb776ae86d5996908af46482f24be8ccde2d4c41", "e4d68a77714d9d388d8233bee18d578559950cf5",  "alice", "bob", "1.00000000 XSAT"]' -p evmutil.xsat
```

### ACTION `creditstake`

* **authority**: `custody.xsat`

> Unstake BTC from validator via credit

#### params

* `{checksum160} proxy` - evm proxy account
* `{checksum160} staker` - evm staker account
* `{name} validator` - validator account
* `{asset} quantity` - staking amount
* `{checksum160} stake_address` - stake address
* `{checksum160} reward_address` - reward address
* `{uint64_t} consecutive_vote_count` - consecutive vote count
* `{uint64_t} latest_consensus_block` - latest consensus block
* `{uint8_t} active_flag` - active flag (0: inactive, 1: active, 2: credit staking validator)
* `{uint32_t} role` - role (0: BTC, 1: XSAT)

#### example

```bash
$ cleos push action endrmng.xsat creditstake '["bb776ae86d5996908af46482f24be8ccde2d4c41", "e4d68a77714d9d388d8233bee18d578559950cf5",  "alice", "1.00000000 BTC"]' -p custody.xsat 
```

### ACTION `newregvldtor`

* **authority**: `validator`

> Register a new validator with additional parameters

#### params

* `{name} validator` - validator account
* `{uint32_t} role` - role (0: BTC, 1: XSAT)
* `{checksum160} stake_addr` - stake address
* `{optional<checksum160>} reward_addr` - reward address
* `{optional<uint16_t>} commission_rate` - commission ratio, decimal is 10^4

#### example

```bash
$ cleos push action endrmng.xsat newregvldtor '["alice", 0, "e4d68a77714d9d388d8233bee18d578559950cf5", "e4d68a77714d9d388d8233bee18d578559950cf5", 2000]' -p alice
```

### ACTION `evmconfigvald`

* **authority**: `validator`

> Configure validator commission and donate rates

#### params

* `{name} validator` - validator account
* `{optional<uint16_t>} commission_rate` - commission ratio, decimal is 10^4
* `{optional<uint16_t>} donate_rate` - the donation rate, represented as a percentage

#### example

```bash
$ cleos push action endrmng.xsat evmconfigvald '["alice", 2000, 100]' -p alice
```

### ACTION `evmsetstaker`

* **authority**: `validator`

> Set validator stake address

#### params

* `{name} validator` - validator account
* `{checksum160} stake_addr` - stake address

#### example

```bash
$ cleos push action endrmng.xsat evmsetstaker '["alice", "e4d68a77714d9d388d8233bee18d578559950cf5"]' -p alice
```

### ACTION `setrwdaddr`

* **authority**: `validator`

> Set validator reward address

#### params

* `{name} validator` - validator account
* `{checksum160} reward_addr` - reward address

#### example

```bash
$ cleos push action endrmng.xsat setrwdaddr '["alice", "e4d68a77714d9d388d8233bee18d578559950cf5"]' -p alice
```

### ACTION `setstakebase`

* **authority**: endrmng.sat

> Set base stake amounts for validators

#### params

* `{asset} xsat_base_stake` - XSAT base stake amount
* `{asset} btc_base_stake` - BTC base stake amount

#### example

```bash
$ cleos push action endrmng.xsat setstakebase '["2100 XSAT", "100 BTC"]' -p endrmng.xsat
```

### ACTION `updcreditstk`

* **authority**: endrmng.sat

> Update credit staking settings

#### params

* `{bool} is_close` - whether to close credit staking

#### example

```bash
$ cleos push action endrmng.xsat updcreditstk '[true]' -p endrmng.xsat
```

### ACTION `endorse`

* **authority**: `BLOCK_ENDORSE_CONTRACT`

> Endorse a validator for a specific block height

#### params

* `{name} validator` - validator account
* `{uint64_t} height` - block height

#### example

```bash
$ cleos push action endrmng.xsat endorse '["alice", 840000]' -p block_endorse.xsat
```

### ACTION `setdepproxy`

* **authority**: endrmng.sat

> Set deposit proxy accounts

#### params

* `{checksum160} btc_deposit_proxy` - BTC deposit proxy
* `{checksum160} xsat_deposit_proxy` - XSAT deposit proxy

#### example

```bash
$ cleos push action endrmng.xsat setdepproxy '["bb776ae86d5996908af46482f24be8ccde2d4c41", "e4d68a77714d9d388d8233bee18d578559950cf5"]' -p endrmng.xsat
```


# Staking Contract

## &#x20;staking.xsat

### Actions

* Add a staking token
* Remove a staking token
* Set the token's staking disable status
* Unstake tokens
* Withdraw tokens that have reached their expiration time

### Quickstart

```bash
# addtoken @staking.xsat
$ cleos push action staking.xsat addtoken '[{ "sym": "8,BTC", "contract": "btc.xsat" }]' -p staking.xsat

# deltoken @staking.xsat
$ cleos push action staking.xsat deltoken '[1]' -p staking.xsat

# setstatus @staking.xsat
$ cleos push action staking.xsat setstatus '{"id": 1, "disabled_staking": true}' -p staking.xsat

# staking @staker
$ cleos push action btc.xsat transfer '{"from":"alice","to":"staking.xsat","quantity":"1.00000000 BTC", "memo":"alice"}' -p alice

# release @staker
$ cleos push action staking.xsat release '{"staking_id": 1, "staker": "alice", "validator": "alice", "quantity": "1.00000000 BTC"}' -p alice

# withdraw @staker
$ cleos push action staking.xsat withdraw '{"staker": "alice"}' -p alice
```

### Table Information

```bash
$ cleos get table rescmng.xsat staking.xsat globalid
$ cleos get table rescmng.xsat staking.xsat tokens
$ cleos get table rescmng.xsat <staker> staking
$ cleos get table rescmng.xsat <staker> releases
```

### TABLE `globalid`

#### scope&#x20;

staking.xsat

#### params

* `{uint64_t} staking_id` - the latest staking id
* `{uint64_t} release_id` - the latest release id

#### example

```json
{
  "staking_id": 1,
  "release_id": 1
}
```

### TABLE `tokens`

#### scope&#x20;

staking.xsat

#### params

* `{uint64_t} id` - token id
* `{uint64_t} token` - whitelist token
* `{bool} disabled_staking` - whether to disable staking

#### example

```json
{
  "id": 1,
  "token": { "sym": "8,BTC", "contract": "btc.xsat" },
  "disabled_staking": false
}
```

### TABLE `staking`

#### scope `staker`

#### params

* `{uint64_t} id` - staking id
* `{extended_asset} quantity` - total number of staking

#### example

```json
{
  "id": 1,
  "quantity": {"quantity":"1.00000000 BTC", "contract":"btc.xsat"}
}
```

### TABLE `releases`

#### scope `staker`

#### params

* `{uint64_t} id` - release id
* `{extended_asset} quantity` - unpledged quantity
* `{time_point_sec} expiration_time` - cancel pledge expiration time

#### example

```json
{
  "id": 1,
  "quantity": {
      "quantity": "1.00000000 BTC",
      "contract": "btc.xsat"
  },
  "expiration_time": "2024-08-12T08:09:57"
}
```

### ACTION `addtoken`

* **authority**: staking.xsat

> Add whitelist token

#### params

* `{extended_symbol} token` - token to add

#### example

```bash
$ cleos push action staking.xsat addtoken '[{ "sym": "8,BTC", "contract": "btc.xsat" }]' -p staking.xsat
```

### ACTION `deltoken`

* **authority**: staking.xsat

> Delete whitelist token

#### params

* `{uint64_t} id` - token id to be deleted

#### example

```bash
$ cleos push action staking.xsat deltoken '[1]' -p staking.xsat
```

### ACTION `setstatus`

* **authority**: staking.xsat

> Set the token’s disabled staking status.

#### params

* `{uint64_t} id` - token id
* `{bool} disabled_staking` - whether to disable staking

#### example

```bash
$ cleos push action staking.xsat setstatus '[1, true]' -p staking.xsat
```

### ACTION `release`

* **authority**: `staker`

> Cancel the pledge and enter the unlocking period.

#### params

* `{uint64_t} staking_id` - staking id
* `{name} staker` - staker account
* `{name} validator` - the validator account to be pledged to
* `{extended_asset} quantity` - unpledged quantity

#### example

```bash
$ cleos push action staking.xsat release '[1, "alice", "alice", "1.00000000 BTC"]' -p alice
```

### ACTION `withdraw`

* **authority**: `staker`

> Withdraw expired staking tokens.

#### params

* `{name} staker` - staker account

#### example

```bash
$ cleos push action staking.xsat withdraw '["alice"]' -p alice
```


# Run exSat native layer RPC Node

Users can access the exSat native layer via the following RPC nodes provided by exSat:

* <https://rpc-us.exsat.network>
* <https://rpc-sg.exsat.network>

Alternatively, users can run their own native layer RPC node by following this [instruction](https://docs.eosnetwork.com/docs/latest/node-operation/api-node).


# Trustless Bridge for Native Tokens

## Background

### Vaulta and EVM

We use the **Vaulta** (<https://www.vaulta.com/>) blockchain network. The Vaulta blockchain is a next-generation Layer-1 built for speed, scale and finality. Your transfers, swaps, and app interactions happen almost instantly with low (or no) fees.

**Vaulta EVM** is a powerful feature of the Vaulta blockchain that brings the best of Ethereum's capabilities to the Vaulta ecosystem. It allows you to use popular Ethereum-based applications (dApps) on Vaulta, benefiting from faster speeds, lower costs, and a more eco-friendly environment.

### Exsat EVM

Vaulta EVM technology allow entities to run their own EVM layers on the Vaulta blockchain. Exsat runs it’s own EVM layer, the **Exsat EVM.**

#### Exsat EVM Mainnet

RPC: <https://evm.exsat.network/>

Block explorer: <https://scan.exsat.network/>

#### Exsat EVM Testnet

RPC: <https://evm-tst3.exsat.network/>

Block explorer: <https://scan-testnet.exsat.network/>

### Runtime Contract

The Vaulta EVM system is run in a way that each EVM transaction is actually part of Vaulta transactions. The EVM runtime contract will process Vaulta transactions invoking EVM transactions.

We will use ***evm\_runtime*** to represent the Vaulta account of the evm runtime contract.

### Reserved Address

Each Vaulta account has a mapped reserved EVM address. The rule is using the uint64 value of the Vaulta name as the last 8 bytes of the EVM address, and then pad the rest with 0xbb. E.g. the name “eosio.evm” is mapped to “0xbbbbbbbbbbbbbbbbbbbbbbbb5530ea015b900000”

## Trustless Bridge

### Basic mode

The basic trustless bridge mechanism for the EVM native token is easy:

* Deposit:
  * User transfer Vaulta side token to the evm\_runtime with the target EVM address as memo.
  * The Vaulta side token will be locked in the evm\_runtime.
  * Same amount of EVM side token will be mint and transfer to the target EVM address.
* Withdraw
  * User transfers to the reserved address of the target account name.
  * The EVM side token will be burned.
  * Same amount of Vaulta side token will be unlocked and send to the target account.
  * As native token of EVM will only be minted when there’s same amount of Vaulta side token locked in the evm\_runtime, it is guaranteed that we will have enough tokens to release.

### “Dusts”

The precision used for the native token in Vaulta and EVM can be different. e.g. the BTC in Exsat EVM can have 18 decimals while the Vaulta side one can only have 8.

Clearly, one can send an amount with higher precision than the Vaulta during the withdraw process. In basic mode, we will block such calls to avoid generating inconsistency. We also introduced an advanced mode to handle this case.

### Advanced mode

To hold the dusts, we allow each Vaulta account to open a bridge balance. User can use the “open” action to open the balance. This balance can be used to hold “dusts” beyond native token precision and to hold the gas for call EVM contracts. User can deposit to this balance by sending some tokens to ***evm\_runtime*** with the eos name of the target balance (in string) as memo.

We will call this balance the **bridge** **balance.**

In advanced mode, deposit and withdraw operation is the same as the basic mode with one exception: during the withdraw process, the Vaulta token will go to the bridge balance instead of being sent to the target account. User need to claim the token separately.


# Trustless Bridge For ERC20 Tokens

## Background

### Vaulta and EVM

We use the **Vaulta** (<https://www.vaulta.com/>) blockchain network. The Vaulta blockchain is a next-generation Layer-1 built for speed, scale and finality. Your transfers, swaps, and app interactions happen almost instantly with low (or no) fees.

**Vaulta EVM** is a powerful feature of the Vaulta blockchain that brings the best of Ethereum's capabilities to the Vaulta ecosystem. It allows you to use popular Ethereum-based applications (dApps) on Vaulta, benefiting from faster speeds, lower costs, and a more eco-friendly environment.

### Exsat EVM

Vaulta EVM technology allow entities to run their own EVM layers on the Vaulta blockchain. Exsat runs it’s own EVM layer, the **Exsat EVM.**

#### Exsat EVM Mainnet

RPC: <https://evm.exsat.network/>

Block explorer: <https://scan.exsat.network/>

#### Exsat EVM Testnet

RPC: <https://evm-tst3.exsat.network/>

Block explorer: <https://scan-testnet.exsat.network/>

### Runtime Contract

The Vaulta EVM system is run in a way that each EVM transaction is actually part of Vaulta transactions. The EVM runtime contract will process Vaulta transactions invoking EVM transactions.

We will use ***evm\_runtime*** to represent the Vaulta account of the evm runtime contract.

### Reserved Address

Each Vaulta account has a mapped reserved EVM address. The rule is using the uint64 value of the Vaulta name as the last 8 bytes of the EVM address, and then pad the rest with 0xbb. E.g. the name “eosio.evm” is mapped to “0xbbbbbbbbbbbbbbbbbbbbbbbb5530ea015b900000”

## Trustless Bridge for ERC20

### Tokens originally issued in Vaulta side

Tokens native to Vaulta can be converted to EVM's ERC20 through the trustless bridge. The converted tokens meet the standard ERC20. When bridging from Vaulta to EVM, the tokens on the Vaulta side will be locked in the bridge contract (”erc2o.xsat” for Exsat), and the corresponding tokens will be minted on the EVM side. The reverse cross-chain will burn the EVM side tokens and release the locked vaulta side tokens.

The tokens on the EVM side have a standard ERC20 interface, and the following additional interfaces are available for bridge operation:

```solidity
function bridgeTransfer(address to, uint256 amount, string memory memo) external payable returns (bool);
function egressFee() external returns (uint256);
```

### Tokens originally issued in EVM side

For tokens native to the EVM side, since we cannot add bridge functions to the contracts of these tokens, we need to implement cross-chain by calling the interface of a separate portal contract. When crossing the chain from the EVM side to the Vaulta side, the token will be locked in the portal contract, and the corresponding token will be minted on the Vaulta side. When crossing the chain in the reverse direction, the Valta side token will be recovered and the EVM side token will be released. The portal contract also has a similar bridge interface:

```solidity
function bridgeTransfer(address to, uint256 amount, string memory memo) external payable returns (bool);
function egressFee() external returns (uint256);
function token() external returns (IERC20);
```

The extra function `token()` will return the linked ERC20 token address of the portal.

Note that as portal contract is not the token contract, `approve()` is required before hand.


# Brief Intro to the Cross-Chain Communication

The Exsat-EVM allow communication between the EVM layer and the native Vaulta layer. This doc will cover this topic.

<figure><img src="/files/YZvU1ZW3IloUUehxUFlT" alt=""><figcaption><p>Cross chain communication</p></figcaption></figure>

## Basic concepts:

### Reserved Address

Each Vaulta account has a mapped reserved EVM address. The rule is using the uint64 value of the Vaulta name as the last 8 bytes of the EVM address, and then pad the rest with 0xbb. E.g. the name “eosio.evm” is mapped to “0xbbbbbbbbbbbbbbbbbbbbbbbb5530ea015b900000”

We will use ***addr\_evm(vaulta\_acct)*** to represent the reserved address of the ***vaulta\_acct***.

### Runtime Contract

The Vaulta-EVM system is run in a way that each EVM transaction is actually part of Vaulta transactions. The EVM runtime contract will process Vaulta transactions invoking EVM transactions.

We will use ***evm\_runtime*** to represent the Vaulta account of the evm runtime contract. Thus the reserved address of the evm runtime contract will be  ***addr\_evm(evm\_runtime)***

### Bridge Balance

Each Vaulta account can call “open” action of EVM runtime to open a bridge balance. This balance can be used to hold “dusts” beyond Vaulta token precision and to hold the gas for call EVM contracts. User can deposit to this balance by sending some tokens to ***evm\_runtime*** with the vaulta name of the target balance (in string) as memo.

We will call this balance the **bridge** **balance.**

## EVM to Vaulta

Sending messages from EVM to Vaulta is done by the Bridge Massage mechanism.

### Prerequisites:

The **receiver** Vaulta account ***receiver*** registered a message channel.

```cpp
bridgereg(eosio::name receiver, eosio::name handler, const eosio::asset& min_fee)
```

A ***handler*** can be assigned to process this message. It can be the same account as the ***receiver***.

The ***min\_fee*** sets a minimum bridge fee for bridge messages in this channel. Details will be covered below.

### Sending Messages

The EVM contracts should call bridgeMsgV0(string,bool,bytes) function at ***addr\_evm(evm\_runtime)***

The three parameter for this call should be:

string receiver: the receiver vaulta name in string representation.

bool force\_atomic: whether the call is atomic or not. Currently only atomic mode is supported. So this parameter should always be true.

bytes data: The message data sent to the Vaulta side.

The method is payable. Users can set a value to pay with the call.

After detected such calls, the EVM runtime contract will generate inline actons calling onbridgemsg(const bridge\_message\_t \&message) action of the registered ***handler*** for the ***receiver***

The message received by the ***handler*** is defined as:

```cpp
struct bridge_message_v0 {
        eosio::name receiver;
        bytes sender;
        eosio::time_point timestamp;
        bytes value;
        bytes data;

        EOSLIB_SERIALIZE(bridge_message_v0, (receiver)(sender)(timestamp)(value)(data));
    };
```

Where

```cpp
eosio::name receiver; // The receiver of the message. Handlers can use this to distinguish messages from different channels if a handler is linked to multiple receivers.
bytes sender; // The EVM address of the message sender.
eosio::time_point timestamp; // timestamp for the message
bytes value; // The value paid in the bridgeMsgV0 call
bytes data; // The actual message data
```

### Fees

As mentioned above, the bridgeMsgV0 method is payable. Users can set a value to pay with the call. The value paid will go into the **receiver’s** balance in evm runtime contract. If a min\_fee is set, the evm runtime will fail the call if the requirement is not met.

### Error Handling

bridgeMsgV0 will ALWAYS succeed viewed from the EVM side. No logic should rely on the result of the call.

If anything is wrong during the message processing, the handler should consider failing the whole transaction if it does not want the EVM state to change.

## Vaulta to EVM

Vaulta to EVM communication can be done by letting the Vaulta account generate EVM transactions by code.

### Prerequisites:

The sender should call “open” at evm\_runtime to open the **bridge balance** to pay for the EVM calls.

The sender should deposit some gas token to its **bridge balance**.

### Generate EVM Transactions

Someone could call this action of the ***evm\_runtime*** to generate an EVM transaction.

```cpp
typedef std::vector<char>       bytes;

void call(eosio::name from, const bytes &to, const bytes& value, const bytes &data, uint64_t gas_limit);
eosio::name from // the eos_caller should be put here. Obviously you need the authorization from the eos_caller to proceed.
 const bytes &to // destination EVM address
 const bytes& value // payment value
 const bytes &data // calldata
 uint64_t gas_limit // gas limit

```

### Perform Read-only calls

One could also call the exec action to call the view functions of EVM contracts. Currently the caller can only get the result via call\_backs. Support for synchronously calls will be available after the next major Vaulta upgrade.

```cpp
typedef std::vector<char>       bytes;

struct exec_input {
   std::optional<bytes> context;
   std::optional<bytes> from;
   bytes                to;
   bytes                data;
   std::optional<bytes> value;
};

struct exec_callback {
   name contract;
   name action;
};

// The callback action should accept this as input
struct exec_output {
   int32_t              status;
   bytes                data;
   std::optional<bytes> context;
};

void exec(const exec_input& input, const std::optional<exec_callback>& callback);

```

### Fees

Payment value and gas fee will be deducted from the **bridge** **balance** of the vault&#x61;***\_caller***


# Brief Intro to the Custodian Bridge Services

## Custodian Bridge Services

We work with licensed custodian service providers to provide the bridge service from other chains to the Exsat EVM. The assets will stay in the addresses managed by custodian service provider. We will mint or release tokens on Exsat EVM accordingly. This approach will give us a safe and compliant way to manage crypto assets.

## Background

### Vaulta and EVM

We use the **Vaulta** (<https://www.vaulta.com/>) blockchain network. The Vaulta blockchain is a next-generation Layer-1 built for speed, scale and finality. Your transfers, swaps, and app interactions happen almost instantly with low (or no) fees.

**Vaulta EVM** is a powerful feature of the Vaulta blockchain that brings the best of Ethereum's capabilities to the Vaulta ecosystem. It allows you to use popular Ethereum-based applications (dApps) on Vaulta, benefiting from faster speeds, lower costs, and a more eco-friendly environment.

### Exsat EVM

Vaulta EVM technology allow entities to run their own EVM layers on the Vaulta blockchain. Exsat runs it’s own EVM layer, the **Exsat EVM.**

#### Exsat EVM Mainnet

RPC: <https://evm.exsat.network/>

Block explorer: <https://scan.exsat.network/>

#### Exsat EVM Testnet

RPC: <https://evm-tst3.exsat.network/>

Block explorer: <https://scan-testnet.exsat.network/>

### Reserved Address

Each Vaulta account has a mapped reserved EVM address. The rule is using the uint64 value of the Vaulta name as the last 8 bytes of the EVM address, and then pad the rest with 0xbb. E.g. the name “eosio.evm” is mapped to “0xbbbbbbbbbbbbbbbbbbbbbbbb5530ea015b900000”

## The Cross Chain Bridges

As mentioned above, the support for native token of the EVM and other tokens will be different. However, the general idea is the same: the user first transfer tokens to addresses managed by the custodian service provider on the source chain, the bridge then mint or release tokens to the EVM address linked to the source chain address.

<figure><img src="/files/le0vjqPjvbEjstRrzBNJ" alt=""><figcaption><p>Deposit tokens to user.</p></figcaption></figure>

<figure><img src="/files/n0J6jEIzPYedQnPaZWUd" alt=""><figcaption><p>Withdraw tokens.</p></figcaption></figure>

We also allow dApps to manage their own user funds. In this mode, the bridged tokens will be sent to a dApp appointed address. A notification will be sent to the dApp with extra context to distinguish origin later (but still in the same Vaulta Tx).&#x20;

<figure><img src="/files/sIZOqtMbwxMvx6m9s9jV" alt=""><figcaption><p>Deposit tokens to dApp.</p></figcaption></figure>

### BTC Bridge

**Deposit**

1. Get the address for deposit. Currently, end users can apply for such addresses on <https://exsat.network/app/bridge>. However, for application developments, it is preferable that the developer contact the Exsat to generate such addresses.
2. Transfer to the assigned BTC address.
3. Tokens will be transferred to the EVM address linked to the BTC address.

**Withdraw**

1. Transfer to `0xbbbbbbbbbbbbbbbbbbbbbbbb3d6f4ef81dc1b200` (reserved address of bproxy.xsat) with memo in certain format:

   memo format：\<permission\_id>,\<evm\_address>,\<btc\_address>,\<gas\_level>

   * permission\_id：The id for a bridge routine. 1 is used for regular usages for now. It is possible that we have different settings for different routines. (e.g. maybe different custodian/speed/fees)
   * evm\_address：The Sender address. Note that this address is mainly for record keeping, no validation is performed on this.
   * btc\_address：Recipient address.
   * gas\_level：”slow” or “fast“

Example: <https://scan.exsat.network/tx/0x31f885b08611274700b49ac4c6f17af591e8ebff74d3d4a9ee734b275132eafd>

The memo of the above transaction is:

`1,0x1c892C483618a9EbF8250a437f9E952Fc6b7212d,bc1palegjlhn6v6fj5jdkvsg0fm0kdzgms8pzy9vkhzylug2fnmjfkcsx6y9he,slow`&#x20;

For more details, please check [Custodian Bridge for BTC](/developer-guides/custodian-bridge-for-btc)

### General Token Bridge

**Deposit**

1. Get the address for deposit. Currently, end users can apply for such addresses on <https://exsat.network/app/bridge>. However, for application developments, it is preferable that the developer contact the Exsat to generate such addresses.
2. Transfer token to the assigned address on source chain.
3. Tokens will be transferred to the EVM address linked to the source chain address.

**Withdraw**

1. Locate the helper contract for the token we want to bridge. Each token has a helper contract to handle the withdraw requests.
2. Call the withdraw function:

```solidity
function withdraw(
        uint256 _permissionId,
        string calldata _chainName,
        string calldata _recipientAddress,
        uint256 _amount,
        string calldata _remark
    ) external {}
```

* \_permission\_id: The id for a bridge routine.
* \_chainName: Chain name：e.g. arb, bsc, eth, solana, tron, The chain name must match the settings indexed by the permission id.
* \_recipientAddress: Recipient address
* \_amount: Amount in wei
* \_remark: Memo for the transfer generated in the destination chain if applicable. Can be empty.

The current supported tokens are:

<table><thead><tr><th width="109.640625">permission id</th><th width="101.8046875">chain name</th><th width="87.87890625">symbol</th><th>token contract</th><th>call contract</th></tr></thead><tbody><tr><td>0</td><td>eth</td><td>USDT</td><td>0xA7366BE06B2867a207c0C4F37481fF7B0cE62D87</td><td>0x4f9cC2c21F35f92ee25CBA295684d56E4044F725</td></tr><tr><td>0</td><td>eth</td><td>USDC</td><td>0x893AfC357b656EdD4F0c028670516F846FE89CFb</td><td>0xBB4D7B8953151Cf583dde191c4df4f50b6E96b38</td></tr><tr><td>1</td><td>tron</td><td>USDT</td><td>0xA7366BE06B2867a207c0C4F37481fF7B0cE62D87</td><td>0x4f9cC2c21F35f92ee25CBA295684d56E4044F725</td></tr><tr><td>2</td><td>solana</td><td>USDT</td><td>0xA7366BE06B2867a207c0C4F37481fF7B0cE62D87</td><td>0x4f9cC2c21F35f92ee25CBA295684d56E4044F725</td></tr><tr><td>2</td><td>solana</td><td>USDC</td><td>0x893AfC357b656EdD4F0c028670516F846FE89CFb</td><td>0xBB4D7B8953151Cf583dde191c4df4f50b6E96b38</td></tr><tr><td>0</td><td>bsc</td><td>USDC</td><td>0x893AfC357b656EdD4F0c028670516F846FE89CFb</td><td>0xBB4D7B8953151Cf583dde191c4df4f50b6E96b38</td></tr><tr><td>0</td><td>arb</td><td>USDT</td><td>0xA7366BE06B2867a207c0C4F37481fF7B0cE62D87</td><td>0x4f9cC2c21F35f92ee25CBA295684d56E4044F725</td></tr><tr><td>0</td><td>arb</td><td>USDC</td><td>0x893AfC357b656EdD4F0c028670516F846FE89CFb</td><td>0xBB4D7B8953151Cf583dde191c4df4f50b6E96b38</td></tr><tr><td>0</td><td>bsc</td><td>USDT</td><td>0xA7366BE06B2867a207c0C4F37481fF7B0cE62D87</td><td>0x4f9cC2c21F35f92ee25CBA295684d56E4044F725</td></tr><tr><td>0</td><td>eth</td><td>ETH</td><td>0x81e1Da8BDEbC4686B9025839c72c7FB0229F180C</td><td>0xE077aB9D41F441E5F2C0cB3FA099A92EcFAC3E80</td></tr></tbody></table>

For more details, please check [Custodian Bridge for Non-BTC Tokens](/developer-guides/custodian-bridge-for-non-btc-tokens)


# Custodian Bridge for Non-BTC Tokens

## Background

### Vaulta and EVM

We use the **Vaulta** (<https://www.vaulta.com/>) blockchain network. The Vaulta blockchain is a next-generation Layer-1 built for speed, scale and finality. Your transfers, swaps, and app interactions happen almost instantly with low (or no) fees.

**Vaulta EVM** is a powerful feature of the Vaulta blockchain that brings the best of Ethereum's capabilities to the Vaulta ecosystem. It allows you to use popular Ethereum-based applications (dApps) on Vaulta, benefiting from faster speeds, lower costs, and a more eco-friendly environment.

### Exsat EVM

Vaulta EVM technology allow entities to run their own EVM layers on the Vaulta blockchain. Exsat runs it’s own EVM layer, the **Exsat EVM.**

#### Exsat EVM Mainnet

RPC: <https://evm.exsat.network/>

Block explorer: <https://scan.exsat.network/>

#### Exsat EVM Testnet

RPC: <https://evm-tst3.exsat.network/>

Block explorer: <https://scan-testnet.exsat.network/>

### Reserved Address

Each Vaulta account has a mapped reserved EVM address. The rule is using the uint64 value of the Vaulta name as the last 8 bytes of the EVM address, and then pad the rest with 0xbb. E.g. the name “eosio.evm” is mapped to “0xbbbbbbbbbbbbbbbbbbbbbbbb5530ea015b900000”

###

Contracts on Vaulta and EVM can communicate with each other through the cross chain message mechanism. This enable us to programmatically coordinate operations in both domain. The actions will usually be organized in a single Vaulta transaction so that they are atomic.

Please check [Brief Intro to the Cross-Chain Communication](/developer-guides/brief-intro-to-the-cross-chain-communication) for more details.

### Trustless Bridge

The Vaulta EVM solution contains designs for bridges to move tokens between the Vaulta native and EVM domain. The support for the native token of the EVM and other tokens will be different.

Please check the following docs for more details.

[Trustless Bridge for Native Tokens](/developer-guides/trustless-bridge-for-native-tokens)

[Trustless Bridge For ERC20 Tokens](/developer-guides/trustless-bridge-for-erc20-tokens)

## The Bridge

Basically, we have a off chain service to connect the custodian service and the contracts on Vaulta. The rest is handled by a bunch of contracts on Vaulta and EVM.

<figure><img src="/files/Wr7ZI6keMrCkpAJBWviG" alt=""><figcaption><p>Deposit ERC20 token to user address.</p></figcaption></figure>

<figure><img src="/files/DHypyiwkQ2WRAj6dusnP" alt=""><figcaption><p>Withdraw ERC20 token.</p></figcaption></figure>

### User Managed by dApp

<figure><img src="/files/YBNl619g37DVRtFFXRIF" alt=""><figcaption><p>Deposit ERC20 token to dApp.</p></figcaption></figure>


# Custodian Bridge for BTC

## Background

### Vaulta and EVM

We use the **Vaulta** (<https://www.vaulta.com/>) blockchain network. The Vaulta blockchain is a next-generation Layer-1 built for speed, scale and finality. Your transfers, swaps, and app interactions happen almost instantly with low (or no) fees.

**Vaulta EVM** is a powerful feature of the Vaulta blockchain that brings the best of Ethereum's capabilities to the Vaulta ecosystem. It allows you to use popular Ethereum-based applications (dApps) on Vaulta, benefiting from faster speeds, lower costs, and a more eco-friendly environment.

### Exsat EVM

Vaulta EVM technology allow entities to run their own EVM layers on the Vaulta blockchain. Exsat runs it’s own EVM layer, the **Exsat EVM.**

#### Exsat EVM Mainnet

RPC: <https://evm.exsat.network/>

Block explorer: <https://scan.exsat.network/>

#### Exsat EVM Testnet

RPC: <https://evm-tst3.exsat.network/>

Block explorer: <https://scan-testnet.exsat.network/>

### Reserved Address

Each Vaulta account has a mapped reserved EVM address. The rule is using the uint64 value of the Vaulta name as the last 8 bytes of the EVM address, and then pad the rest with 0xbb. E.g. the name “eosio.evm” is mapped to “0xbbbbbbbbbbbbbbbbbbbbbbbb5530ea015b900000”

### Cross Chain Messages

Contracts on Vaulta and EVM can communicate with each other through the cross chain message mechanism. This enable us to programmatically coordinate operations in both domain. The actions will usually be organized in a single Vaulta transaction so that they are atomic.

Please check [Brief Intro to the Cross-Chain Communication](/developer-guides/brief-intro-to-the-cross-chain-communication) for more details.

### Trustless Bridge

The Vaulta EVM solution contains designs for bridges to move tokens between the Vaulta native and EVM domain. The support for the native token of the EVM and other tokens will be different.

Please check the following docs for more details.

[Trustless Bridge for Native Tokens](/developer-guides/trustless-bridge-for-native-tokens)

[Trustless Bridge For ERC20 Tokens](/developer-guides/trustless-bridge-for-erc20-tokens)

## The Bridge

Basically, we have a off chain service to connect the custodian service and the contracts on Vaulta. The rest is handled by a bunch of contracts on Vaulta and EVM.

<figure><img src="/files/gCtolKryGqXrcHodiS1o" alt=""><figcaption><p>Deposit BTC to user address.</p></figcaption></figure>

<figure><img src="/files/ovAwQ0dpLdOHMIooXNmx" alt=""><figcaption><p>Withdraw BTC.</p></figcaption></figure>

### User Managed by dApp

<figure><img src="/files/AVFBbAl2Y40zvSJUPg1i" alt=""><figcaption><p>Deposit BTC to dAp</p></figcaption></figure>


# Wallet Setup

### **1. Visit**[ **exsat.network** ](https://exsat.network)**and click 'Connect Wallet' in the top navigation.**

<figure><img src="/files/EZB8nV0Dczlsw1L5C7np" alt=""><figcaption></figcaption></figure>

After clicking the "Connect Wallet" button, if you have multiple wallets installed, choose the one you want to connect to.

<figure><img src="/files/GAmCi0QGyFJ090295354" alt="" width="259"><figcaption></figcaption></figure>

### 2. Approve to add exSat Mainnet in your wallet (e.g., MetaMask).

After you click 'Connect Wallet,' MetaMask will prompt you to add the exSat Mainnet, please approve it.

<figure><img src="/files/SDQUAlKs4JTPBHmzIEsK" alt="" width="270"><figcaption></figcaption></figure>

If MetaMask does not prompt you to add the exSat Mainnet, you can manually add the exSat Mainnet to your wallet:

<figure><img src="/files/EfGQYGFqNIOcECHVDg9n" alt="" width="266"><figcaption></figcaption></figure>

<figure><img src="/files/Fucib5AbpexvdoJSYEOe" alt="" width="208"><figcaption></figcaption></figure>

<figure><img src="/files/0OF9XFfZUIgMxWMsFwew" alt="" width="362"><figcaption></figcaption></figure>

* **Network Name:** exSat Mainnet
* **RPC URL:** <https://evm.exsat.network>
* **Chain ID:** 7200
* **Currency Symbol:** BTC
* **Block Explorer URL:** <https://scan.exsat.network>

### 3. Switch to exSat Mainnet

After added exSat Mainnet to Metamask network list, Metamask will ask to switch network to exSat mainnet. After click "Switch network",  you'll be able to use your EVM accounts in Metamask to sign transactions on exSat network.

<figure><img src="/files/ls7nVJJX9Km6Nwtt0Twl" alt="" width="270"><figcaption></figcaption></figure>

**More Information:** When you visit exSat.network after the exSat Mainnet has been added, if your wallet's current network is not exSat Mainnet, a popup will appear with the message 'Please switch to the correct chain to continue!' Please click "OK" to proceed.

<figure><img src="/files/IRm6iXo2OuZjdzE78D3o" alt="" width="515"><figcaption></figcaption></figure>


---

[Next Page](/llms-full.txt/1)